3_[spring]api에 대한 문서화와 더불어 api tester 기능까지도 도와주는 똑똑한 swagger 사용하기
[Spring-Swagger]Swagger
01. What is Swagger ?
개발한 REST API를 편리하게 문서화해줌으로써 관리 및 제 3의 사용자가 편리하게 API를 호출해보고 테스트할 수 있는 프로젝트Spring Boot에서는 간단하게springfox-boot-starter를 gradle dependencies에 추가하여 사용[이전에는Swagger UI가 필요했지만 지금은 필요치 않음]- 외부에 노출되면 안되는 곳(예: 운영환경)에서 사용 시 주의해야 할 것
- 다른 언어 기반 프레임워크에서도 존재하지만,
자바기반인 스프링에서는어노테이션 기반으로 컨트롤러에 대한 공개 및 숨기기가 가능하고, 어노테이션 기반으로 인해서조금 더 디테일한 설명이 가능하다
02. Swagger 설정하기
swagger를 사용하기 위해서 maven repository에서 springfox 로 검색해서
Springfox Boot Starter 를 선택하자
기존에는 Swagger2와 Swagger UI를 사용했지만 최근에는 Springfox Boot Starter가 나와서 이것 하나만으로도 커버가 가능해졌다(버전이 3.0.0 하나만 나온 뜨끈뜨끈한 신상이다!)
plugins {
    id 'org.springframework.boot' version '2.5.3'
    id 'io.spring.dependency-management' version '1.0.11.RELEASE'
    id 'java'
}

group = 'com.example'
version = '0.0.1-SNAPSHOT'
sourceCompatibility = '1.8'

configurations {
    compileOnly {
        extendsFrom annotationProcessor
    }
}

repositories {
    mavenCentral()
}

dependencies {
    // https://mvnrepository.com/artifact/io.springfox/springfox-boot-starter
    ****📌**implementation group: 'io.springfox', name: 'springfox-boot-starter', version: '3.0.0'**📌
    implementation 'org.springframework.boot:spring-boot-starter-web'
    compileOnly 'org.projectlombok:lombok'
    annotationProcessor 'org.projectlombok:lombok'
    testImplementation 'org.springframework.boot:spring-boot-starter-test'
}

test {
    useJUnitPlatform()
}
▶️ 이전에는 @EnableSwagger2 를 했었지만, 이 버전부터는 이 어노테이션을 적어주지 않아도 기본적으로 컨트롤러 등에 대해서 공개된다!
package com.example.swagger01.controller;

import org.springframework.web.bind.annotation.GetMapping;
import org.springframework.web.bind.annotation.RequestMapping;
import org.springframework.web.bind.annotation.RestController;

@RestController
@RequestMapping("/api")
public class ApiController {
    @GetMapping("/hello")
    public String hello(){
        return "hello!";
    }

}
먼저 간단하게 plain text를 출력하는 요청 메서드를 하나 만들어두고,
http://localhost:8089/swagger-ui/
로 접속해보자
이 때, 화면에는 보여지는 2개의 컨트롤러가 있는데
- api-controller는 우리가 만들었던 ApiController이고
- basic-error-controller(Basic Error Controller)는 기본적으로 스프링에서 제공되는 컨트롤러
이다
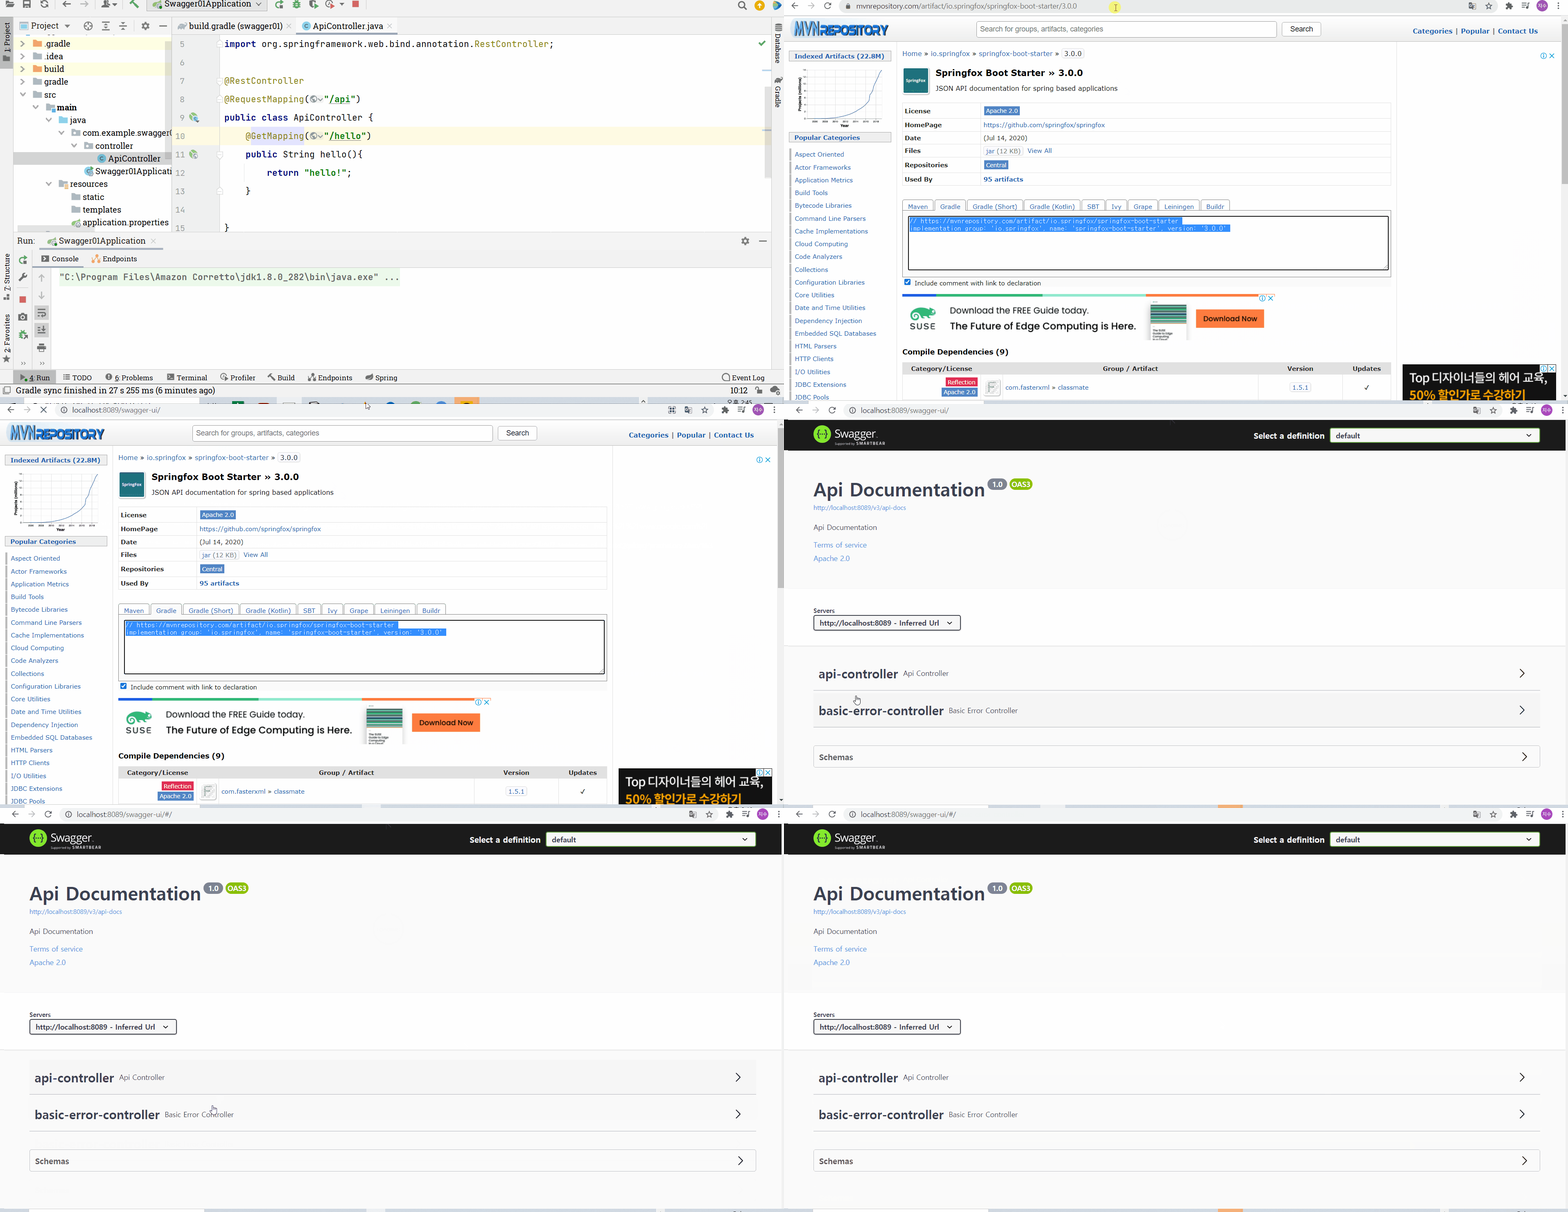
그리고 우리가 만든 컨트롤러를 눌러보면 만든 요청 메서드를 확인해볼 수 있다!
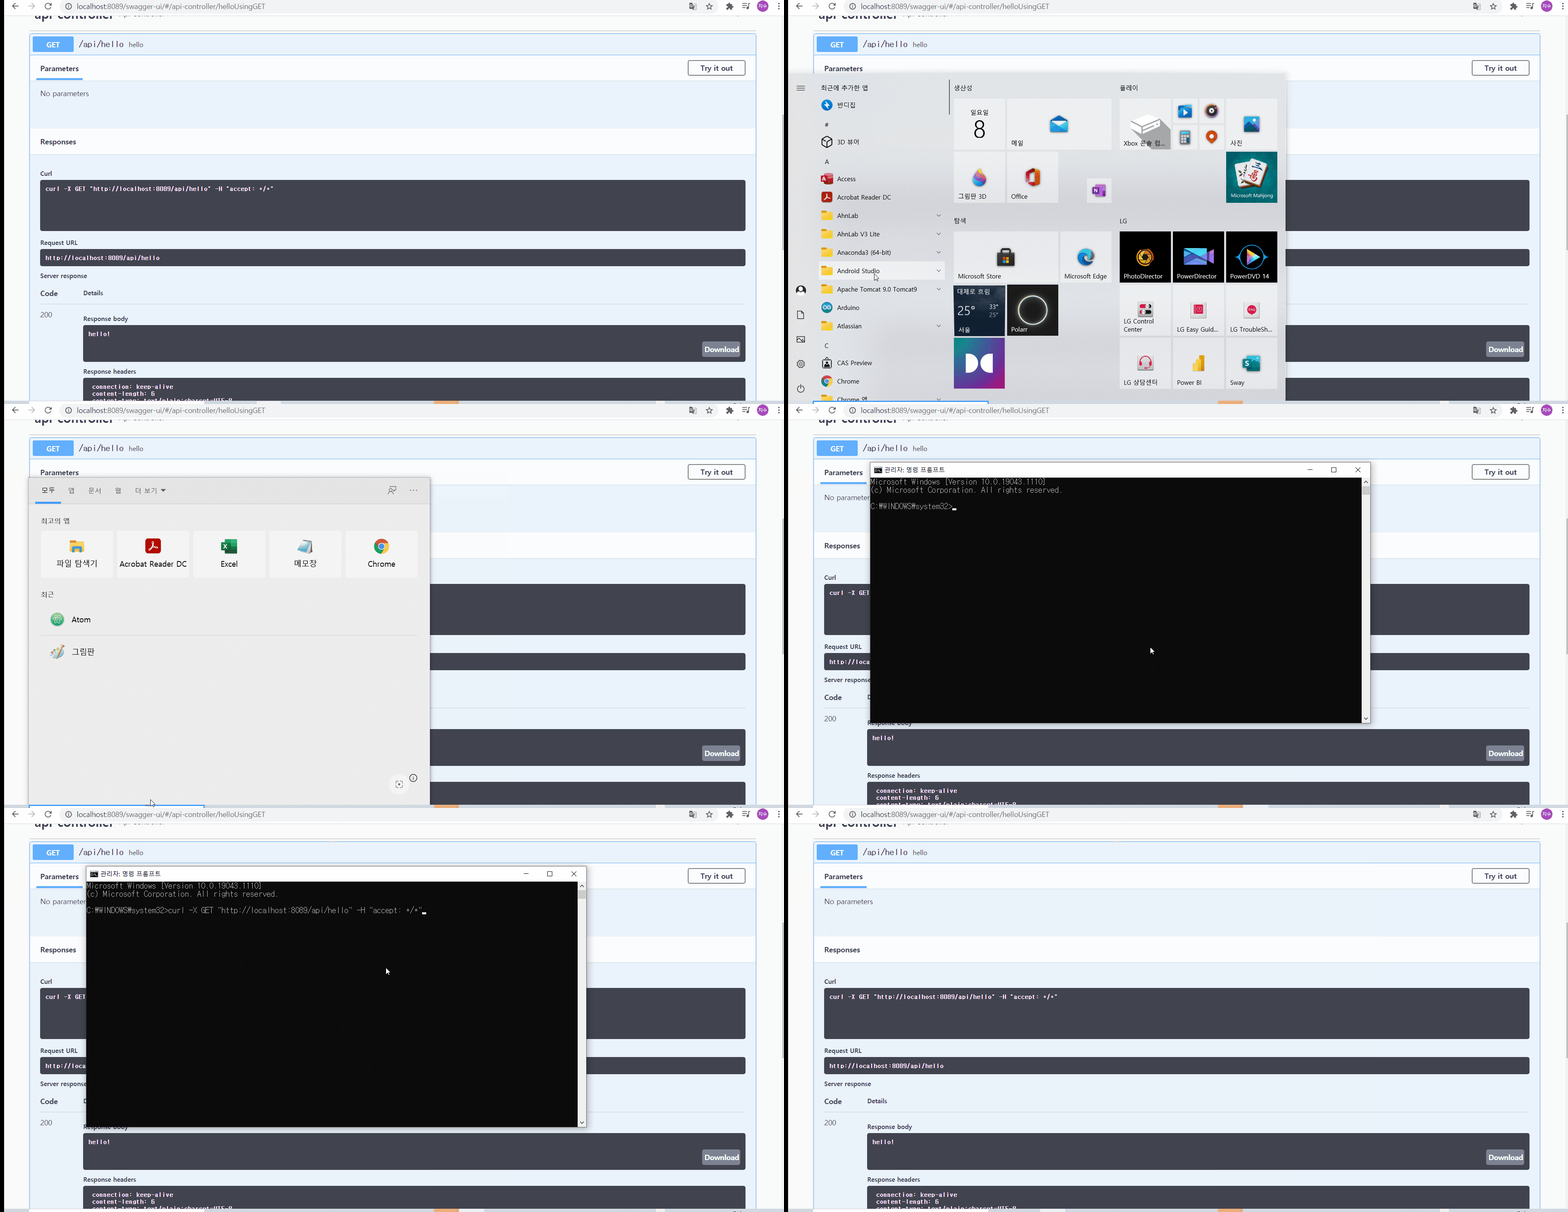
더불어, 이 요청 메서드를 눌러서 try it out을 누른 후, execute를 누르면, 요청 URL뿐 아니라 Response까지도 확인해볼 수 있다! 그리고 curl 명령어를 이용해서 cmd에서 그 응답 body를 확인해볼 수 있다
02-1. 어떻게 하면 제 3자까지도 보기 편하게 만들 수 있을까?
이렇게 해도 좋지만, 보다 사용자에게 친숙하게 만들어보자
02-1-1. @Api 어노테이션? 이 클래스는 나 Swagger의 것이다!
@Api 어노테이션을 ApiController 클래스에 붙이고, tags 라는 오퍼레이션에 대해서 태그를 붙여주도록 하자(tags는 배열값이 올 수 있는데, 이 값은 오퍼레이션을 설명할 수 있는 적절한 값이어야 한다!) 이렇게 하게 되면, 이 클래스는 swagger의 리소스인데, tags의 값으로써 보여주겠습니다 라는 의사를 밝히게 된 것이나 다름없다
package com.example.swagger01.controller;

import io.swagger.annotations.Api;
import org.springframework.web.bind.annotation.GetMapping;
import org.springframework.web.bind.annotation.RequestMapping;
import org.springframework.web.bind.annotation.RestController;

**@Api(tags={"API 정보를 제공하는 컨트롤러입니다"})**
@RestController
@RequestMapping("/api")
public class ApiController {
    @GetMapping("/hello")
    public String hello(){
        return "hello!";
    }

}

그런데 문득, 배열로 값을 넣어주게 된다면, 어떻게 될지 궁금해져서 시험삼아서 진행해보았다
package com.example.swagger01.controller;

import io.swagger.annotations.Api;
import org.springframework.web.bind.annotation.GetMapping;
import org.springframework.web.bind.annotation.RequestMapping;
import org.springframework.web.bind.annotation.RestController;

**@Api(tags={"API 정보를 제공하는 컨트롤러입니다","컨트롤러 정보"})**
@RestController
@RequestMapping("/api")
public class ApiController {
    @GetMapping("/hello")
    public String hello(){
        return "hello!";
    }

}
그 결과, 동일 컨트롤러에 대해서 각각의 값으로 표시되는 것을 확인해볼 수 있었다
이번에는 간단하게 덧셈을 할 것인데, path variable로 x를 받고, query parameter로 y를 받자
package com.example.swagger01.controller;

import io.swagger.annotations.Api;
import org.springframework.web.bind.annotation.*;

@Api(tags={"API 정보를 제공하는 컨트롤러입니다"})
@RestController
@RequestMapping("/api")
public class ApiController {
    @GetMapping("/hello")
    public String hello(){
        return "hello!";
    }

    @GetMapping("/plus/{x}")
    **public int plus**(@PathVariable int x,
                    @RequestParam int y){
        return x+y;
    }

}
그리고 실행을 하고 swagger에서 테스트를 해보면, 200 OK가 뜨고, 값이 3과 5로 각각 x 와 y에 대해서 넣어주었다면 ,8이 body에 출력되는 것을 확인해볼 수 있다
이번에는 이 필요한 파라미터들에 대해서 설명을 붙여주자
02-1-2. @ApiParam(value=,defaultValue=) ? 메서드에서 사용되는 파라미터들(쿼리 파라미터, Path Variable 등)에 대해서 설명을 제안해주자!
먼저, x의 경우, “x값”이라는 설명과 동시에 기본값으로 20을 넣어주고
y는 “y값”이라는 설명과 함께 기본값으로 30을 넣어주자
그런데, 사실 어차피 파라미터에 required가 붙어서 기본값은 무용지물이다
🌟 주의할 사항은 defaultValue의 값은 아무리 이 파라미터가 int 형이어도, 무조건 String으로 넣어주어야 한다!
package com.example.swagger01.controller;

import io.swagger.annotations.Api;
import io.swagger.annotations.ApiParam;
import org.springframework.web.bind.annotation.*;

@Api(tags={"API 정보를 제공하는 컨트롤러입니다"})
@RestController
@RequestMapping("/api")
public class ApiController {
    @GetMapping("/hello")
    public String hello(){
        return "hello!";
    }

    @GetMapping("/plus/{x}")
    public int plus(**@ApiParam(value="x값", defaultValue ="20")**
                    @PathVariable int x,
                    **@ApiParam(value="y값",defaultValue = "30"**)
                    @RequestParam int y){
        return x+y;
    }

}
이제 실행해보면 이전과 다르게 파라미터에 대한 설명이 붙어 있는 것을 확인해볼 수 있다

🌟 그리고 hidden 속성을 주어서 숨길 것인지도 설정해줄 수 있다
02-1-3. @ApiModelProperty ? 요청메서드의 파라미터가 객체로 전달될 때, 그 객체 내부의 필드에 대한 설명을 해주자!
그러면 요청을 객체로 받아오는 경우는 어떨까?
아래처럼 이름과 나이를 필드로 갖는 dto 객체가 있다고 가정해보자
package com.example.swagger01.dto;

import lombok.AllArgsConstructor;
import lombok.Data;
import lombok.NoArgsConstructor;

@Data
@NoArgsConstructor
@AllArgsConstructor
public class UserRequest {
    private String name;
    private int age;
}
그리고 응답도 json으로 받아주기 위해서 동일하게 가주자
package com.example.swagger01.dto;

import lombok.AllArgsConstructor;
import lombok.Data;
import lombok.NoArgsConstructor;

@Data
@NoArgsConstructor
@AllArgsConstructor
public class UserResponse {
    private String name;
    private int age;
}
그리고 아무런 swagger 설정없이 컨트롤러에서 에코시켜주자
package com.example.swagger01.controller;

import com.example.swagger01.dto.UserRequest;
import com.example.swagger01.dto.UserResponse;
import io.swagger.annotations.Api;
import io.swagger.annotations.ApiParam;
import org.springframework.web.bind.annotation.*;

@Api(tags={"API 정보를 제공하는 컨트롤러입니다"})
@RestController
@RequestMapping("/api")
public class ApiController {
    @GetMapping("/hello")
    public String hello(){
        return "hello!";
    }

    @GetMapping("/plus/{x}")
    public int plus(@ApiParam(value="x값", defaultValue ="20")
                    @PathVariable int x,
                    @ApiParam(value="y값",defaultValue = "30")
                    @RequestParam int y){
        return x+y;
    }

    @GetMapping("/user")
    public UserResponse user(UserRequest userRequest){
        return new UserResponse(userRequest.getName(), userRequest.getAge());
    }

}
이 경우, @ApiModelProperty 를 request, response를 위한 dto 객체 내부 필드에 붙여주고
- value를 통해서 필드에 대한 간단한 설명을
- example을 통해서 필드에 넣을 값에 대한 예시를
- required를 통해서 필수 속성인지를 지정
하는 것 등을 제공할 수 있게 된다
package com.example.swagger01.dto;

import io.swagger.annotations.ApiModelProperty;
import lombok.AllArgsConstructor;
import lombok.Data;
import lombok.NoArgsConstructor;

@Data
@NoArgsConstructor
@AllArgsConstructor
public class UserRequest {
    **@ApiModelProperty(value="사용자의 이름", example="steve",required = true)**
    private String name;
    **@ApiModelProperty(value="사용자의 나이",example = "20",required=true)**
    private int age;
}
package com.example.swagger01.dto;

import io.swagger.annotations.ApiModelProperty;
import lombok.AllArgsConstructor;
import lombok.Data;
import lombok.NoArgsConstructor;

@Data
@NoArgsConstructor
@AllArgsConstructor
public class UserResponse {
    **@ApiModelProperty(value="사용자의 이름", example="steve",required = true)**
    private String name;
    **@ApiModelProperty(value="사용자의 나이",example = "20",required=true)**
    private int age;
}
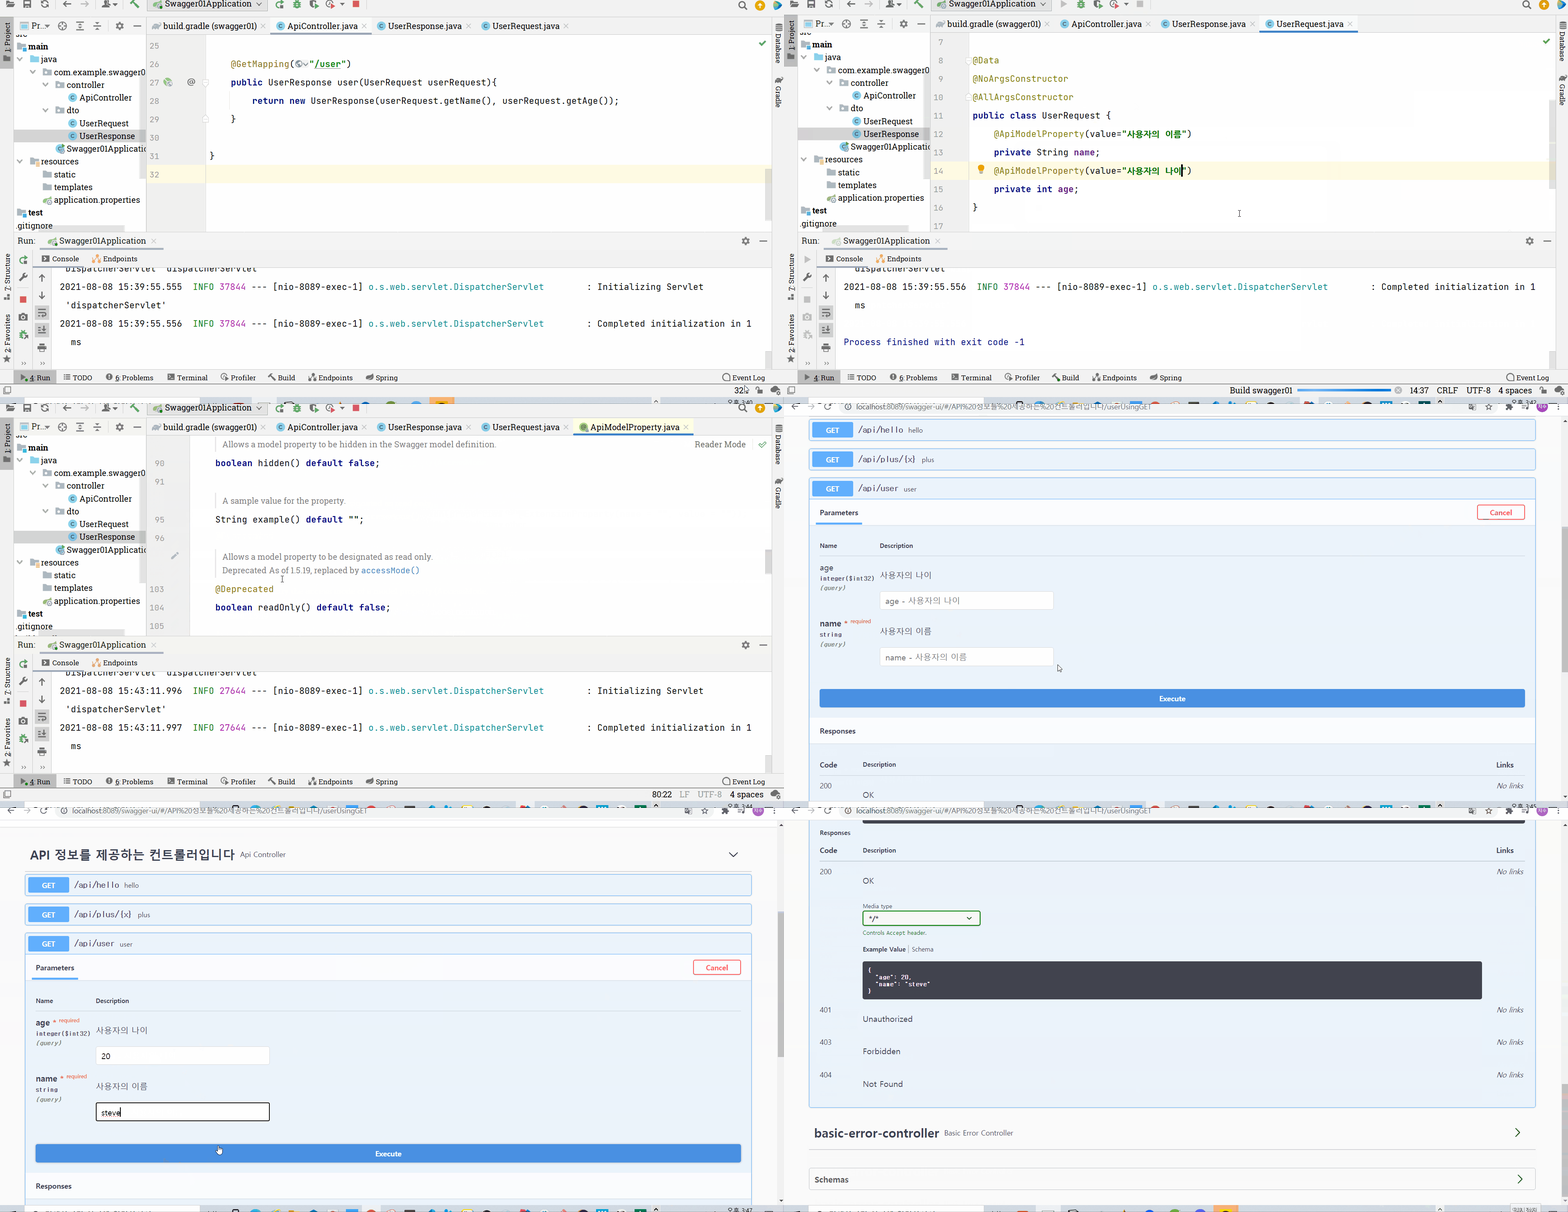
그리고, 아래에서는 단계별로 접근해봤을 때를 나타낸 것인데, 중요한 것은 중~후반부 부분인데, ApiModelProperty 어노테이션을 붙였을 때, 이 때 value값과 exmple, required 속성을 활용함으로써 보다 설명이 풍부해졌다는 점이다!
그런데 응답에 대해서는 굳이 설명을 달지 않아도 스웨거에서 json 데이터를 보여주기 때문에 설명이 달리지 않는 것을 확인해볼 수 있다
이렇게 되면, 개발자 입장에서도 이 값이 어떤 값인지, 어떤 값을 넣으면 될 지 보다 직관적으로 이해가 될 수 있을 것이다!
02-1-4. @ApiOperation ? Api 어노테이션이 클래스라면 , 나는 요청 메서드가 어떤 메서드인지 알려주겠어
위의 내용에서 이번에는 ApiOperation을 덧붙여주자
해당 어노테이션에서 접근가능한 속성은 다양하나 그중에서 몇가지만 살펴본다면
- HttpMethod : GET, POST, DELETE, PUT 등을 서블릿에 명시
- hidden: 메서드를 보일지(false) 안보이게 할 지(true) 정의
- value: 해당 메서드에 대한 설명을 덧붙이기
HttpMethod속성은 우리 입장에서는 스웨거 상으로는 별 차이가 없는 것처럼 보인다
package com.example.swagger01.controller;

import com.example.swagger01.dto.UserRequest;
import com.example.swagger01.dto.UserResponse;
import io.swagger.annotations.Api;
import io.swagger.annotations.ApiOperation;
import io.swagger.annotations.ApiParam;
import org.springframework.web.bind.annotation.*;

@Api(tags={"API 정보를 제공하는 컨트롤러입니다"})
@RestController
@RequestMapping("/api")
public class ApiController {
    @ApiOperation(value="hello를 외치는 메서드",hidden=true)
    @GetMapping("/hello")
    public String hello(){
        return "hello!";
    }

    @ApiOperation(value="두 수를 더하는 메서드",httpMethod = "GET")
    @GetMapping("/plus/{x}")
    public int plus(@ApiParam(value="x값", defaultValue ="20")
                    @PathVariable int x,
                    @ApiParam(value="y값",defaultValue = "30")
                    @RequestParam int y){
        return x+y;
    }

    @ApiOperation(value="사용자의 나이와 이름을 echo해주는 메서드")
    @GetMapping("/user")
    public UserResponse user(UserRequest userRequest){
        return new UserResponse(userRequest.getName(), userRequest.getAge());
    }

}
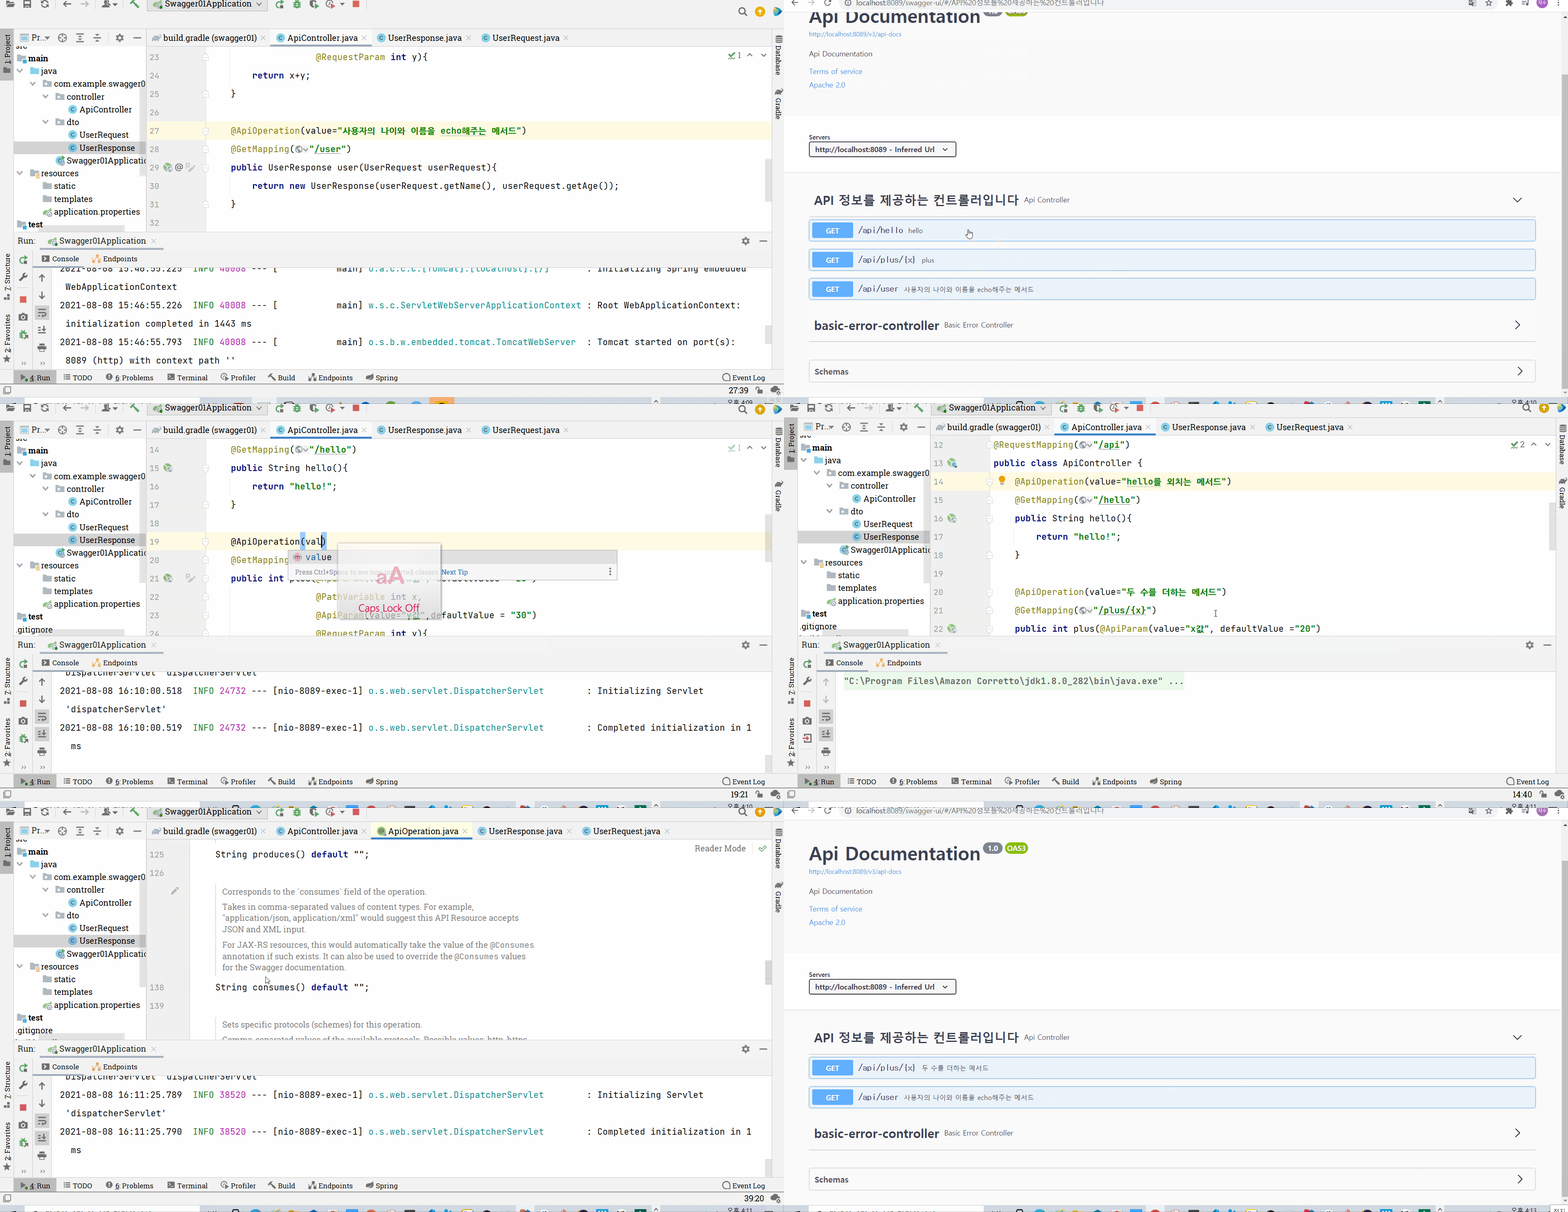
아래는 HttpMethod 속성이 없을 때 스웨거 ui 에서 확인할 수 있는 화면을 보여준다
아래와 같이, value 속성을 통해서 이전에는 없었던, 메서드에 대한 설명이 덧붙여짐을 확인해볼 수 있고, hidden 속성으로 인해서 특정 메서드가 보이지 않게 될 수도 있음을 확인해볼 수 있다
02-1-5. @ApiResponse ? @ApiResponses ? 응답에 대해서 응답 상태코드/메시지 등을 명시해주기 위해서 사용
먼저 @ApiResponse 를 살펴보자
아래처럼 code값과 message값을 지정해준다면, HttpStatusCode에 따라 보여질 메시지에 대한 설명이 보여질 수 있다!
package com.example.swagger01.controller;

import com.example.swagger01.dto.UserRequest;
import com.example.swagger01.dto.UserResponse;
import io.swagger.annotations.Api;
import io.swagger.annotations.ApiOperation;
import io.swagger.annotations.ApiParam;
import io.swagger.annotations.ApiResponse;
import org.springframework.web.bind.annotation.*;

@Api(tags={"API 정보를 제공하는 컨트롤러입니다"})
@RestController
@RequestMapping("/api")
public class ApiController {
    @ApiOperation(value="hello를 외치는 메서드")
    @GetMapping("/hello")
    public String hello(){
        return "hello!";
    }

    @ApiOperation(value="두 수를 더하는 메서드",httpMethod = "GET")
    @GetMapping("/plus/{x}")
    public int plus(@ApiParam(value="x값", defaultValue ="20")
                    @PathVariable int x,
                    @ApiParam(value="y값",defaultValue = "30")
                    @RequestParam int y){
        return x+y;
    }

    **@ApiResponse(code=400,message="사용자의 나이가 10살 이하일 때")**
    @ApiOperation(value="사용자의 나이와 이름을 echo해주는 메서드")
    @GetMapping("/user")
    public UserResponse user(UserRequest userRequest){
        return new UserResponse(userRequest.getName(), userRequest.getAge());
    }

}
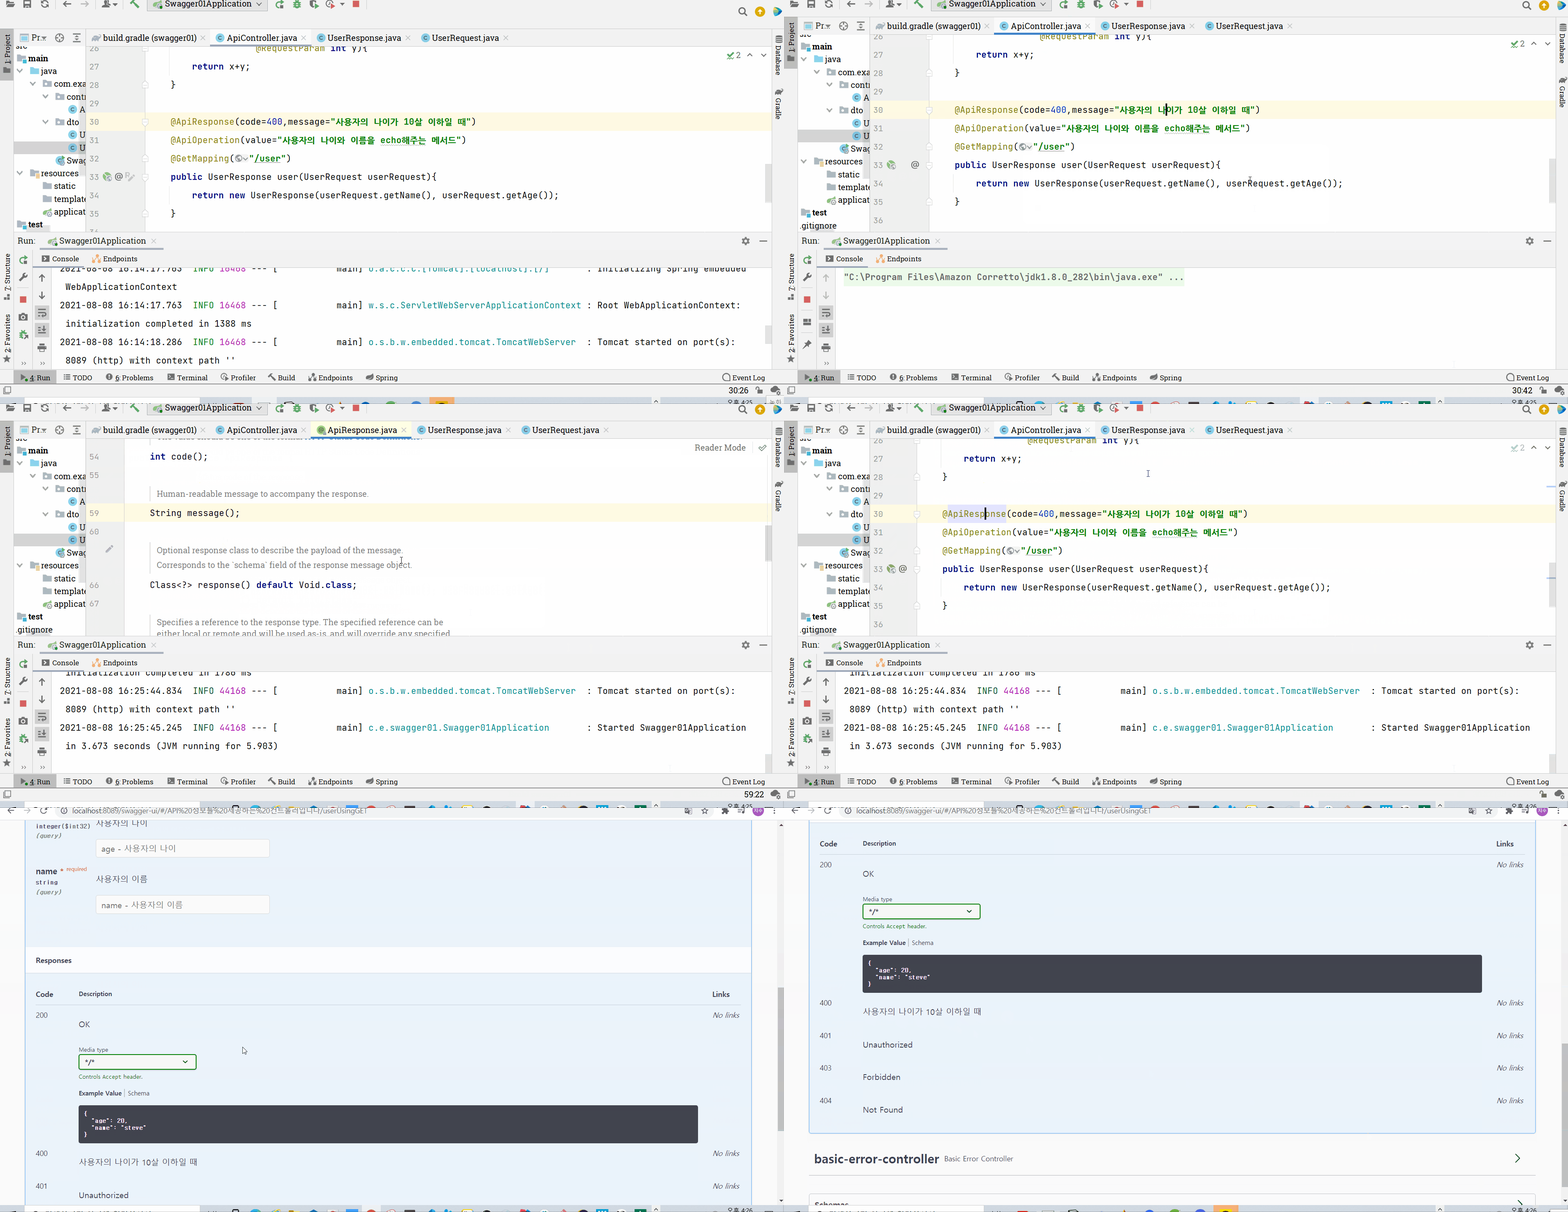
그런데 문득, 400에러뿐 아니라, 200 등 정상코드 등에 대해서도 설명해줄 수 있으면 좋을 것 같다는 생각에 검색해보았다! 그결과 아래와 같이 @ApiResponses로 외부에서 한번 감싸주는 형태로 사용하면 여러 값을 묶어서 넣어줄 수 있음을 확인해볼 수 있었다
https://groups.google.com/g/swagger-swaggersocket/c/KAmdyf4aRGs?pli=1
package com.example.swagger01.controller;

import com.example.swagger01.dto.UserRequest;
import com.example.swagger01.dto.UserResponse;
import io.swagger.annotations.*;
import org.springframework.web.bind.annotation.*;

@Api(tags={"API 정보를 제공하는 컨트롤러입니다"})
@RestController
@RequestMapping("/api")
public class ApiController {
    @ApiOperation(value="hello를 외치는 메서드")
    @GetMapping("/hello")
    public String hello(){
        return "hello!";
    }

    **@ApiResponses({
            @ApiResponse(code=200,message = "모든 값이 올바릅니다"),
            @ApiResponse(code=400,message = "입력하신 두 수의 형태 및 값을 확인해주세요"),
            @ApiResponse(code=500,message="관리자에게 문제에 대한 해결을 요청해주세요")
    })**
    @ApiOperation(value="두 수를 더하는 메서드",httpMethod = "GET")
    @GetMapping("/plus/{x}")
    public int plus(@ApiParam(value="x값", defaultValue ="20")
                    @PathVariable int x,
                    @ApiParam(value="y값",defaultValue = "30")
                    @RequestParam int y){
        return x+y;
    }

    @ApiResponse(code=400,message="사용자의 나이가 10살 이하일 때")
    @ApiOperation(value="사용자의 나이와 이름을 echo해주는 메서드")
    @GetMapping("/user")
    public UserResponse user(UserRequest userRequest){
        return new UserResponse(userRequest.getName(), userRequest.getAge());
    }

    public UserResponse myUser(@Request)

}
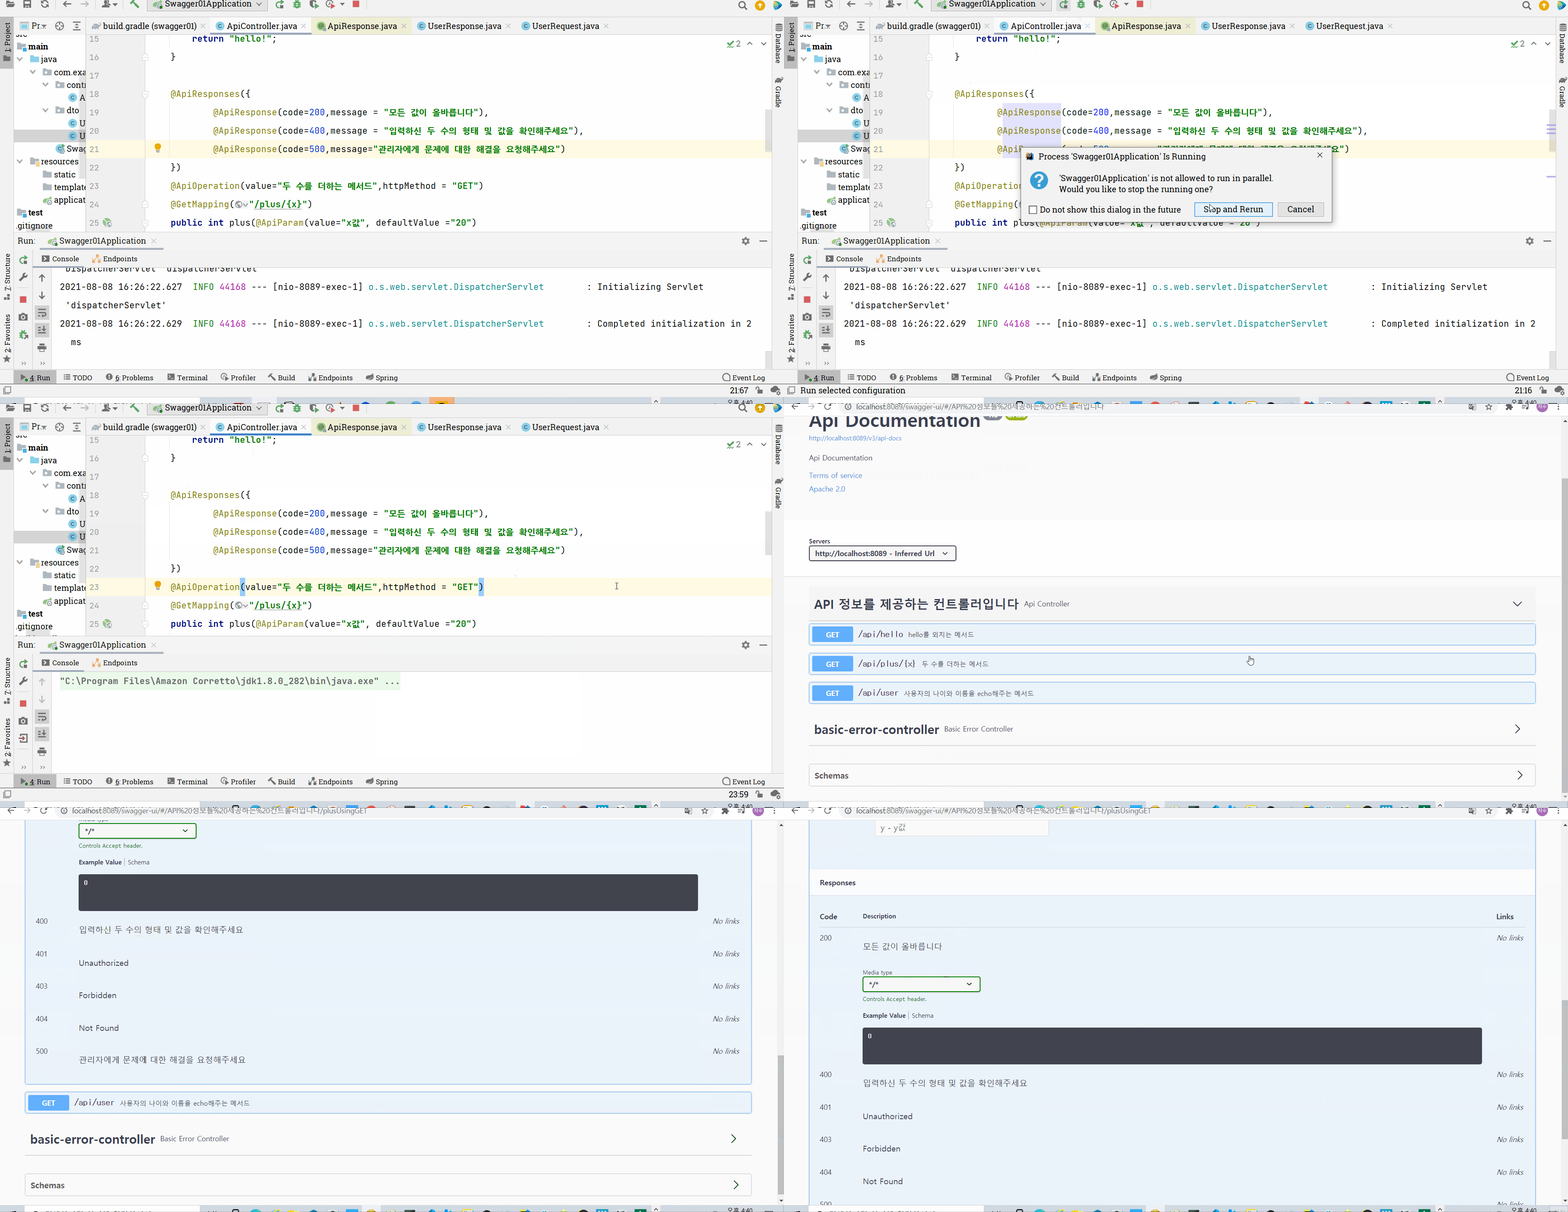
그런데 과연 이러한 설명은 GET 메서드에만 적용가능할까? 우리가 사용하는 대표적인 요청 메서드 중 POST 메서드를 확인해보자
우선, 객체 관리를 new 로 하지 않고 그 책임을 스프링에게 넘겨주기 위해서 dto 객체 모두에 Components 를 붙여주고, 컨트롤러에 상수처럼 final UserResponse 객체를 만들어주고 RequiredArgsConstructor로 생성자를 주입해주자
(컨트롤러 내부에서 약간의 변경이 있다)
그러면 아래처럼 200 등의 상태에 따라 안내를 하는 문구를 확인해볼 수 있다!
package com.example.swagger01.controller;

import com.example.swagger01.dto.UserRequest;
import com.example.swagger01.dto.UserResponse;
import io.swagger.annotations.*;
import lombok.RequiredArgsConstructor;
import org.springframework.context.ApplicationContext;
import org.springframework.web.bind.annotation.*;

@Api(tags={"API 정보를 제공하는 컨트롤러입니다"})
@RestController
@RequestMapping("/api")
@RequiredArgsConstructor
public class ApiController {

    private final UserResponse userResponse;

    @ApiOperation(value="hello를 외치는 메서드")
    @GetMapping("/hello")
    public String hello(){
        return "hello!";
    }

    @ApiResponses({
            @ApiResponse(code=200,message = "모든 값이 올바릅니다"),
            @ApiResponse(code=400,message = "입력하신 두 수의 형태 및 값을 확인해주세요"),
            @ApiResponse(code=500,message="관리자에게 문제에 대한 해결을 요청해주세요")
    })
    @ApiOperation(value="두 수를 더하는 메서드",httpMethod = "GET")
    @GetMapping("/plus/{x}")
    public int plus(@ApiParam(value="x값", defaultValue ="20")
                    @PathVariable int x,
                    @ApiParam(value="y값",defaultValue = "30")
                    @RequestParam int y){
        return x+y;
    }

    @ApiResponse(code=400,message="사용자의 나이가 10살 이하일 때")
    @ApiOperation(value="사용자의 나이와 이름을 echo해주는 메서드")
    @GetMapping("/user")
    public UserResponse user(UserRequest userRequest){
        userResponse.setAge(userRequest.getAge());
        userResponse.setName(userRequest.getName());
        return userResponse;
    }

    **@ApiResponses({
            @ApiResponse(code=200,message="요청에 대해서 정상 응답되었습니다"),
            @ApiResponse(code=400,message="요청에 문제가 보고되었습니다. 요청을 확인해주세요"),
            @ApiResponse(code=404,message="요청하신 페이지가 존재하지 않습니다")
    })
    @PostMapping("/postUser")
    public UserResponse myUser(@RequestBody UserRequest userRequest){
        userResponse.setAge(userRequest.getAge());
        userResponse.setName(userRequest.getName());
        return userResponse;
    }**

}
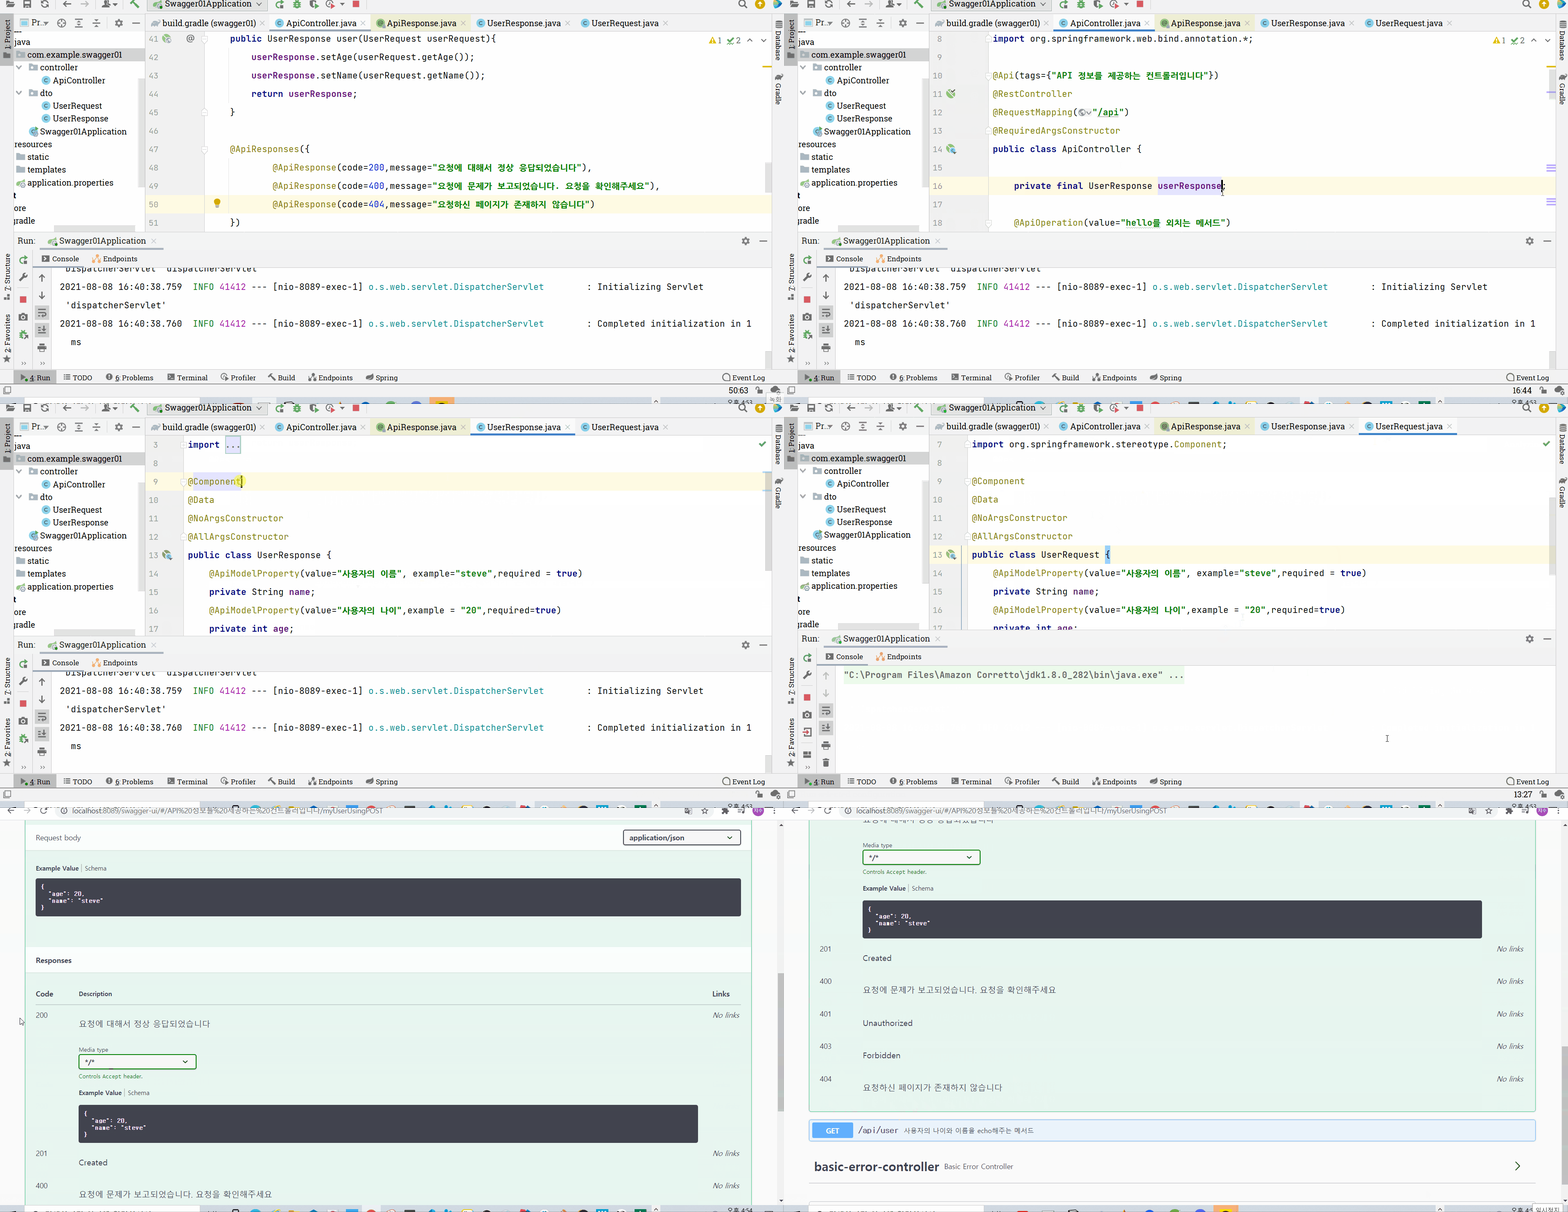
02-1-6. @ApiImplicitParams @ApiImplicitParam? 언제까지 @ApiParams로 여러 파라미터에 대해서 하나씩 설명을 달아줄 거야? 이제는 메서드 단위로 설명을 지정해주는 건 어떨까?
위에서 plus에 대해서 @ApiParams 로 설명에 대해서 달아주었다
그런데 파라미터가 더 많아지면? 그 모든 파라미터마다 해당 어노테이션을 달아줄 것인가?
▶️ 그래서 나온 것이 바로 @ApiImplicitParams 와 @ApiImplicitParam!!
이것도 ApiResponsees와 ApiResponse의 관계처럼 감싸주는 형태이다!
🌟 이때 중요한 것은 쿼리 파라미터나 PathVariable 등에 대해서 어떤 곳에 적용될 것인지를 알려주기 위해서 name 속성을 기재해주는 것이 NullPointerException을 미연에 방지해줄 수 있다!
package com.example.swagger01.controller;

import com.example.swagger01.dto.UserRequest;
import com.example.swagger01.dto.UserResponse;
import io.swagger.annotations.*;
import lombok.RequiredArgsConstructor;
import org.springframework.context.ApplicationContext;
import org.springframework.web.bind.annotation.*;

@Api(tags={"API 정보를 제공하는 컨트롤러입니다"})
@RestController
@RequestMapping("/api")
@RequiredArgsConstructor
public class ApiController {

    private final UserResponse userResponse;

    @ApiOperation(value="hello를 외치는 메서드")
    @GetMapping("/hello")
    public String hello(){
        return "hello!";
    }

    @ApiResponses({
            @ApiResponse(code=200,message = "모든 값이 올바릅니다"),
            @ApiResponse(code=400,message = "입력하신 두 수의 형태 및 값을 확인해주세요"),
            @ApiResponse(code=500,message="관리자에게 문제에 대한 해결을 요청해주세요")
    })

    @ApiOperation(value="두 수를 더하는 메서드")
    **@ApiImplicitParams({
            @ApiImplicitParam(name="x",value="x값"),
            @ApiImplicitParam(name="y",value="y값")
    })**
    @GetMapping("/plus/{x}")
    public int plus(@PathVariable int x, @RequestParam int y){
        return x+y;
    }

    @ApiResponse(code=400,message="사용자의 나이가 10살 이하일 때")
    @ApiOperation(value="사용자의 나이와 이름을 echo해주는 메서드")
    @GetMapping("/user")
    public UserResponse user(UserRequest userRequest){
        userResponse.setAge(userRequest.getAge());
        userResponse.setName(userRequest.getName());
        return userResponse;
    }

    @ApiResponses({
            @ApiResponse(code=200,message="요청에 대해서 정상 응답되었습니다"),
            @ApiResponse(code=400,message="요청에 문제가 보고되었습니다. 요청을 확인해주세요"),
            @ApiResponse(code=404,message="요청하신 페이지가 존재하지 않습니다")
    })
    @PostMapping("/postUser")
    public UserResponse myUser(@RequestBody UserRequest userRequest){
        userResponse.setAge(userRequest.getAge());
        userResponse.setName(userRequest.getName());
        return userResponse;
    }

}
그러면 아래와 같이 @ApiParams 때와 동일하게 설명이 적용될 수 있음을 확인해볼 수 있다
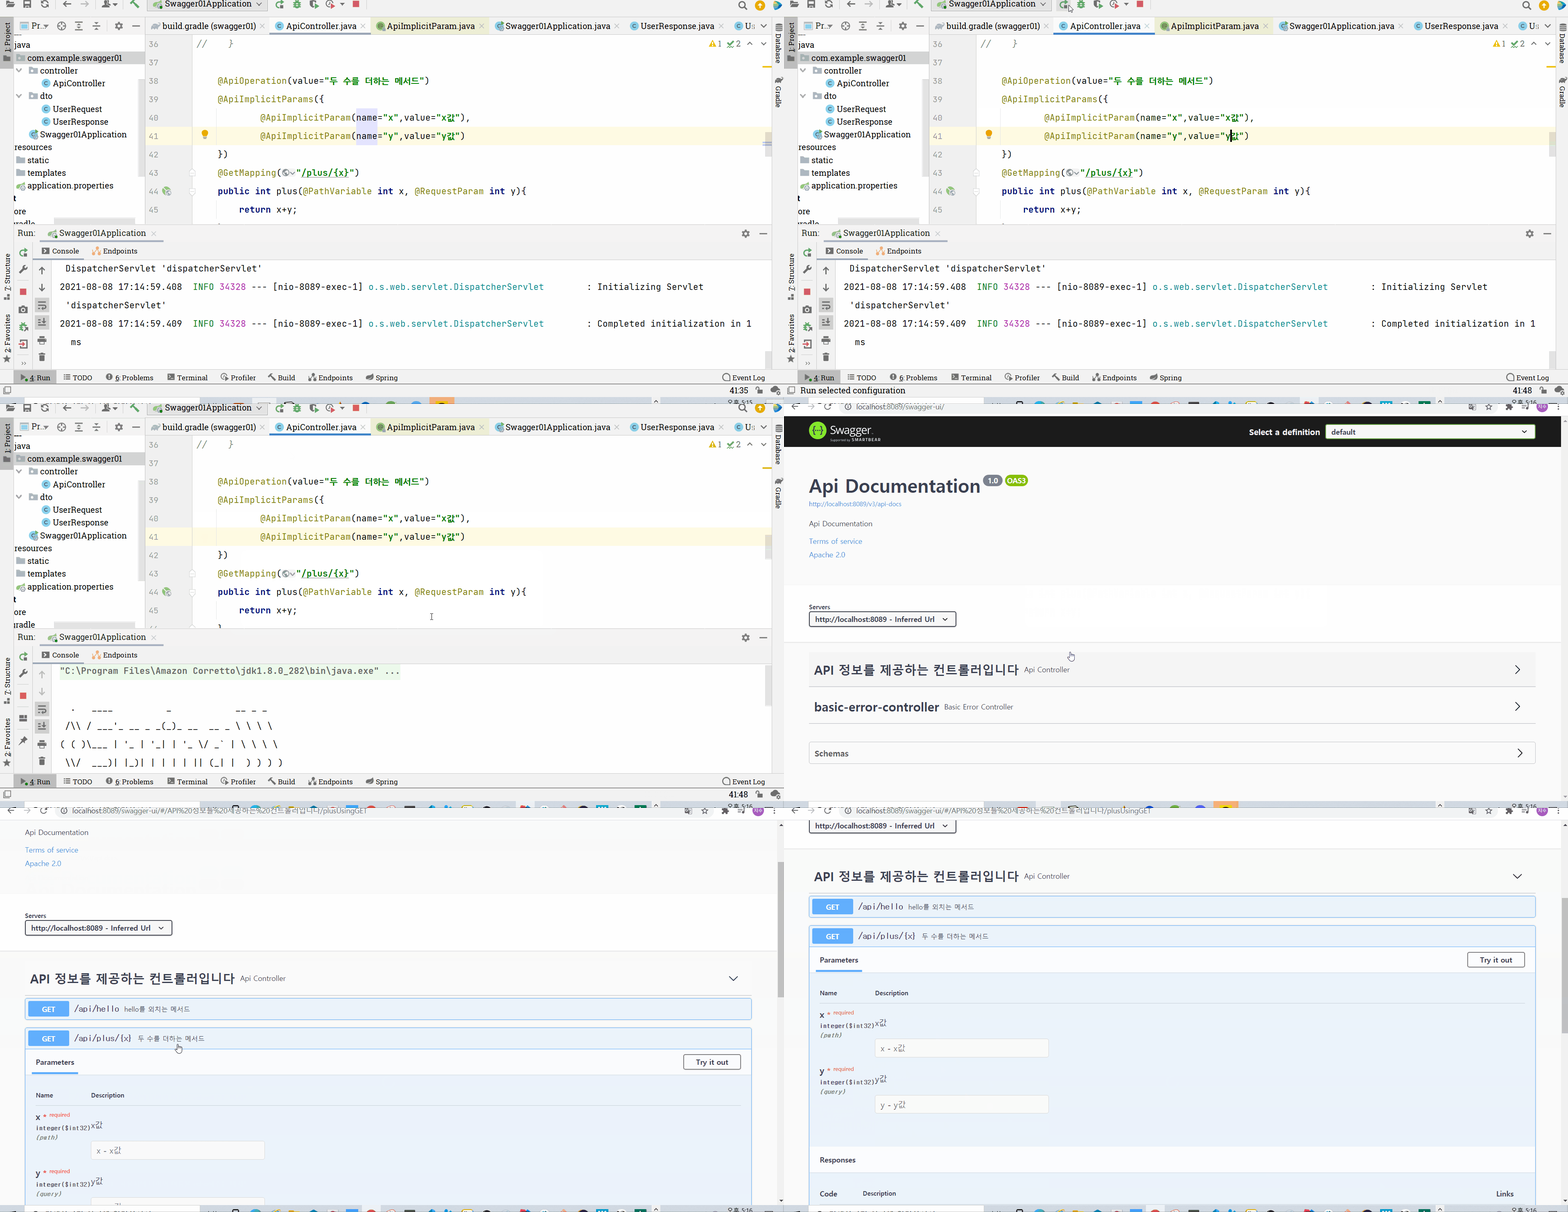
🌟 POST 나 PUT은 Body를 타고 데이터가 오가기 때문에, @ApiParams 나 @ApiImplicitParam(s) 는 사용하는데에 부적절하다
- 사용은 가능하지만 스웨거 등에서 응답이 예상과 다르게 될 것이다. 사용자 입장에서는 파라미터에 값을 넣었는데 예상한 값이 나오지 않는다고 받아들일 수 있다. 그 이유는 body의 값을 채워야 하기 때문이다
그리고 아래처럼 , 파라미터 타입이 path Variable인지, query parameter인지(paramType)
필수사항인지(required)도 표시해줄 수 있다
더불어서, 그 데이터 필드의 자료형도 표시해줄 수 있다(dataType)
package com.example.swagger01.controller;

import com.example.swagger01.dto.UserRequest;
import com.example.swagger01.dto.UserResponse;
import io.swagger.annotations.*;
import lombok.RequiredArgsConstructor;
import org.springframework.context.ApplicationContext;
import org.springframework.web.bind.annotation.*;

@Api(tags={"API 정보를 제공하는 컨트롤러입니다"})
@RestController
@RequestMapping("/api")
@RequiredArgsConstructor
public class ApiController {

    private final UserResponse userResponse;

    @ApiOperation(value="hello를 외치는 메서드")
    @GetMapping("/hello")
    public String hello(){
        return "hello!";
    }

    @ApiResponses({
            @ApiResponse(code=200,message = "모든 값이 올바릅니다"),
            @ApiResponse(code=400,message = "입력하신 두 수의 형태 및 값을 확인해주세요"),
            @ApiResponse(code=500,message="관리자에게 문제에 대한 해결을 요청해주세요")
    })
//    @ApiOperation(value="두 수를 더하는 메서드",httpMethod = "GET")
//    @GetMapping("/plus/{x}")
//    public int plus(@ApiParam(value="x값", defaultValue ="20")
//                    @PathVariable int x,
//                    @ApiParam(value="y값",defaultValue = "30")
//                    @RequestParam int y){
//        return x+y;
//    }

    @ApiOperation(value="두 수를 더하는 메서드")
    **@ApiImplicitParams({
            @ApiImplicitParam(name="x",value="x값",required = true,paramType = "path",dataType="int"),
            @ApiImplicitParam(name="y",value="y값",required = true,paramType = "param",dataType = "int")
    })**
    @GetMapping("/plus/{x}")
    public int plus(@PathVariable int x, @RequestParam int y){
        return x+y;
    }

    @ApiResponse(code=400,message="사용자의 나이가 10살 이하일 때")
    @ApiOperation(value="사용자의 나이와 이름을 echo해주는 메서드")
    @GetMapping("/user")
    public UserResponse user(UserRequest userRequest){
        userResponse.setAge(userRequest.getAge());
        userResponse.setName(userRequest.getName());
        return userResponse;
    }

//post는 쿼리파라미터를 통한 방식보다 body를 타기 때문에
    //ApiImplicitParams나 QueryParams는 어울리지 않음
    @ApiResponses({
            @ApiResponse(code=200,message="요청에 대해서 정상 응답되었습니다"),
            @ApiResponse(code=400,message="요청에 문제가 보고되었습니다. 요청을 확인해주세요"),
            @ApiResponse(code=404,message="요청하신 페이지가 존재하지 않습니다")
    })
    @PostMapping("/postUser")
    public UserResponse myUser(@RequestBody UserRequest userRequest){
        userResponse.setAge(userRequest.getAge());
        userResponse.setName(userRequest.getName());
        return userResponse;
    }

}
그런데 위의 경우
java.lang.IllegalArgumentException: No enum constant springfox.documentation.service.ParameterType.PARAM
위와 같은 IllegalArgumentException으로 사용할 수 없는 enum 상수값이 사용되었다고 표시되었다
그래서 공식문서를 확인해보았다!
ApiImplicitParam (swagger-annotations 1.3.10 API)
그 결과, paramType의 값으로는 path query body header form 만이 올 수 있다고 한다!
그래서 아래처럼 수정해주면 이제는 에러가 없이 잘 실행된다
package com.example.swagger01.controller;

import com.example.swagger01.dto.UserRequest;
import com.example.swagger01.dto.UserResponse;
import io.swagger.annotations.*;
import lombok.RequiredArgsConstructor;
import org.springframework.context.ApplicationContext;
import org.springframework.web.bind.annotation.*;

@Api(tags={"API 정보를 제공하는 컨트롤러입니다"})
@RestController
@RequestMapping("/api")
@RequiredArgsConstructor
public class ApiController {

    private final UserResponse userResponse;

    @ApiOperation(value="hello를 외치는 메서드")
    @GetMapping("/hello")
    public String hello(){
        return "hello!";
    }

    @ApiResponses({
            @ApiResponse(code=200,message = "모든 값이 올바릅니다"),
            @ApiResponse(code=400,message = "입력하신 두 수의 형태 및 값을 확인해주세요"),
            @ApiResponse(code=500,message="관리자에게 문제에 대한 해결을 요청해주세요")
    })
//    @ApiOperation(value="두 수를 더하는 메서드",httpMethod = "GET")
//    @GetMapping("/plus/{x}")
//    public int plus(@ApiParam(value="x값", defaultValue ="20")
//                    @PathVariable int x,
//                    @ApiParam(value="y값",defaultValue = "30")
//                    @RequestParam int y){
//        return x+y;
//    }

    @ApiOperation(value="두 수를 더하는 메서드")
    @ApiImplicitParams({
            @ApiImplicitParam(name="x",value="x값",required = true,paramType = "path",dataType="int"),
            @ApiImplicitParam(name="y",value="y값",required = true,**paramType = "query"**,dataType = "int")
    })
    @GetMapping("/plus/{x}")
    public int plus(@PathVariable int x, @RequestParam int y){
        return x+y;
    }

    @ApiResponse(code=400,message="사용자의 나이가 10살 이하일 때")
    @ApiOperation(value="사용자의 나이와 이름을 echo해주는 메서드")
    @GetMapping("/user")
    public UserResponse user(UserRequest userRequest){
        userResponse.setAge(userRequest.getAge());
        userResponse.setName(userRequest.getName());
        return userResponse;
    }

//post는 쿼리파라미터를 통한 방식보다 body를 타기 때문에
    //ApiImplicitParams나 QueryParams는 어울리지 않음
    @ApiResponses({
            @ApiResponse(code=200,message="요청에 대해서 정상 응답되었습니다"),
            @ApiResponse(code=400,message="요청에 문제가 보고되었습니다. 요청을 확인해주세요"),
            @ApiResponse(code=404,message="요청하신 페이지가 존재하지 않습니다")
    })
    @PostMapping("/postUser")
    public UserResponse myUser(@RequestBody UserRequest userRequest){
        userResponse.setAge(userRequest.getAge());
        userResponse.setName(userRequest.getName());
        return userResponse;
    }

}
이렇게 스웨거를 이용하게 되면 개발자 입장에서는 굳이 api tester의 도움없이 실행할 수 있을 뿐 아니라 사용자에게 쉽게 설명할 수 있는 문서 작성이 가능 해진다!