35_[jquery]jquery 객체 조작
jQuery-객체 조작
여기에서 객체 조작은 바닐라 자바스크립트에서 공부했었던, html 의 document 내부에 객체를 만들거나 삭제하거나, 속성을 변경하는 행위를 의미한다!
🌟 잠깐 잊지 말자!! html 문서의 구조!
Document ◀️ html 요소 ◀️ head, body 요소
1. 속성 조작 메서드
- 요소의 속성을 바꿀 때 사용하는 메서드
- html(), text() 메서드
- 앞서 설명했던 것처럼, 매개변수가 없다면, -html은 하위 요소를 문자열로 반환하고 -text는 하위 요소의 텍스트 노드를 반환한다
- 반대로, 매개변수로 새 요소 혹은 새 텍스트가 있다면 -html은 하위 요소를 전부 제거하고 지정한 텍스트를 생성한다
아래의 예제처럼, html()과 text()는 기존의 하위 요소 혹은 하위 요소의 텍스트를 모두 반환함을 확인해볼 수 있다.
또한, html내부에는 태그 요소를 넣어줌으로써 기존 하위 요소를 모두 제거 후, 구글 링크로 이동하는 a 태그가 적용될 수 있다
마찬가지로 text 내부에 새 텍스트를 넣어줌으로써 기존의 내용이 아닌 새로운 내용으로 교체됨을 확인해볼 수 있다! 편의를 위해서 만들어진 제이쿼리의 특성인 ‘코드 간결화’가 돋보이는 순간이다!
<!DOCTYPE html>
<html lang="ko">

<head>
    <meta charset="UTF-8">
    <meta http-equiv="X-UA-Compatible" content="IE=edge">
    <meta name="viewport" content="width=device-width, initial-scale=1.0">
    <title>Document</title>
</head>
<script src="./js/jquery-3.6.0.min.js"></script>
<script>
    $(() => {
        const res1=$("#sec_1").html();//sec_1의 하위 요소를 모두 저장하여 문자열로 보여줄것
        console.log(res1);
        //sec_1의 p요소를 a태그로 바꾸기
        $("#sec_1 p").html("<a href='https://www.google.com' target='_blank'>내용1</a>");

        //sec_2의 하위요소의 텍스트만 가져오기
        const res2=$("#sec_2").text();
        console.log(res2);

        //sec_2의 p요소의 텍스트를 변경
        $("#sec_2 p").text("텍스트 변경하자!");
    })
</script>

<body>
    <h1><strong>객체 조작 및 생성</strong></h1>
    <section id="sec_1">
        <h2><em>html()</em></h2>
        <p>내용1</p>
    </section>
    <section id="sec_2">
        <h2><em>텍스트()</em></h2>
        <p>내용2</p>
    </section>
</body>

</html>

속성 조작 메서드-html(), text()
- attr(), removeAttr() 메서드
먼저 attr()을 이용하여 가위바위보 게임을 간단하게 만들어보자
<!DOCTYPE html>
<html lang="ko">

<head>
    <meta charset="UTF-8">
    <meta http-equiv="X-UA-Compatible" content="IE=edge">
    <meta name="viewport" content="width=device-width, initial-scale=1.0">
    <title>Document</title>
</head>
<script src="./js/jquery-3.6.0.min.js"></script>
<script>
    $(() => {
        //이미지의 src 속성을 확인해보기
        const src = $("#sec_1 p>img").attr("src");
        console.log(`사용자 이미지 경로: ${src}`);

        //임의로 컴퓨터측에서 가위,바위,보 뽑기
        const rdn = ["scissors", "rock", "paper"];
        let comp = rdn[Math.floor(Math.random() * 3)];
        //요소 생성하기
        $("#sec_1 p").eq(1).html(`<img src="./img/${comp}.png" alt="${comp}" style="border:3px solid red; width:300px;">`);
        console.log(`컴퓨터측 이미지 경로: ${$("#sec_1 img").eq(1).attr("src")}`);
        if (comp === 'scissors') {
            //내용 바꾸기
            $("#sec_1 div").text("비겼습니다");
        } else if (comp === 'rock') {
            //내용 바꾸기
            $("#sec_1 div").text("컴퓨터가 이겼습니다");
        } else if(comp ==='paper'){
              //내용 바꾸기
              $("#sec_1 div").text("사용자가 이겼습니다");
        }
    })
</script>

<body>
    <h1><strong>객체 조작 및 생성</strong></h1>
    <section id="sec_1">
        <h2>이미지 속성</h2>
        <!--사용자-->
        <p><img src="./img/scissors.png" alt="scissors" style="border:3px solid purple;width:300px;"></p>
        <p></p>
        <div></div>
    </section>
</body>

</html>
위와 같이, img 요소를 통해서 src 속성값을 가져와서 출력하면 속성의 값을 확인해볼 수 있다
그리고 임의로 배열에서 값을 하나 뽑아서 승부를 내도록 여분의 p요소와 div 요소를 두어 표시하고, html과 text 메서드를 이용하여서 위와 같이 이미지 요소와 텍스트 요소를 추가/교체할 수 있다!
이번에는 attr(속성,속성값) 중에서 여러 속성을 지정하는 경우를 적용하여 이미지를 교체해주면서,
removeAttr로 style 속성을 제거해보자!
🌹 replace(a,b): a를 b로 바꾸거나 새로 지정
<!DOCTYPE html>
<html lang="ko">
<head>
    <meta charset="UTF-8">
    <meta http-equiv="X-UA-Compatible" content="IE=edge">
    <meta name="viewport" content="width=device-width, initial-scale=1.0">
    <title>Document</title>
</head>
<script src="./js/jquery-3.6.0.min.js"></script>
<script>
    $(()=>{
        //이미지를 교체
        let src = $("#sec_1 p>img").attr("src");
        $("#sec_1 img").attr({
            "width":"200px",
            "src":src.replace("./img/scissors.png","./img/paper.png"),
            "alt":"paper"
        })
        .removeAttr("style");
    });
</script>
<body>
    <h1><strong>객체 조작 및 생성</strong></h1>
    <section id="sec_1">
        <h2>이미지 속성</h2>
        <p><img src="./img/scissors.png" alt="scissors" style="border:3px solid purple;width:300px;"></p>
        <p></p>
        <div></div>
    </section>
</body>
</html>
%EA%B3%BC%20removeAttr(%EC%86%8D%EC%84%B1).PNG?raw=true)
위에서 img 태그의 src 속성을 가져오고, img 요소에 대해서 여러 속성을 지정해주기 위해서
.attr({속성1:값1, 속성2:값2})를 이용하게 되면
가위 이미지가 보 이미지로 변경되고
너비는 200px로, 대체 텍스트는 paper로 변경된다
그리고 removeAttr(속성)을 통해서 기존에 적용되었던 인라인 스타일링이 제거되었음을 확인해볼 수 있다!
- addClass(), removeClass(), toggleClass(), hasClass()
(1) $(“요소선택”).addClass(“class 값”) : 요소를 선택하여 지정한 class 값을 생성
(2) $(“요소선택”).removeClass(“class 값”) : 요소를 선택하여 지정한 class 값을 삭제
(3) $(“요소선택”).toggleClass(“class 값”) : 요소를 선택하여 지정한 class 값이 있으면 삭제하고, 없으면 생성
(4) $(“요소선택”).hasClass(“class 값”) : 선택한 요소에 지정한 class 값이 있으면 true, 없으면 false 반환
<!DOCTYPE html>
<html lang="ko">
<head>
    <meta charset="UTF-8">
    <meta http-equiv="X-UA-Compatible" content="IE=edge">
    <meta name="viewport" content="width=device-width, initial-scale=1.0">
    <title>Document</title>
    <link rel="stylesheet" href="./jq03_cl.css">
</head>
<script src="./js/jquery-3.6.0.min.js"></script>
<script>
    $(()=>{
        //p1에 aqua 클래스 추가
        $("#p1").addClass("aqua");
        //red클래스 제거
        $("#p2").removeClass("red");
        //p3,p4요소에 toggleClass로 green 지정
        $("#p3").toggleClass("green");
        $("#p4").toggleClass("green");
        //p5가 yellow 클래스를 가졌는지 여부를 p6의 텍스트로 변경하기
        $("#p6").text($("#p5").hasClass("yellow"));
    })
</script>
<body>
    <p id="p1">내용1</p>
    <p id="p2" class="red">내용2</p>
    <p id="p3">내용3</p>
    <p id="p4" class="green">내용4</p>
    <p id="p5" class="yellow">내용5</p>
    <p id="p6">내용6</p>
</body>
</html>

속성조작메서드-addClass, removeClass, toggleClass, hasClass
먼저, 제이쿼리의 속성조작을 하기 전에는 red 혹은 green, yellow 클래스(내용2, 내용4, 내용5) 부분에 각각 빨간색, 초록색, 노란색 배경이 칠해져 있었다
하지만, 속성조작을 함으로써,
aqua 클래스가 추가된 “내용1”에는 아쿠아클래스가 추가되면서 그에 대한 스타일링이 적용되었다
내용2의 경우 red 클래스를제거하여 기존의 빨간 배경이 사라지게 되었다
내용3의 경우, 원래 아무런 클래스가 없었는데 toggleClass를 통해서 green 클래스가 대체되었다
내용4의 경우 원래 green클래스가 있었는데, toggle되어 green 클래스가 제거되어 기존의 초록색 배경이 사라지게 되었다
내용 6의 경우, 기존 내용 5가 yellow 클래스를 포함하고 있으므로 true를 반환하여 텍스트노드로 true가 새로 작성되었다
- val() 메서드
<!DOCTYPE html>
<html lang="ko">
<head>
    <meta charset="UTF-8">
    <meta http-equiv="X-UA-Compatible" content="IE=edge">
    <meta name="viewport" content="width=device-width, initial-scale=1.0">
    <title>Document</title>
</head>
<script src="./js/jquery-3.6.0.min.js"></script>
<script>
    $(()=>{
        //이름 값 가져오기
        const input1=$("#form_1 input").eq(0).val();
        console.log(`이름 : ${input1}`);
        //아이디 값 바꾸기
        $("#form_1 input").eq(1).val("bye");
        const input2=$("#form_1 input").eq(1).val();
        console.log(`변경된 아이디 : ${input2}`);
    })
</script>
<body>
    <h1>객체 조작 및 생성</h1>
    <form action="#" id="form_1">
        <p>
            <label for="user_name">이름</label>
            <input type="text" name="user_name" id="user_name"value="용대리">
        </p>
        <p>
            <label for="user_id">아이디</label>
            <input type="text" name="user_id" id="user_id"value="hello">
        </p>
    </form>
</body>
</html>
val()은 폼 요소에서 value 값을 가져오고,
val(“값”)은 기존의 폼 요소의 value 값을 대체하게 된다
그렇기 때문에 input1에는 용대리가, input2에는 bye가 들어가게 된다
.PNG?raw=true)
속성 조작 메서드-val()
- prop() 메서드
- 선택한 폼 요소(선택 상자, 체크박스, 라디오 버튼)의 상태 속성 값을 가져오거나 새로 설정
- 선택한 요소의 태그명(tagName), 노드 타입(nodeType), 선택 상자의 선택된 옵션의 인덱스(Index) 값도 알 수 있게 됨
| (1) $(“요소선택”).prop(“[checked | selected]”) : 선택한 폼 요소가 체크된 상태인지, 선택된 상태인지 확인하여 체크 혹은 선택된 상태이면 true 아니라면 false 반환 |
| (2) $(“요소선택”).prop(“[checked | selected]”, [true | false]) : 폼 요소를 선택하여 체크 혹은 선택 상태를 바꿀 수 있음 |
- (3) $(“요소선택”).prop(“[tagName | nodeType | selectedIndex | defaultValue]”)
- 선택한 요소의 태그명이나 노드 타입, 선택된 옵션의 인덱스값을 구함 :defaultValue는 사용자가 value 속성값을 변경해도 초기의 value 속성값을 가져옴
reference:
<!DOCTYPE html>
<html lang="ko">

<head>
    <meta charset="UTF-8">
    <meta http-equiv="X-UA-Compatible" content="IE=edge">
    <meta name="viewport" content="width=device-width, initial-scale=1.0">
    <title>Document</title>
</head>
<script src="./js/jquery-3.6.0.min.js"></script>
<script>
    $(() => {
        const res1 = $("#chk1").prop("checked");
        $("#chk3").prop("checked", true); //chk3를 checked로 설정
        const res2 = $("#chk3").prop("checked");
        console.log(`chk1 checked: ${res1}, after set chk3 checked: ${res2}`);

        const selIdx = $("#se_1").prop("selectedIndex");
        console.log(`selected Index: ${selIdx}`);

        const tagName= $("#se_1").prop("tagName");
        console.log(`tagName: ${tagName}`);

        const nodeType= $("#se_1").prop("nodeType");
        console.log(`nodeType: ${nodeType}`);
    });
</script>

<body>
    <h1><strong>객체 조작 및 생성</strong></h1>
    <form action="#" id="form_1">
        <p>
            <label for="chk1">chk1</label>
            <input type="checkbox" name="chk1" id="chk1">

            <label for="chk2">chk2</label>
            <input type="checkbox" name="chk1" id="chk2" checked>

            <label for="chk3">chk3</label>
            <input type="checkbox" name="chk1" id="chk3">
        </p>
        <p>
            <select name="se_1" id="se_1">
                <option value="opt1" selected>option1</option>
                <option value="opt2">option2</option>
                <option value="opt3">option3</option>
            </select>
        </p>
    </form>
</body>

</html>

속성조작메서드-prop
먼저 chk1 아이디인 요소가 체크되어있지 않으므로 false를 반환하고,
chk3인 요소에 대해서 체크되어 있도록 설정해주면 chk3의 checked 상태는 true가 된다
그리고 selectedIndex를 통해서 selected된 옵션의 인덱스가 0임을 확인해볼 수 있다
그리고 select 요소의 nodeType이 1로 확인되는데, 이는 위에서 확인한 바와 같이,
element 노드임을 나타내는 것이다!
2. 수치 조작 메서드
🌺 요소의 높이/너비 메서드
요소의 높이/너비 계산범위
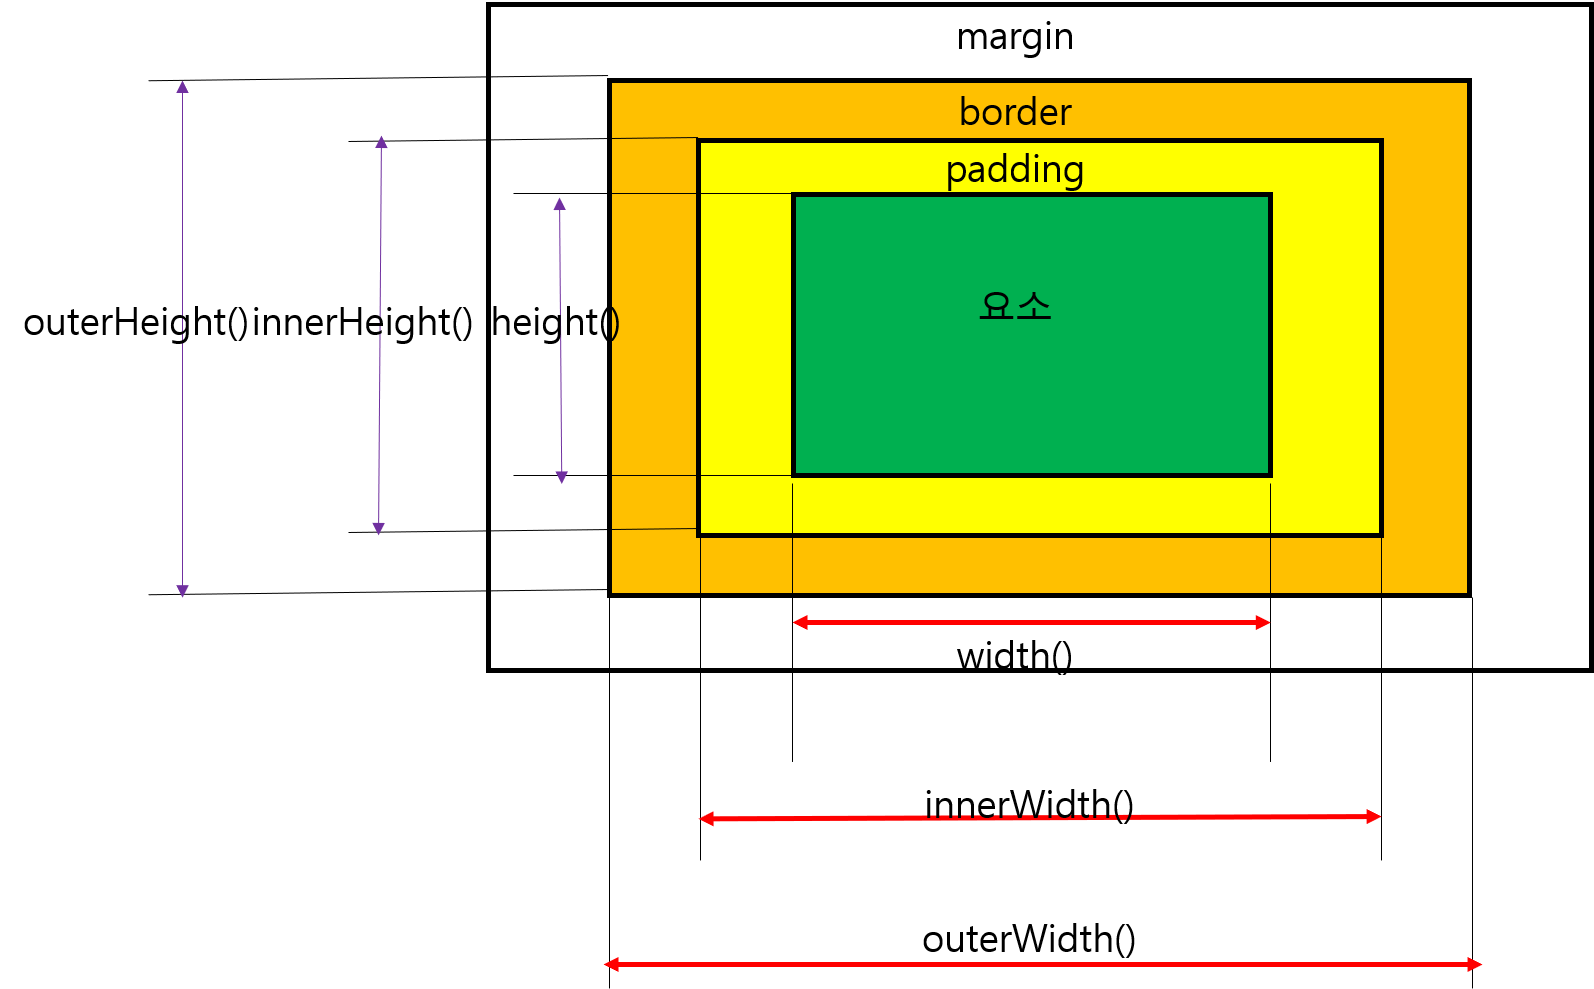
html 구조 내에서 어떤 요소에 대해서는 여백(margin, padding) 뿐 아니라 border 두께도 실질적인 너비 및 높이 계산에 포함된다!
이때 구조 내부에는 다양한 너비 및 높이를 아래의 메서드들을 이용하여 도출할 수 있다
1) width() 나 height()는 요소의 left to right, top to bottom의 길이
2) innerWidth() 나 innerHeight()는 요소의 padding까지 고려해서 padding_left to padding_right 혹은 padding_top to padding_bottom의 길이
3) outerWidth()나 outerHeight()는 요소의 border까지 고려해서 border_left to border_right 혹은
border_top to border_bottom의 길이
(1) $(“요소선택”).height(); : 요소의 높이값을 반환 $(“요소선택”).height(값); : 요소의 높이값을 변경
(2) $(“요소선택”).weight(); : 요소의 너비값을 반환 $(“요소선택”).weight(값); : 요소의 너비값을 변경
(3) $(“요소선택”).innerHeight(); : padding을 포함한 요소의 높이값을 반환 $(“요소선택”).innerHeight(값); : padding을 포함한 요소의 높이값을 변경
(3) $(“요소선택”).innerWeight(); : padding을 포함한 요소의 너비값을 반환 $(“요소선택”).innerWeight(값); : padding을 포함한 요소의 너비값을 변경
(3) $(“요소선택”).outerHeight(); : padding 및 테두리를 포함한 요소의 높이값을 반환 $(“요소선택”).outerHeight(값); : padding 및 테두리를 포함한 요소의 높이값을 변경
(3) $(“요소선택”).outerWeight(); :padding 및 테두리를 포함한 요소의 너비값을 반환 $(“요소선택”).outerWeight(값); : padding 및 테두리를 포함한 요소의 너비값을 변경
<!DOCTYPE html>
<html lang="ko">
<head>
    <meta charset="UTF-8">
    <meta http-equiv="X-UA-Compatible" content="IE=edge">
    <meta name="viewport" content="width=device-width, initial-scale=1.0">
    <title>Document</title>
    <link rel="stylesheet" href="./jq03_wh.css">
</head>
<script src="./js/jquery-3.6.0.min.js"></script>
<script>
    $(()=>{
        $("div").eq(0).text(`수치 조작 전 p1의 너비: ${ $("#p1").width()}, 높이: ${$("#p1").height()}|
        innerWidth: ${$("#p1").innerWidth()}, innerHeight: ${$("#p1").innerHeight()}|
        outerWidth: ${$("#p1").outerWidth()}, outerHeight: ${$("#p1").outerHeight()}`);

        $("#p1").width("300px");
        $("#p1").height("300px");
        $("div").eq(1).text(`요소 너비, 높이 조작 후 p1의 너비: ${ $("#p1").width()}, 높이: ${$("#p1").height()}|
        innerWidth: ${$("#p1").innerWidth()}, innerHeight: ${$("#p1").innerHeight()}|
        outerWidth: ${$("#p1").outerWidth()}, outerHeight: ${$("#p1").outerHeight()}`);

        $("#p1").innerWidth("350px");
        $("#p1").innerHeight("360px");
        $("div").eq(2).text(`padding을 포함한 너비, 높이 조작 후 p1의 너비: ${ $("#p1").width()}, 높이: ${$("#p1").height()}|
        innerWidth: ${$("#p1").innerWidth()}, innerHeight: ${$("#p1").innerHeight()}|
        outerWidth: ${$("#p1").outerWidth()}, outerHeight: ${$("#p1").outerHeight()}`);

        $("#p1").outerWidth("400px");
        $("#p1").outerHeight("400px");
        $("div").eq(3).text(`padding및 border를 포함한 너비, 높이 조작 후 p1의 너비: ${ $("#p1").width()}, 높이: ${$("#p1").height()}|
        innerWidth: ${$("#p1").innerWidth()}, innerHeight: ${$("#p1").innerHeight()}|
        outerWidth: ${$("#p1").outerWidth()}, outerHeight: ${$("#p1").outerHeight()}`);
    })
</script>
<body>
    <h1>수치 조작 메서드</h1>
    <p id="p1">내용1</p>
    <p id="p2">내용2</p>
    <div></div>
    <div></div>
    <div></div>
    <div></div>
</body>
</html>
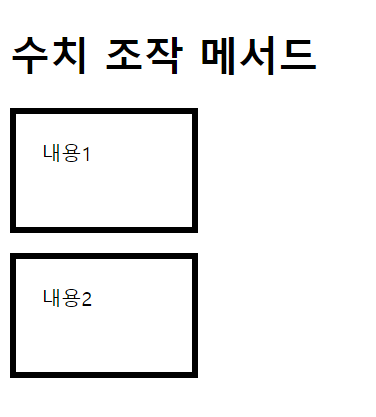
먼저 결과를 확인해보자
아래 사진은 너비와 높이에 대한 조작을 하기 전의 화면이다
다음은 수치 조작 메서드를 이용해서 요소, padding까지 포함된 경우, padding+border까지 포함된 경우의 너비 및 높이를 변경했을 때의 결과화면이다!

여기에서 중요한 점은 사용자가 innerWidth 혹은 outerWidth 등을 설정했을 때, 스타일 시트에서 설정해둔 값이 있다면 그 값을 고려해서 계산된 나머지 길이가 요소의 너비, 높이가 된다는 점이 눈여겨볼만하다!
🌺 요소 위치 메서드
요소 위치 메서드
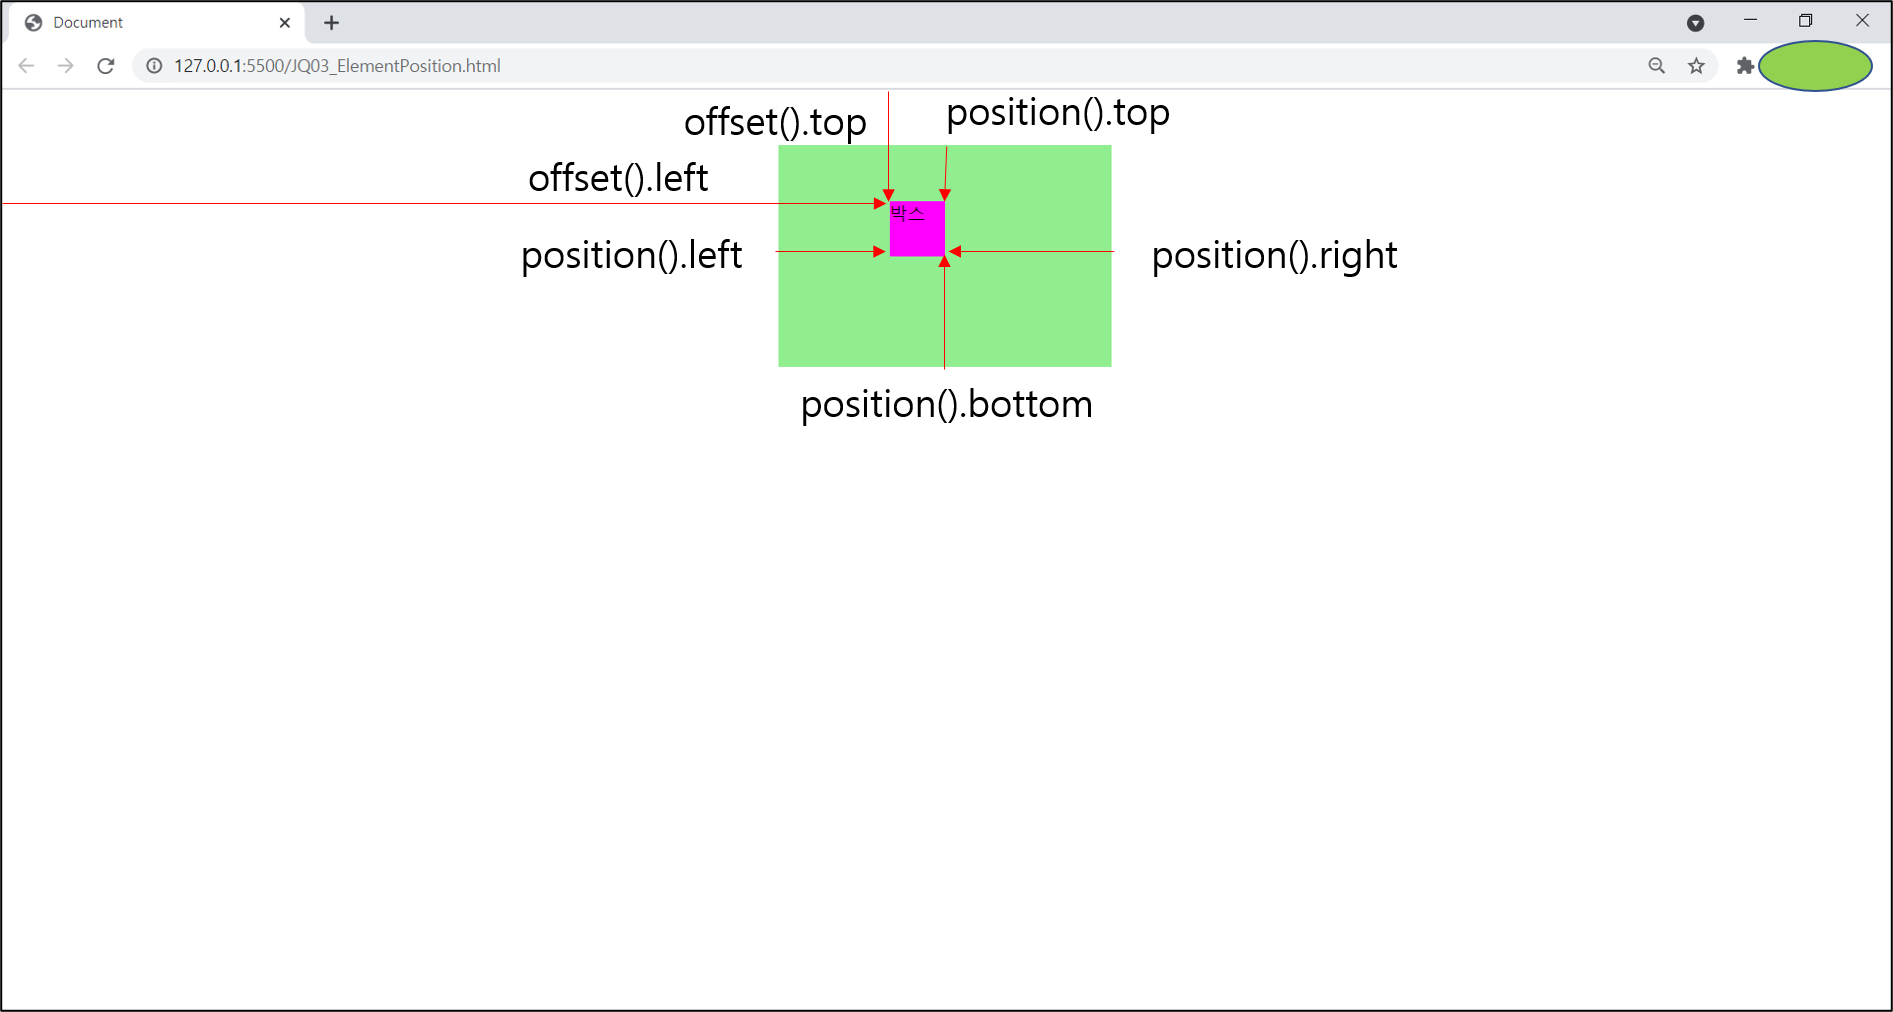
🌹 position() 메서드 : 포지션 기준이 되는 요소를 “기준으로 선택한 요소”에서 왼쪽/오른쪽/윗쪽/아랫쪽으로 얼마나 떨어져 있는지 그 위치의 좌푯값을 반환하거나, 변경할 때 사용
| (1) $(“요소선택”).position().[left | right | top | bottom] |
🌹 offset() 메서드 : document를 기준으로 선택한 요소가 document의 왼쪽 혹은 윗쪽으로부터 얼마나 떨어져 있는지 그 위치의 좌푯값을 반환하거나 변경할 때 사용
| (2) $(“요소선택”).offset().[left | top] |
<!DOCTYPE html>
<html lang="ko">

<head>
    <meta charset="UTF-8">
    <meta http-equiv="X-UA-Compatible" content="IE=edge">
    <meta name="viewport" content="width=device-width, initial-scale=1.0">
    <title>Document</title>
    <link rel="stylesheet" href="./jq03_position.css">
</head>
<script src="./js/jquery-3.6.0.min.js"></script>
<script>
    $(()=>{
        const txt1 = $(".txt_1 span"),
              txt2 = $(".txt_2 span"),
              box  = $(".box");

        const offset = box.offset().top;
        const position= box.position().top;

        txt1.text(offset);
        txt2.text(position);
    });
</script>

<body>
    <div id="box_wrap">
        <p class="box">박스</p>
    </div>
    <p class="txt_1">절대 top위칫값: <span></span></p>
    <p class="txt_2">상대 top위칫값: <span></span></p>
</body>

</html>
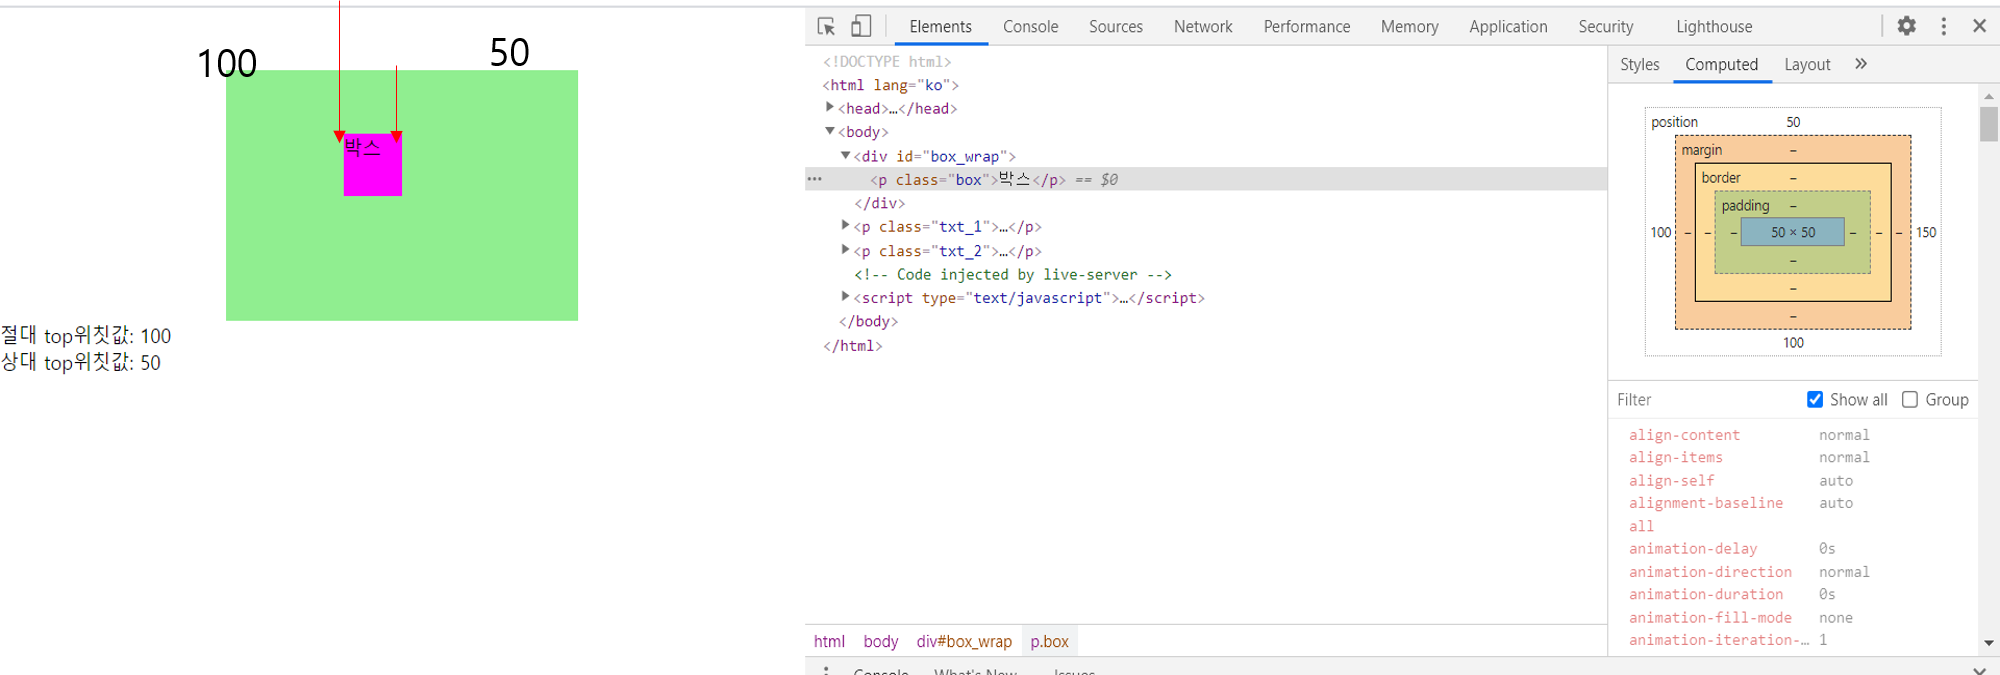
요소 위치 메서드 - offset, position
위의 경우, offset에 대한 값은 100, position에 대한 값은 50으로 반환되는 것을 확인해볼 수 있다
이는, document의 상단에서 100만큼 요소가 떨어져 있고, 요소를 둘러싸고 있는 div 요소로부터는 50만큼 떨어져 있음을 의미한다!
이는 아래와 같이 작성한 css 파일에서도 확인해볼 수 있다
*{
    margin:0;
    padding:0;
}
#box_wrap{
    width: 300px;
    height: 200px;
    margin:50px auto 0;
    position:relative;
    background-color: lightgreen;
}
.box{
    width: 50px;
    height: 50px;
    position:absolute;
    left: 100px;
    top: 50px;
    background-color: magenta;
}
box 요소는 지금 절대적인 top 값을 50으로 두었고, 이를 둘러싼 div 요소인 box_wrap은 margin-top 값을 50으로 주었기 때문에, offset은 100, position은 50이 된다!
https://api.jquery.com/offset/
그리고, 만약, offset 을 바꾸고 싶다면 위의 api에서 기술한 바를 참조해보면,
| $(“요소선택”).offset({left | top : 값}); |
으로 변경해주면 된다!
box.offset({top:300});

txt1.text(box.offset().top);
txt2.text(box.position().top);
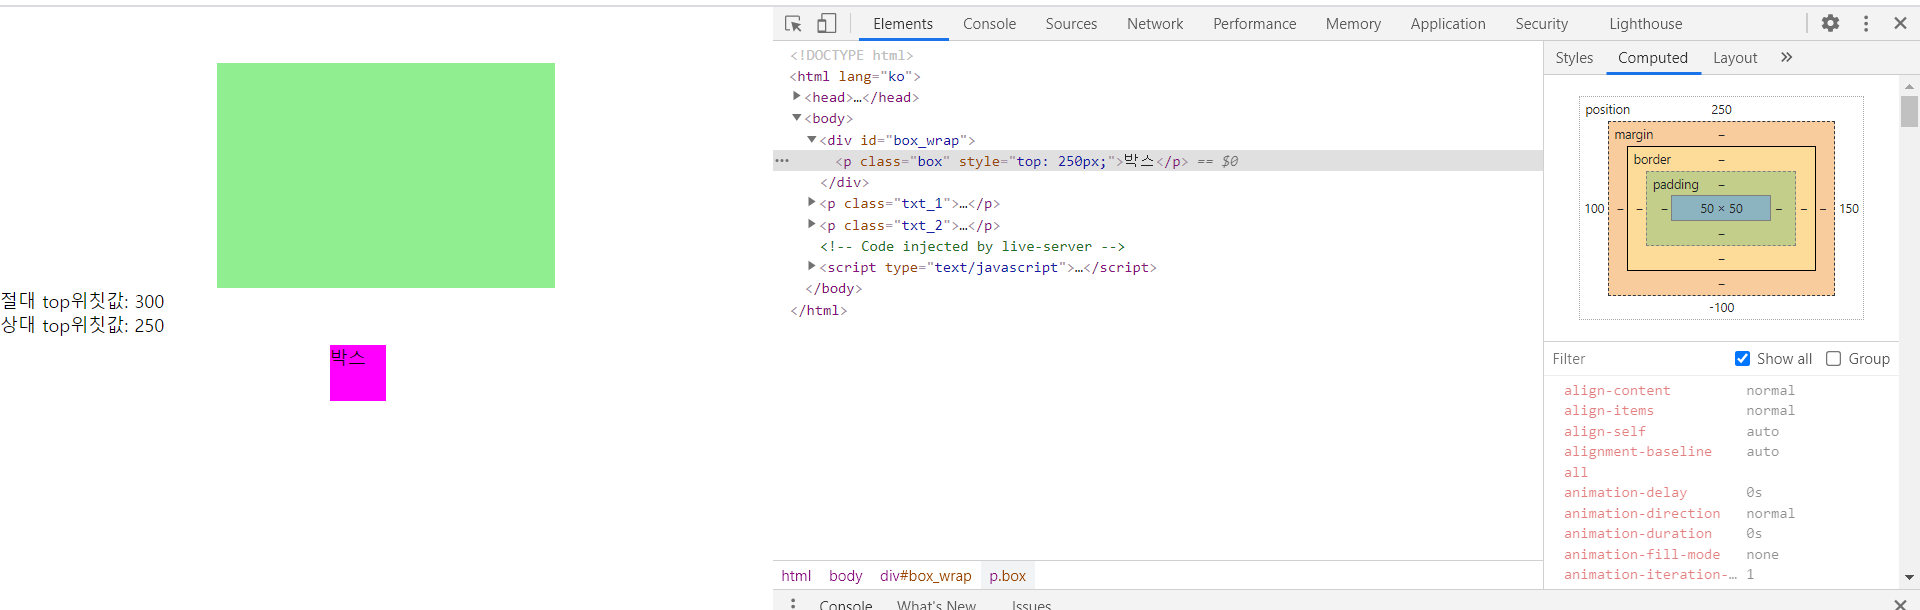
위와 같이 변경되는 부분은 위의 단 세줄만 추가한 것인데,
offset을 300으로 잡았고, div의 margin-top이 50이므로 position은 250(=300-50)이 된다!
🌺 스크롤바 위치 메서드
(1) $(“요소선택”).scrollTop(); - 스크롤바가 수직으로 이동한 위칫값 반환 $(“요소 선택”).scrollLeft(); - 스크롤바가 수평으로 이동한 위칫값 반환
(2) $(“요소선택”).scrollTop(“새값”); - 스크롤바를 수직으로 입력한 수치만큼 이동 $(“요소 선택”).scrollLeft(“새값”); - 스크롤바를 수평으로 입력한 수치만큼 이동
<!DOCTYPE html>
<html lang="ko">
<head>
    <meta charset="UTF-8">
    <meta http-equiv="X-UA-Compatible" content="IE=edge">
    <meta name="viewport" content="width=device-width, initial-scale=1.0">
    <title>Document</title>
    <style>
        *{
            margin:0;
            padding:0;
        }
        body{
            line-height: 1;
        }
        #wrap{
            height: 5000px;
            padding-top: 2000px;
        }
    </style>
</head>
<script src="./js/jquery-3.6.0.min.js"></script>
<script>
    $(()=>{
        const topNum=$("h1").offset().top;
        $(window).scrollTop(topNum);//h1요소가 document로부터 떨어진 만큼
        //수직으로 이동

        console.log($(window).scrollTop());
    });
</script>
<body>
    <div id="wrap">
        <h1>위치 메서드</h1>
    </div>
</body>
</html>
위의 경우, topNum 내에는 h1요소가 document 상단으로부터 얼만큼 떨어져 있는지를 담고 있다. 이를 콘솔에서 확인해보면 2000px만큼 떨어져 있음을 알 수 있다! 그 이유는 여백을 모두 초기화한 후, h1 요소를 둘러싼 wrap 요소의 padding-top이 2000으로 주어졌기 때문이다!
그런데 이러한 topNum을 window 객체의 scrollTop에 대한 매개변수로 제공하게 되면, h1요소가 document 상단으로부터 떨어진 만큼 위치로 스크롤이 수직이동된다!
3. 객체 편집 메서드
🌺 before(), insertBefore(), after(), insertAfter()
(1) $(“요소선택”).before(“새요소”); $(“새요소”).insertBefore(“요소선택”); - 선택한 요소의 이전 위치에 새 요소 생성
(2) $(“요소선택”).after(“새요소”); $(“새요소”).insertAfter(“요소선택”); - 선택한 요소의 이후 위치에 새 요소 생성
객체 편집 메서드는 기존의 html에 새로운 html 요소를 추가하는 작업을 수행한다!
<!DOCTYPE html>
<html lang="ko">
<head>
    <meta charset="UTF-8">
    <meta http-equiv="X-UA-Compatible" content="IE=edge">
    <meta name="viewport" content="width=device-width, initial-scale=1.0">
    <title>Document</title>
</head>
<script src="./js/jquery-3.6.0.min.js"></script>
<script>
    $(()=>{
        $("#wrap p:eq(2)").after("<p>After</p>");
        $("#wrap p:eq(2)").next().css("color","red");

        $("<p style='color:blue;'>insertAfter</p>").insertAfter("#wrap p:eq(0)");

        $("#wrap p:eq(2)").before("<a href='https://www.naver.com' target='_blank'>Naver</a>");
        $("<em>화이팅!</em>").insertBefore("#wrap p:eq(1)");
    });
</script>
<body>
    <div id="wrap">
        <p>내용1</p>
        <p>내용2</p>
        <p>내용3</p>
    </div>
</body>
</html>

객체 편집 메서드 -before, insertBefore, after, insertAfter
위의 경우, 처음에는 인덱스2에 해당되는 내용 3의 뒷 부분에 After라는 내용을 가진 요소가 추가되는 것을 확인해볼 수 있다. 이제 After는 인덱스 3이 되었다!
그 다음에는 인덱스 0에 해당되는 내용1의 뒷부분에 insertAfter라는 내용의 요소를 넣고,
그러면 인덱스는
인덱스 0 : 내용 1 인덱스 1: insertAfter 인덱스 2: 내용 2 인덱스 3: 내용 3 인덱스 4 : After
가 된다
이 상황에서 인덱스 2의 앞 부분에 a 요소를 넣게 되면, 인덱스는(before 이용)
인덱스 0 : 내용 1 인덱스 1: insertAfter 인덱스 2 : Naver 인덱스 3: 내용 2 인덱스 4: 내용 3 인덱스 5 : After
가 된다
그 다음, insertBefore를 이용하여 인덱스 1의 앞부분에 추가하고자 하면,
인덱스 0 : 내용 1 인덱스 1: 화이팅! 인덱스 2 insertAfter 인덱스 3 : Naver 인덱스 4: 내용 2 인덱스 5: 내용 3 인덱스 6 : After
와 같이 p 요소 그룹 간 관계가 구성, 정리된다!
🌟 중요한 점은 가상 클래스 요소 선택자인 ::before, ::after가 아니라는 점에 유의하자!!
🌺 append(), appendTo(), prepend(), prependTo() 메서드
(1) $(“요소선택”).append(“새요소”); $(“새 요소”).appendTo(“요소선택”);
- 선택한 요소 내의 마지막 위치에 새 요소를 생성하고 추가
(2) $(“요소선택”).prepend(“새요소”); $(“새요소”).prependTo(“요소선택); -선택한 요소 내의 앞 위치에 새 요소를 생성하고 추가
일부러, before와 after와 개념적으로 혼동이 올 수 있어서, li 요소가 5개인 ul 요소를 이용해서 테스트해보자!
<!DOCTYPE html>
<html lang="ko">
<head>
    <meta charset="UTF-8">
    <meta http-equiv="X-UA-Compatible" content="IE=edge">
    <meta name="viewport" content="width=device-width, initial-scale=1.0">
    <title>Document</title>
</head>
<script src="./js/jquery-3.6.0.min.js"></script>
<script>
    $(()=>{
        const ul = $("#listZone");
        $("<li>prependTo</li>").prependTo(ul);
        $(ul).prepend("<li>prepend</li>");

        $("<li>appendTo</li>").appendTo(ul);
        $(ul).append("<li>append</li>");
    });
</script>
<body>
    <ul id="listZone">
        <li>내용1</li>
        <li>내용2</li>
        <li>내용3</li>
        <li>내용4</li>
        <li>내용5</li>
    </ul>
</body>
</html>
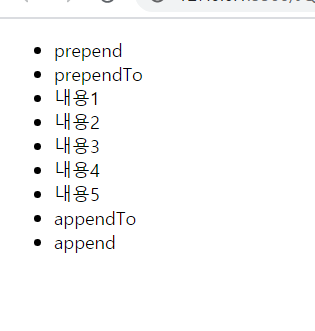
객체 편집 메서드- append,appendTo, prepend, prependTo
위에서 언급한 리스트를 이용해서 테스트해보면,
append, appendTo는 ul 요소 내의 가장 맨 뒷 부분부터 천천히 쌓이고
prepend,prependTo는 ul 요소 내부의 가장 맨 윗 부분부터 천천히 쌓이는 것을 확인해볼 수 있다!
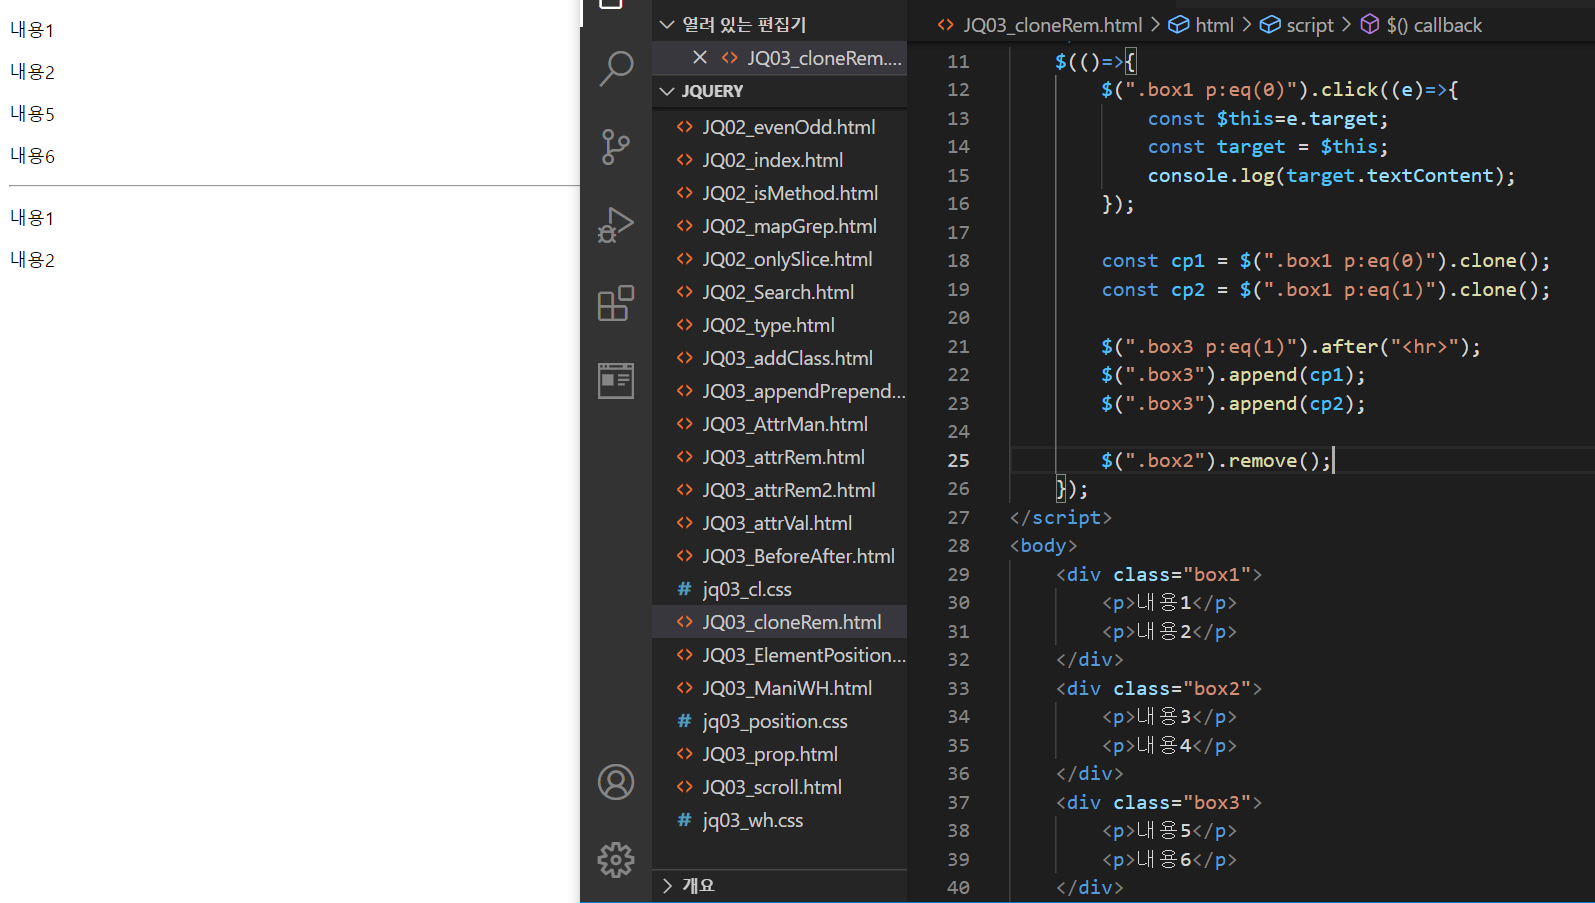
🌺 clone(), empty(), remove()
(1) $(“요소선택”).clone([true|false]);
- 선택한 요소를 복제
- true 이면 이벤트까지 복제
- false 이면 요소만 복제 (기본값)
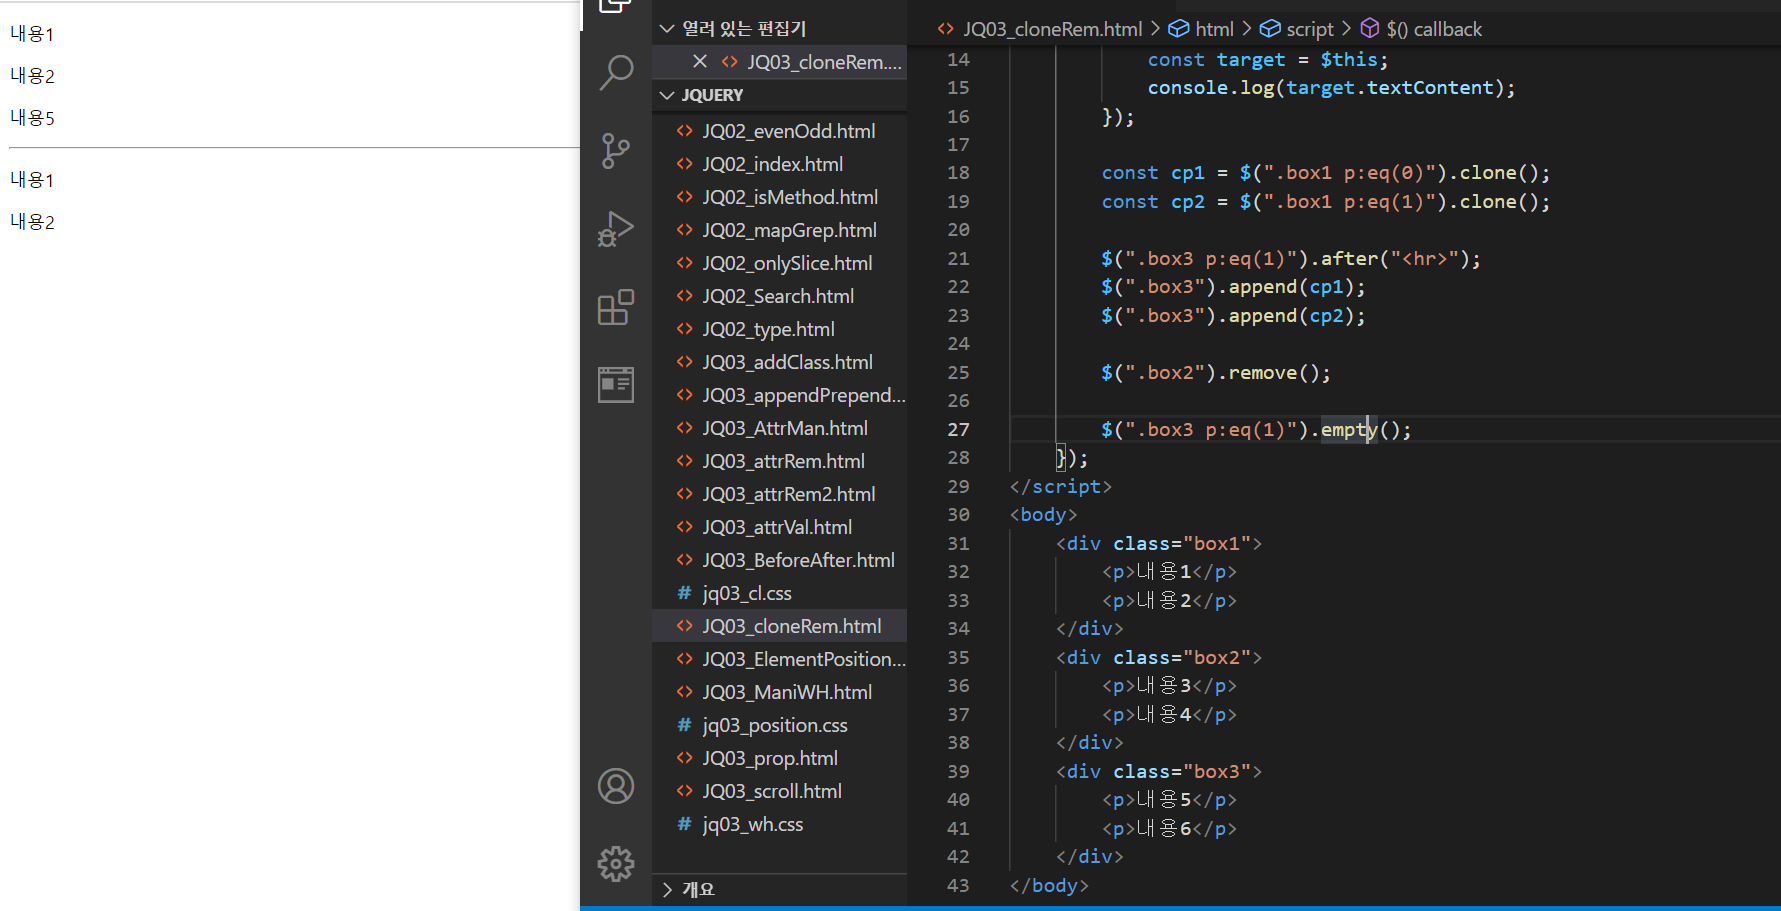
(2) $(“요소선택”).empty(); - 선택한 요소의 모든 하위 요소를 삭제
(3) $(“요소선택”).remove(); - 선택한 요소를 삭제
<!DOCTYPE html>
<html lang="ko">
<head>
    <meta charset="UTF-8">
    <meta http-equiv="X-UA-Compatible" content="IE=edge">
    <meta name="viewport" content="width=device-width, initial-scale=1.0">
    <title>Document</title>
</head>
<script src="./js/jquery-3.6.0.min.js"></script>
<script>
    $(()=>{
        $(".box1 p:eq(0)").click((e)=>{
            const $this=e.target;
            const target = $this;
            console.log(target.textContent);
        });

        const cp1 = $(".box1 p:eq(0)").clone();
        const cp2 = $(".box1 p:eq(1)").clone();

        $(".box3 p:eq(1)").after("<hr>");
        $(".box3").append(cp1);
        $(".box3").append(cp2);

        $(".box2").remove();

        $(".box3 p:eq(1)").empty();
    });
</script>
<body>
    <div class="box1">
        <p>내용1</p>
        <p>내용2</p>
    </div>
    <div class="box2">
        <p>내용3</p>
        <p>내용4</p>
    </div>
    <div class="box3">
        <p>내용5</p>
        <p>내용6</p>
    </div>
</body>
</html>
먼저, box1 요소를 복제해서 담은 후, 기존의 box3의 마지막 요소 뒷 부분에 수평선을 긋고, 그 뒤에 복제한 요소들을 붙여넣으면 아래와 같이 box1과 내용이 같은 요소들이 생성된다. 주의할 점은, 아래의 gif 파일에서 확인해볼 수 있듯, 이벤트가 있는 내용1 요소에 대해서 clone 옵션을 true로 주면, 이벤트까지 복제되는 것을 확인해볼 수 있다!(false 혹은 값을 주지 않으면 이벤트는 복제되지 않음을 알 수 있다!)
객체 편집 메서드- clone()
그 후에, box2요소에 대해서 remove를 하게 되면, 하위 요소들이 모두 삭제되고
empty를 하게 되면 해당 요소를 제거하게 된다
다만, 예시처럼 하위요소를 감싸는 상위 요소를 empty하게 되면 remove와 동일한 효과를 얻을 수 있다!
객체 편집 메서드- remove()
객체 편집 메서드- empty()
🌺 replaceAll(), replaceWith() 메서드
(1) $(“요소선택”).replaceWith(“새 요소”); (2) $(“새 요소”).replaceAll(“요소 선택”) ;
-선택한 모든 요소를 한꺼번에 바꿀때 사용
-html()과 유사!
<!DOCTYPE html>
<html lang="ko">
<head>
    <meta charset="UTF-8">
    <meta http-equiv="X-UA-Compatible" content="IE=edge">
    <meta name="viewport" content="width=device-width, initial-scale=1.0">
    <title>Document</title>
</head>
<script src="./js/jquery-3.6.0.min.js"></script>
<script>
    $(()=>{
        $("h2").replaceWith("<h3>replaceWith반영됨!</h3>");
        $("<h4>replaceAll적용됨</h4>").replaceAll("div:first-of-type");
    });
</script>
<body>
    <section class="box1">
        <h2>제목1</h2>
        <div>내용1</div>
        <div>내용2</div>
    </section>
    <section class="box2">
        <h2>제목2</h2>
        <div>내용3</div>
        <div>내용4</div>
    </section>
</body>
</html>

객체 편집 메서드- replaceWith, replaceAll
🌺 upwrap(), wrap(), wrapAll(), wrapInner()
(1) $(“요소선택”).unwrap(); - 선택한 요소의 부모요소를 삭제
(2) $(“요소선택”).wrap(새요소); - 선택한 요소를 새 요소로 각각 감쌈
(3) $(“요소선택”).wrapAll(새요소); - 선택한 요소를 새 요소로 한꺼번에 감쌈
(4) $(“요소선택”).wrapInner(새요소); - 선택한 요소의 모든 하위 요소를 새 요소로 감쌈
<!DOCTYPE html>
<html lang="ko">
<head>
    <meta charset="UTF-8">
    <meta http-equiv="X-UA-Compatible" content="IE=edge">
    <meta name="viewport" content="width=device-width, initial-scale=1.0">
    <title>Document</title>
    <style>
        div{
            background-color: aqua;
        }
        li{
            margin:30px;
        }
    </style>
</head>
<script src="./js/jquery-3.6.0.min.js"></script>
<script>
    $(()=>{
        $("strong").unwrap();//strong을 감싸는 부모 요소를 삭제
        $(".ct1").wrap("<div/>");//class값이 ct1인 요소를 <div>요소로 감쌈
        $(".ct2").wrapAll("<div />");//class값이 ct2인 요소를 모두 묶어서
            //div요소로 감쌈
        $("li").wrapInner("<div />");
    });
</script>
<body>
    <h1 id="tit_1">
        <strong>
            객체 조작 및 생성
        </strong>
    </h1>
    <p class="ct1">내용1</p>
    <p class="ct1">내용2</p>
    <p class="ct2">내용3</p>
    <p class="ct2">내용4</p>
    <ul>
        <li>내용3</li>
        <li>내용4</li>
    </ul>
</body>
</html>
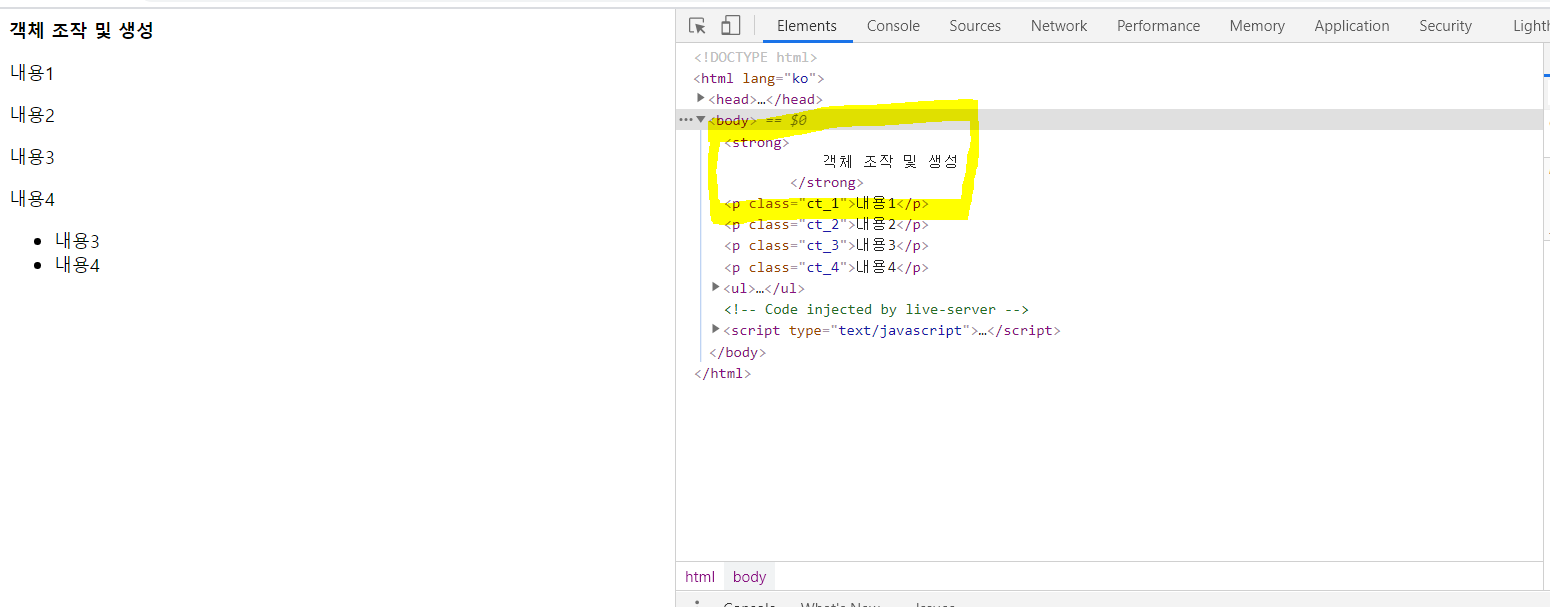
객체 편집 메서드- unwrap
먼저 unwrap은 위와 같이 어떤 요소를 감싸는 부모 요소를 제거하게 된다는 것을 확인해볼 수 있다!

객체 편집 메서드-wrap
그리고 wrap은 어떤 요소 각각에 대해서 그 외부를 새 요소로 감싼다
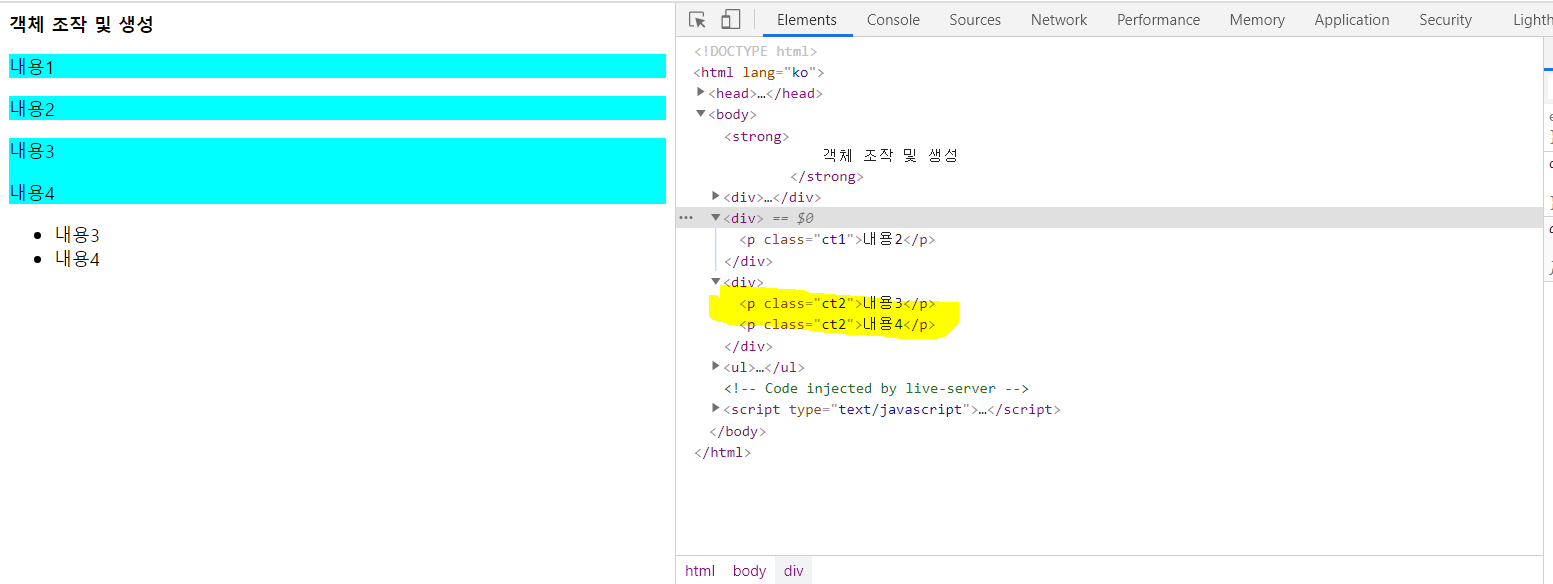
객체 편집 메서드- wrapAll
하지만 wrapAll은 해당 요소에 선택될 수 있는 요소를 묶어서 하나로 만들고, 그 외부를 새 요소로 감싼다!
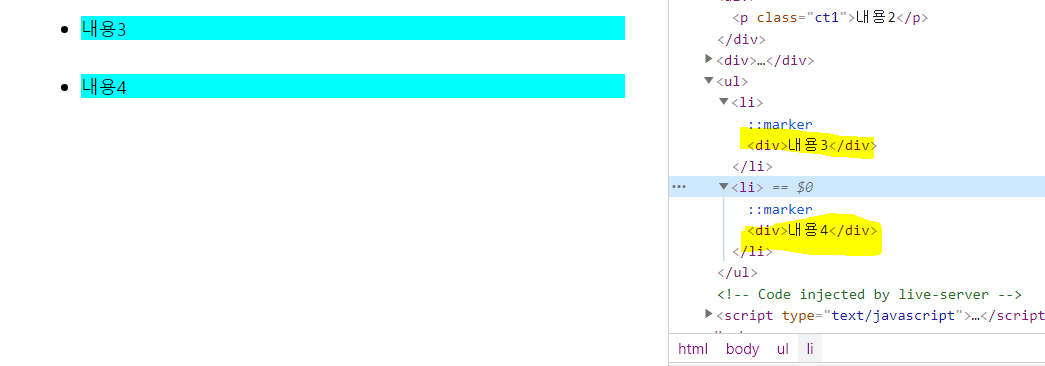
객체 편집 메서드-wrapInner
그리고 wrapInner는 존재하고 있던 어떤 특정 요소 각각의 내부를 새 요소로 감싼다!