2_[spring]websockethandler를 이용한 웹소켓 서버 구현
[Spring]WebSocketHandler를 이용한 웹소켓 서버 구현
🌟 스프링에서 웹소켓 서버 구현하기🌟
- WebSocketHandler 인터페이스 구현
websocket:handlers또는@EnableWebSocket어노테이션으로 WebSocketHandler 구현 객체를웹소켓 엔드포인트로 등록
01. spring-websocket 라이브러리 추가
<?xml version="1.0" encoding="UTF-8"?>
<project xmlns="http://maven.apache.org/POM/4.0.0" xmlns:xsi="http://www.w3.org/2001/XMLSchema-instance"
	xsi:schemaLocation="http://maven.apache.org/POM/4.0.0 https://maven.apache.org/maven-v4_0_0.xsd">
	<modelVersion>4.0.0</modelVersion>
	<groupId>com.jeju</groupId>
	<artifactId>ws</artifactId>
	<name>Spring_WebSocket</name>
	<packaging>war</packaging>
	<version>1.0.0-BUILD-SNAPSHOT</version>
	<properties>
		<java-version>1.6</java-version>
		<org.springframework-version>4.3.5.RELEASE</org.springframework-version>
		<org.aspectj-version>1.6.10</org.aspectj-version>
		<org.slf4j-version>1.6.6</org.slf4j-version>
	</properties>
	<dependencies>
		<!-- Spring -->
		<dependency>
			<groupId>org.springframework</groupId>
			<artifactId>spring-context</artifactId>
			<version>${org.springframework-version}</version>
			<exclusions>
				<!-- Exclude Commons Logging in favor of SLF4j -->
				<exclusion>
					<groupId>commons-logging</groupId>
					<artifactId>commons-logging</artifactId>
				 </exclusion>
			</exclusions>
		</dependency>
		<dependency>
			<groupId>org.springframework</groupId>
			<artifactId>spring-webmvc</artifactId>
			<version>${org.springframework-version}</version>
		</dependency>

		<!-- AspectJ -->
		<dependency>
			<groupId>org.aspectj</groupId>
			<artifactId>aspectjrt</artifactId>
			<version>${org.aspectj-version}</version>
		</dependency>

		<!-- Logging -->
		<dependency>
			<groupId>org.slf4j</groupId>
			<artifactId>slf4j-api</artifactId>
			<version>${org.slf4j-version}</version>
		</dependency>
		<dependency>
			<groupId>org.slf4j</groupId>
			<artifactId>jcl-over-slf4j</artifactId>
			<version>${org.slf4j-version}</version>
			<scope>runtime</scope>
		</dependency>
		<dependency>
			<groupId>org.slf4j</groupId>
			<artifactId>slf4j-log4j12</artifactId>
			<version>${org.slf4j-version}</version>
			<scope>runtime</scope>
		</dependency>
		<dependency>
			<groupId>log4j</groupId>
			<artifactId>log4j</artifactId>
			<version>1.2.15</version>
			<exclusions>
				<exclusion>
					<groupId>javax.mail</groupId>
					<artifactId>mail</artifactId>
				</exclusion>
				<exclusion>
					<groupId>javax.jms</groupId>
					<artifactId>jms</artifactId>
				</exclusion>
				<exclusion>
					<groupId>com.sun.jdmk</groupId>
					<artifactId>jmxtools</artifactId>
				</exclusion>
				<exclusion>
					<groupId>com.sun.jmx</groupId>
					<artifactId>jmxri</artifactId>
				</exclusion>
			</exclusions>
			<scope>runtime</scope>
		</dependency>

		<!-- @Inject -->
		<dependency>
			<groupId>javax.inject</groupId>
			<artifactId>javax.inject</artifactId>
			<version>1</version>
		</dependency>

		<!-- Servlet -->
		<dependency>
			<groupId>javax.servlet</groupId>
			<artifactId>servlet-api</artifactId>
			<version>2.5</version>
			<scope>provided</scope>
		</dependency>
		<dependency>
			<groupId>javax.servlet.jsp</groupId>
			<artifactId>jsp-api</artifactId>
			<version>2.1</version>
			<scope>provided</scope>
		</dependency>
		<dependency>
			<groupId>javax.servlet</groupId>
			<artifactId>jstl</artifactId>
			<version>1.2</version>
		</dependency>

		<!-- Test -->
		<dependency>
			<groupId>junit</groupId>
			<artifactId>junit</artifactId>
			<version>4.7</version>
			<scope>test</scope>
		</dependency>
**<!-- https://mvnrepository.com/artifact/org.springframework/spring-websocket -->
		<dependency>
    		<groupId>org.springframework</groupId>
    		<artifactId>spring-websocket</artifactId>
    		<version>${org.springframework-version}</version>
		</dependency>**

	</dependencies>
    <build>
        <plugins>
            <plugin>
                <artifactId>maven-eclipse-plugin</artifactId>
                <version>2.9</version>
                <configuration>
                    <additionalProjectnatures>
                        <projectnature>org.springframework.ide.eclipse.core.springnature</projectnature>
                    </additionalProjectnatures>
                    <additionalBuildcommands>
                        <buildcommand>org.springframework.ide.eclipse.core.springbuilder</buildcommand>
                    </additionalBuildcommands>
                    <downloadSources>true</downloadSources>
                    <downloadJavadocs>true</downloadJavadocs>
                </configuration>
            </plugin>
            <plugin>
                <groupId>org.apache.maven.plugins</groupId>
                <artifactId>maven-compiler-plugin</artifactId>
                <version>2.5.1</version>
                <configuration>
                    <source>1.6</source>
                    <target>1.6</target>
                    <compilerArgument>-Xlint:all</compilerArgument>
                    <showWarnings>true</showWarnings>
                    <showDeprecation>true</showDeprecation>
                </configuration>
            </plugin>
            <plugin>
                <groupId>org.codehaus.mojo</groupId>
                <artifactId>exec-maven-plugin</artifactId>
                <version>1.2.1</version>
                <configuration>
                    <mainClass>org.test.int1.Main</mainClass>
                </configuration>
            </plugin>
        </plugins>
    </build>
</project>
afterConnectionEstablished(): 웹 소켓 클라이언트가 특정 엔드포인트로 연결할 시 호출handleMessage(): 웹소켓 클라이언트가 데이터를 전송할 때, 이 메서드를 통해서클라이언트가 전송한 데이터를 전달handleTransportError: 웹소켓 클라이언트와의 연결 문제 발생시 호출afterConnectionClosed: 웹소켓 클라이언트가 직접 연결을 끊거나, 서버에서 타임아웃이 발생하면 연결을 끊을 때 호출supportsPartialMessages: 큰 데이터를 나눠서 받을 수 있는지 그 여부를 지정(이 값이 true이고, 웹소켓 컨테이너(톰캣)가 부분메시지를 지원하면, handleMessage() 를 여러번 호출해서 데이터를 부분적으로 전달)
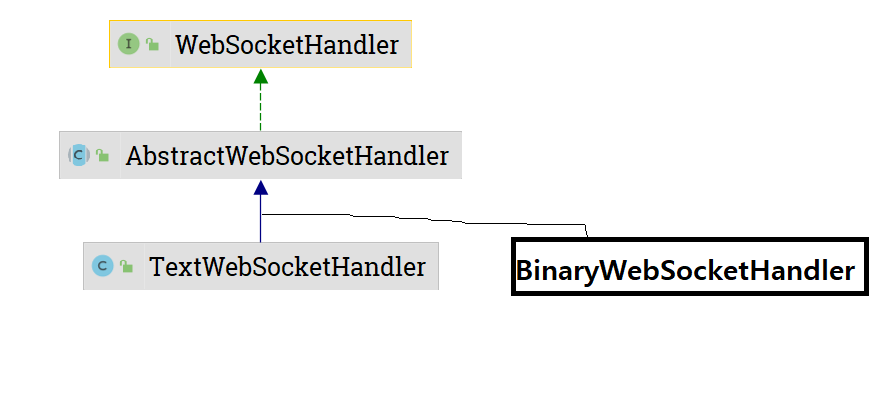
WebSocketHandler 인터페이스의 주요 구현 클래스
핵심은 WebSocketHandler!!
AbstractWebSocketHandler 클래스의 handleMessage는 WebSocketMessage의 타입에 따라 다음의 세 메서드 중 하나를 호출(모두 protected void 타입이고, throws Exception을 생략하였음)
- handleTextMessage(WebSocketSession session, TextMessage message)
- handleBinaryMessage(WebSocketSession session, BinaryMessage message)
- handlePongMessage(WebSocketSession session, PongMessage message)
package org.springframework.web.socket;

/**
 * A message that can be handled or sent on a WebSocket connection.
 *
 * @author Rossen Stoyanchev
 * @since 4.0
 */
public interface WebSocketMessage<T> {

	/**
	 * Returns the message payload. This will never be {@code null}.
	 */
	T getPayload();

	/**
	 * Return the number of bytes contained in the message.
	 */
	int getPayloadLength();

	/**
	 * When partial message support is available and requested via
	 * {@link org.springframework.web.socket.WebSocketHandler#supportsPartialMessages()},
	 * this method returns {@code true} if the current message is the last part of the
	 * complete WebSocket message sent by the client. Otherwise {@code false} is returned
	 * if partial message support is either not available or not enabled.
	 */
	boolean isLast();

}
위는 WebSocketMessage 인터페이스인데
- getPayload: 메시지를 반환
- getPayloadLength: 메시지의 길이를 반환
- isLast: 부분 메시지 보내기가 지원될 때, 현재 메시지가 전체 메시지의 마지막인지 확인
위와 같은 메서드들이 존재하는 것을 확인해볼 수 있다
02. WebSocketHandler를 상속받은 클래스에서 기능 오버라이딩하기
간단하게 TextWebSocketHandler를 상속받도록 하고
afterConnectionEstablished와 handleTextMessage, afterConnectionClosed 메서드만 오버라이딩하도록 하자
package com.example.websocket.handler;

import org.springframework.web.socket.CloseStatus;
import org.springframework.web.socket.TextMessage;
import org.springframework.web.socket.WebSocketSession;
import org.springframework.web.socket.handler.TextWebSocketHandler;

public class EchoHandler extends TextWebSocketHandler {
    @Override
    public void afterConnectionEstablished(WebSocketSession session) throws Exception {
        System.out.printf("%s 연결됨\n",session.getId());
    }

    @Override
    **protected void handleTextMessage**(WebSocketSession session, TextMessage message) throws Exception {
        System.out.printf("%s로부터 [%s]받음\n", session.getId(), message.getPayload());
        session.sendMessage(new TextMessage("echo: "+message.getPayload()));//메시지 전달
    }

    @Override
    public void afterConnectionClosed(WebSocketSession session, CloseStatus status) throws Exception {
        System.out.printf("%s 연결 끊김\n",session.getId());
    }
}
03. 웹 소켓 설정 파일(WEB-INF하위에)로 웹 소켓 객체 생성하여 등록하기
→ws-config.xml이라는 이름으로 빈을 관리해주고, 웹 서버 실행 시 web.xml이 읽히므로 해당 부분에 configuration 파일 넣어주기
- ws-config.xml
-websocket:mapping ← 웹 소켓 클라이언트가 연결할 때 사용할 엔드포인트(path 속성)과 ,WebSocketHandler 객체를 연결
-아래는 “/echo-ws”로 접속시 echoHandler빈을 통해서 처리하겠다고 명시
<?xml version="1.0" encoding="UTF-8"?>
<beans xmlns="http://www.springframework.org/schema/beans"
	xmlns:xsi="http://www.w3.org/2001/XMLSchema-instance"
	xmlns:websocket="http://www.springframework.org/schema/websocket"
	xmlns:mvc="http://www.springframework.org/schema/mvc"
	xsi:schemaLocation="http://www.springframework.org/schema/websocket http://www.springframework.org/schema/websocket/spring-websocket-4.0.xsd
		http://www.springframework.org/schema/mvc http://www.springframework.org/schema/mvc/spring-mvc-3.1.xsd
		http://www.springframework.org/schema/beans http://www.springframework.org/schema/beans/spring-beans.xsd">

	**<websocket:handlers>
		<websocket:mapping handler="echoHandler" path="/echo-ws"/>
	</websocket:handlers>**

	<bean id="echoHandler" class="com.jeju.ws.handler.EchoHandler"/>
	<mvc:default-servlet-handler/>

</beans>
-
: 디폴트 서블릿 핸들러를 설정
- web.xml에 configuration 파일 등록
-3.1.1.RELEASE가 처음에 내가 사용중인 sts에서 기본적으로 pom.xml에서 스프링 버전으로 적혀져 있었는데, 이는 스프링 웹소켓의 최소버전인 4.x.x와 부합해서 스프링버전을 올려야만 했다(가장 안정적인 것은 역시 RELEASE가 붙은거..! 다른 스프링 라이브러리도 그 버전이 있을테니!)
-그런데 Caused by: java.lang.IllegalArgumentException: 이름이 [spring_web]인, 둘 이상의 fragment들이 발견되었습니다. 문제가 있어서 <absolute-ordering />를 붙여주었더니 해결되었다! ⬇️
<?xml version="1.0" encoding="UTF-8"?>
<web-app version="2.5" xmlns="http://java.sun.com/xml/ns/javaee"
	xmlns:xsi="http://www.w3.org/2001/XMLSchema-instance"
	xsi:schemaLocation="http://java.sun.com/xml/ns/javaee https://java.sun.com/xml/ns/javaee/web-app_2_5.xsd">

	**<absolute-ordering />**
	<!-- The definition of the Root Spring Container shared by all Servlets and Filters -->
	<context-param>
		<param-name>contextConfigLocation</param-name>
		<param-value>/WEB-INF/spring/appServlet/applicationContext.xml</param-value>
	</context-param>

	<!-- Creates the Spring Container shared by all Servlets and Filters -->
	<listener>
		<listener-class>org.springframework.web.context.ContextLoaderListener</listener-class>
	</listener>

	<!-- Processes application requests -->
	<servlet>
		<servlet-name>appServlet</servlet-name>
		<servlet-class>org.springframework.web.servlet.DispatcherServlet</servlet-class>
		<init-param>
			<param-name>contextConfigLocation</param-name>
			<param-value>
			/WEB-INF/spring/appServlet/servlet-context.xml
			**/WEB-INF/ws/ws-config.xml**
			</param-value>
		</init-param>
		<load-on-startup>1</load-on-startup>
	</servlet>

	<servlet-mapping>
		<servlet-name>appServlet</servlet-name>
		<url-pattern>/</url-pattern>
	</servlet-mapping>

	<filter>
		<filter-name>encodingFilter</filter-name>
		<filter-class>org.springframework.web.filter.CharacterEncodingFilter</filter-class>
		<init-param>
			<param-name>encoding</param-name>
			<param-value>UTF-8</param-value>
		</init-param>
		<init-param>
			<param-name>forceEncoding</param-name>
			<param-value>true</param-value>
		</init-param>

	</filter>

</web-app>
(별도) 간단한 뷰 페이지 만들기
- 자바스크립트를 이용해서
ws://localhost:포트번호/context root/echo-ws 로 소켓 연결 - 서버에 연결되면
소켓객체.send(값)으로 서버에 메시지 전송 - context root 는 프로젝트위에서 우클릭-properties-Web Project Settings에서 확인가능
- 기본적으로 context root는 com.a.b에서(기본 3자리 요구됨) b에 해당
<!DOCTYPE html>
<html>
<head>
<meta charset="UTF-8">
<title>Insert title here</title>
</head>
<script src="https://code.jquery.com/jquery-3.6.0.min.js" integrity="sha256-/xUj+3OJU5yExlq6GSYGSHk7tPXikynS7ogEvDej/m4=" crossorigin="anonymous"></script>
<body>
	<input type="text" id="message"/>
	<input type="button" value="전송" id="sendBtn"/>
	<script src="/js/socket.js"></script>
</body>
</html>
/**
 *
 */
$(function(){
	$("#sendBtn").click(function(){sendMessage();});
});

var socket;

function sendMessage(){
	socket=new WebSocket("ws://localhost:8088/ws/echo-ws");
	socket.onmessage=onMessage;//메시지는 onMessgae 함수로 처리
	socket.onclose=onClose;//닫는것은 onClose 메서드로 처리
	socket.onopen=function(){
		//서버 연결 시 메시지 전송
		socket.send($("#message").val());
	};
}

//서버에서 메시지를 받으면 실행
function onMessage(event){
	var data=event.data;
	alert(`서버에서 데이터 받음: ${data}`);
	//연결종료
	socket.close();

}

//연결 종료시 실행
function onClose(event){
	alert("연결 끊김");
}
- 소켓 객체에서 처리해줘야 할 과정
1) onmessage: 서버에서 메시지를 받으면 실행
2) onclose: 연결이 종료되었을 때 실행
3) onopen: 서버 연결 시 실행
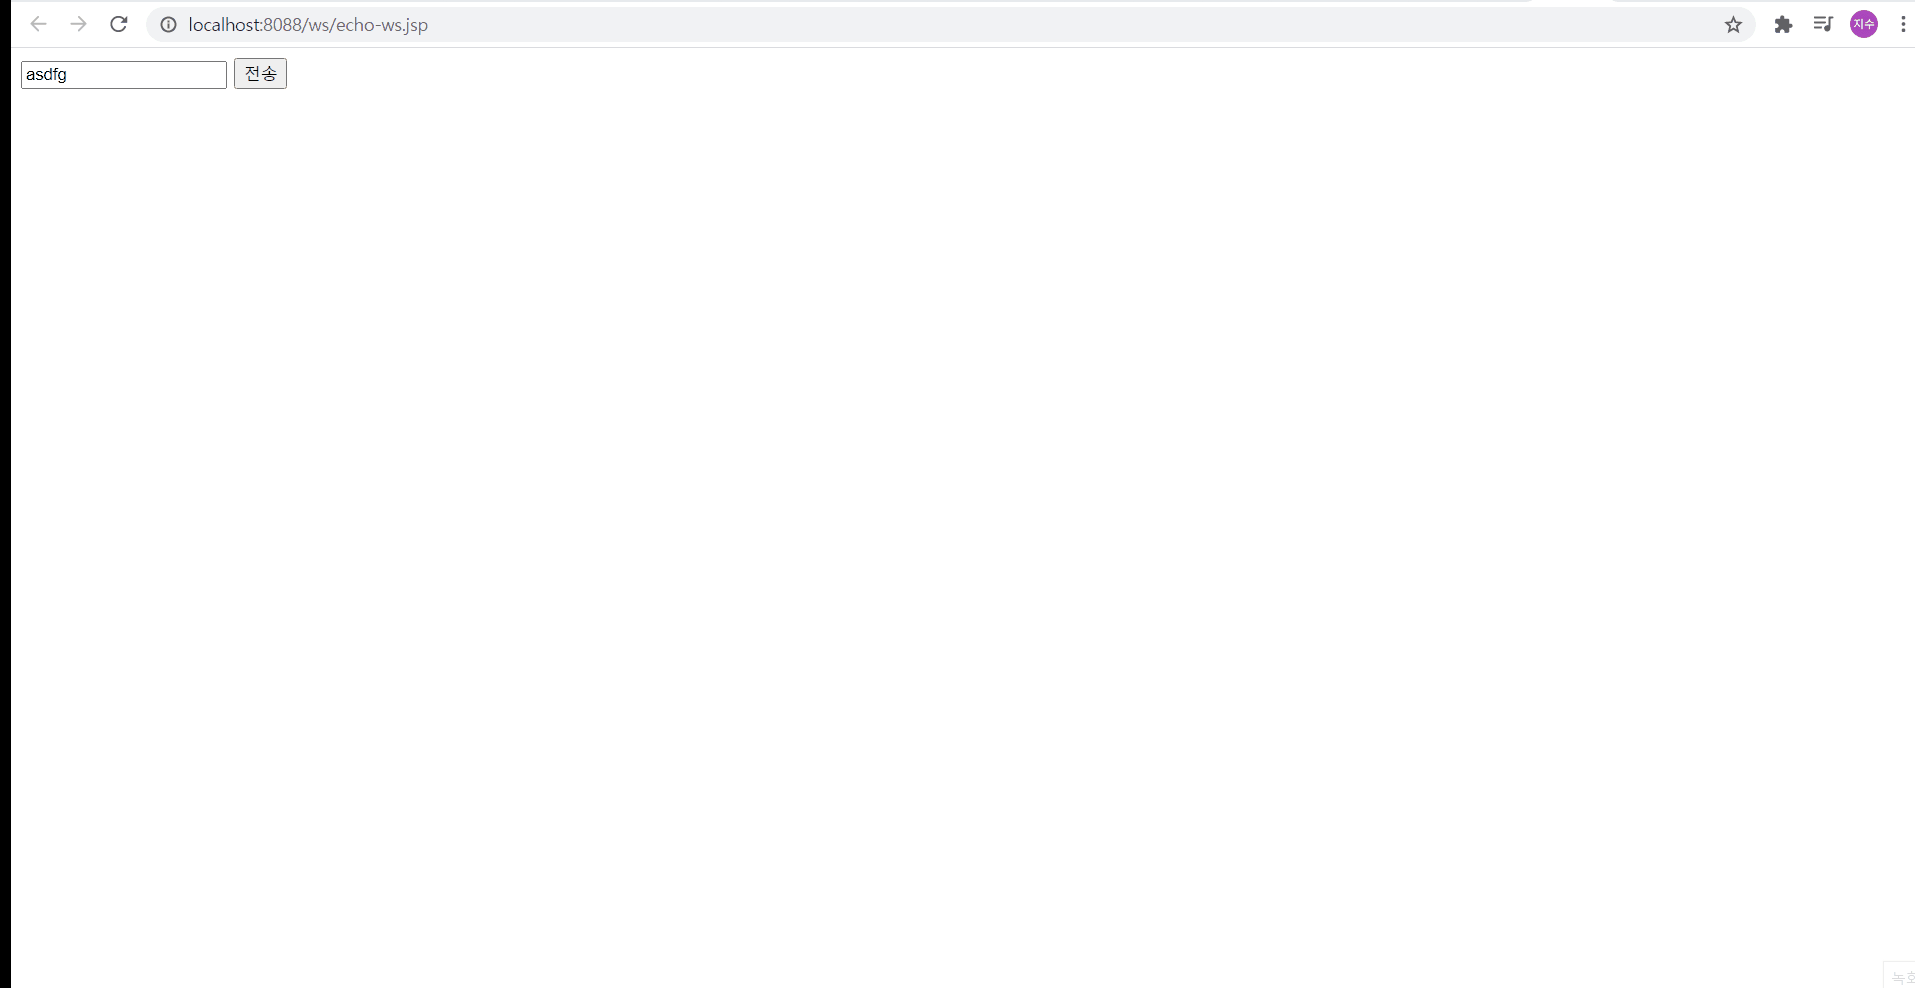
간단하게 테스트를 해보면, 먼저 클라이언트에서 메시지를 보내면, 서버에서 그 메시지 앞에 “echo:”를 붙여서 보낸 것을 바로 handleTextMessage에서 다시 한 번 확인해볼 수 있다