2_[spring]post api작성하기
POST API 작성하기
- POST API는 리소스 생성, 추가에 해당됨
- Data Body로 데이터를 실어보내기 때문에 굳이 Query Parameter로 데이터를 보낼 필요는 없음
-
또한 조회를 하지 않기 때문에 Query Parameter를 굳이 사용할 필요는 없음
- 현업에서는 xml보다는 json 형태의 데이터를 주고 받음
- json(javascript object notation)은 string, number, boolean, object{}, array[]로 나타낼 수 있음
{ “key” : “value” }
{ “phone_number”:”010-1234-5678”, “age” : 10, “is_agree”:false, “account”:{ “email” : “steve@gmail.com”, “password”:”1234” }, “place”:[“대한민국”, “서울특별시”] }
🌟 json을 사용할 때에는 snake case와 camel case 중 snake case를 더 많이 사용한다! 지금부터 고치자!
❓ What is ‘Snake case’?
phone_number
처럼 언더바를 이용해서 단어 사이를 이어주는 것!
🌟 반대로, 자바에서는 camel case를 더 많이 사용!
phoneNumber
🌟 예전에는 content-type에서 application/json;charset=utf-8 이라고 덧붙여주었는데, 지금은 UTF-8이 기본이라서 뒤에 charset을 붙여주지 않아도 됨
- @PostMapping과 @RequestBody를 이용해서 데이터 생성하기
- GET과 매핑은 유사하지만 생성을 해주어야 하기 때문에 key-value값 형태가 중요!
- key-value를 RequestBody를 통해서 데이터를 넘겨주기
아래와 같은 json 데이터를 만든다고 가정하면
{
   "account":"",
   "email":"",
   "password":"",
   "address":""
}
package com.example.post_api.controller;

import org.springframework.web.bind.annotation.PostMapping;
import org.springframework.web.bind.annotation.RequestBody;
import org.springframework.web.bind.annotation.RequestMapping;
import org.springframework.web.bind.annotation.RestController;

import java.util.Map;

@RestController
@RequestMapping("/api")
public class PostApiController {
    //value는 객체 등도 올 수 있어서 object value로 받을 것
    **@PostMapping("/post")**
    public void post(**@RequestBody Map<String,Object> requestData**){
        StringBuilder sb = new StringBuilder();
        System.out.println("post mapping");

        requestData.forEach((key,value) ->{
            sb.append("["+key+" = "+value+"]\n");
        });
        System.out.print(sb);
    }
}
위와 같이 회원정보를 받는 경우를 가정해보자
그렇게 되면 PostMapping으로 주소를 매핑해주어야 하는데, GET과 달리 값에 대한 부분을 뒤에 붙이지 않는다
그리고 talend로 확인해보았을 때, 데이터를 입력해주면, 서버에서는 RequestBody 어노테이션(Data Body에 데이터를 붙여줌)이 붙어 있는 Map 인스턴스로 받아서 처리하게 된다!

하지만 어떤 값을 보낼 지 미리 알 수는 없어서 Map으로는 조금 애매하다! 이를 해결하고자 한 방식이 2번의 방식!
- DTO 객체를 이용 + RequestBody 어노테이션 이용
POST방식은 GET방식과 다르게 DTO 객체를 이용할 때 어노테이션을 붙여주어야 한다!
먼저 위에서 이용했던 회원계정 정보를 dto 객체로 만들어보자
package com.example.post_api.dto;

public class PostRequestDto {
    private String account;
    private String email;
    private String password;
    private String address;

    public PostRequestDto() {
    }

    public PostRequestDto(String account, String email, String password, String address) {
        this.account = account;
        this.email = email;
        this.password = password;
        this.address = address;
    }

    public String getAccount() {
        return account;
    }

    public void setAccount(String account) {
        this.account = account;
    }

    public String getEmail() {
        return email;
    }

    public void setEmail(String email) {
        this.email = email;
    }

    public String getPassword() {
        return password;
    }

    public void setPassword(String password) {
        this.password = password;
    }

    public String getAddress() {
        return address;
    }

    public void setAddress(String address) {
        this.address = address;
    }

    @Override
    public String toString() {
        return "PostRequestDto{" +
                "account='" + account + '\'' +
                ", email='" + email + '\'' +
                ", password='" + password + '\'' +
                ", address='" + address + '\'' +
                '}';
    }
}
그리고 이를 컨트롤러에서 PostMapping해주자
package com.example.post_api.controller;

import com.example.post_api.dto.PostRequestDto;
import org.springframework.web.bind.annotation.PostMapping;
import org.springframework.web.bind.annotation.RequestBody;
import org.springframework.web.bind.annotation.RequestMapping;
import org.springframework.web.bind.annotation.RestController;

import java.util.Map;

@RestController
@RequestMapping("/api")
public class PostApiController {
    @PostMapping("/post02")
    public void dtoPost(@RequestBody PostRequestDto dto){
        System.out.println(dto);
    }
}

그 결과는 Map을 이용했을 때와 결과는 유사하지만, 어떤 키인지 보다 명확해질 수 있다!
뿐만 아니라, dto 객체에 정의해둔 getter 메서드를 통해서 필드에 접근하는 것이 보다 유연해질 수 있다!
🌟 dto 객체의 필드 이름은 반드시 그 키의 이름에 매칭이 되어야 한다!!
📌 자바에서는 camel case로 작성하는데, json(js)에서는 snake case로 작성하는 경우가 있을 수 있다! 이 때에는 어떻게 할까?
A] ObjectMapper를 이용해서 notation을 명시하지 않으면 매칭이 안되어서 null값으로 체크될 수 있다! ▶️나중에 학습하게 될 것!
핸드폰 번호가 그 예시가 될 수 있기 때문에 위의 dto 객체를 조금 수정해보자!
(자바: phoneNumber, js : phone_number)
package com.example.post_api.dto;

public class PostRequestDto {
    private String account;
    private String email;
    private String password;
    private String address;
    private String phoneNumber;

    public PostRequestDto() {
    }

    public PostRequestDto(String account, String email, String password, String address) {
        this.account = account;
        this.email = email;
        this.password = password;
        this.address = address;
    }

    public String getAccount() {
        return account;
    }

    public void setAccount(String account) {
        this.account = account;
    }

    public String getEmail() {
        return email;
    }

    public void setEmail(String email) {
        this.email = email;
    }

    public String getPassword() {
        return password;
    }

    public void setPassword(String password) {
        this.password = password;
    }

    public String getAddress() {
        return address;
    }

    public void setAddress(String address) {
        this.address = address;
    }

    public String getPhoneNumber() {
        return phoneNumber;
    }

    @Override
    public String toString() {
        return "PostRequestDto{" +
                "account='" + account + '\'' +
                ", email='" + email + '\'' +
                ", password='" + password + '\'' +
                ", address='" + address + '\'' +
                ", phoneNumber='" + phoneNumber + '\'' +
                '}';
    }

    public void setPhoneNumber(String phoneNumber) {
        this.phoneNumber = phoneNumber;
    }
}
- notation이 다른 경우-“@JsonProperty(json에서 명명하는 표기법에 해당되는 필드 키 이름)”을 이용하기
@JsonProperty("phone_number")
    private String phoneNumber;
JsonProperty 어노테이션을 이용하여 json에서의 snake notation으로 표기된 명칭을 적어주면 매칭이 되어 잘 작동될 수 있다!
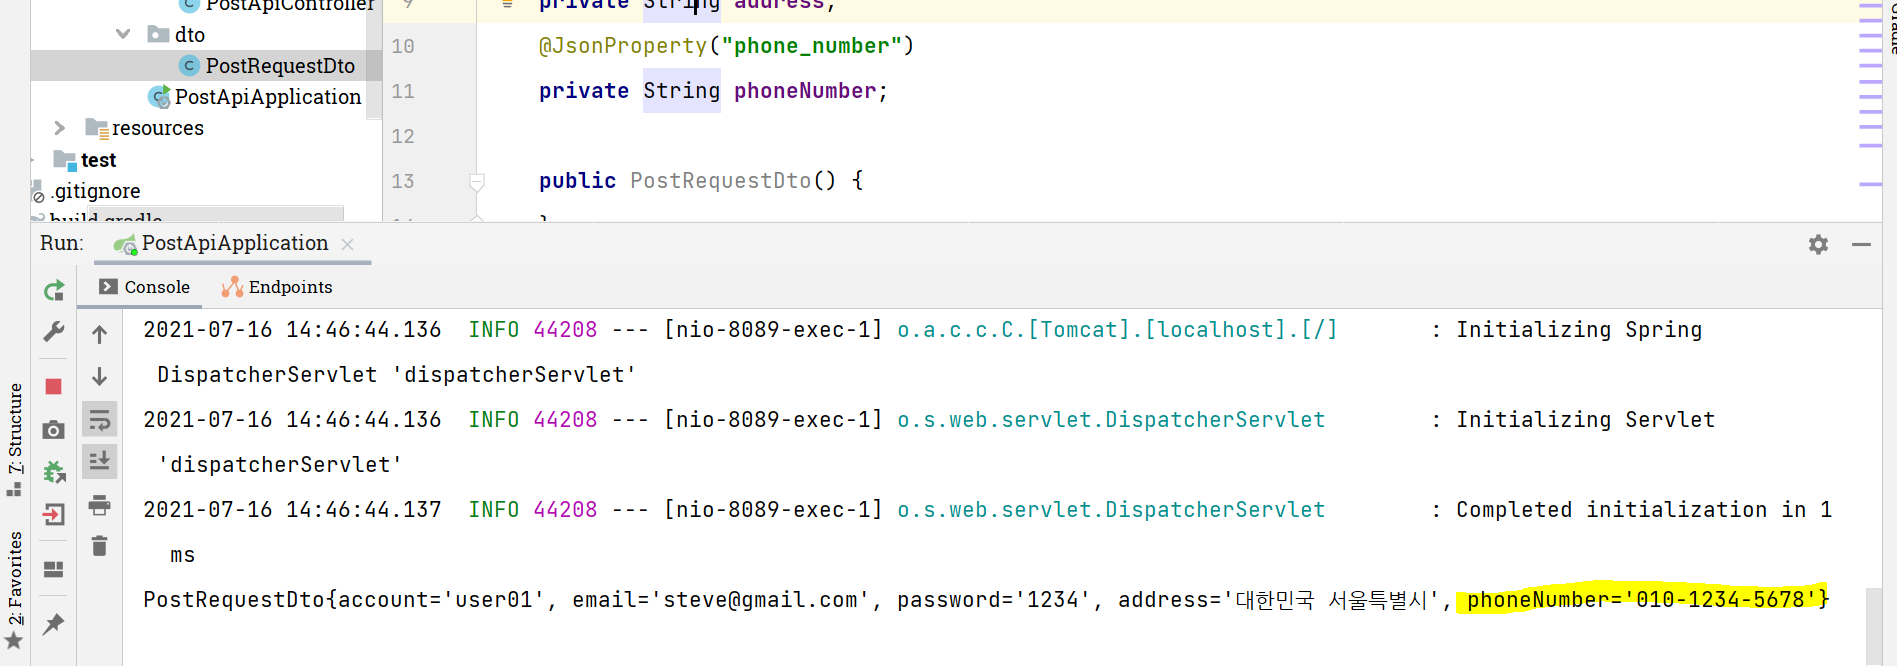
JsonProperty로 해당 필드를 매칭시켜주면 위와 같이 phoneNumber 필드에는 null값이 아닌 값이 제대로 들어오는 것을 확인해볼 수 있다!
- 약어로 표기하는 경우(예: OTP) 보통 대문자로 표기하는데, 이 역시도 JsonProperty로 해결할 수 있다!
@JsonProperty("OTP")
    private String OTP;

이렇게 지금 알아본 JsonProperty를 이용해서 매칭하게 되면 원하는 형태로 값을 받아볼 수 있다!
📌 BONUS 📌
- @RequestController : REST API 설정
- @RequestMapping : 리소스 설정! URI 설정! [요청메서드가 내부에서 다양하게 사용될 수 있기 때문에 메서드로 구분 가능]
- @PostMapping : POST 리소스 위치 설정
- @RequestBody : Request Body 부분 파싱 [서버로 데이터 전송]
- @PathVariable : URL(파일 경로) 의 경로 변수 파싱(name=a&~~) -GET방식과 유사하게 사용가능!
package com.example.post_api.controller;

import com.example.post_api.dto.PostRequestDto;
import org.springframework.web.bind.annotation.*;

import java.util.Map;

@RestController
@RequestMapping("/api")
public class PostApiController {

    @PostMapping("/post03/name/{name}/num/{num}")
    public String pathPost(@PathVariable String name, @PathVariable int num){
        String st = new StringBuilder("[name= "+name+", num= "+num+"]\n").toString();
        System.out.println(st);
        return st;
    }

}

- @JsonProperty : json 표기법에 대한 매칭
- @JsonNaming : 일괄적으로 클래스에 대해서 camel case인지 snake case인지 설정하는 것