1_[spring jpa]repository interface 메서드 실습(1)
Repository Interface 메서드 실습(1)
🌟 인메모리 데이터베이스의 특징 중 하나- 테스트가 완료되면 데이터도 메모리에서 내려옴
🌟기본적인 데이터를 만들어두고 조회하기 위한 목적으로 만들기 좋은 데이터 파일 : data.sql
- resources 폴더 하위에 해당 파일을 두면, JPA가 로딩을 할 때 자동으로 해당 쿼리를 한 번 실행해줌
우리는 테스트를 할 것이기 때문에 test 하위에 data.sql 파일을 만들어주자
1.경로도 동일해야 하기 때문에 test 폴더 하위에 resources 라는 디렉토리를 추가히주자
2.resources 하위에 data.sql 이라는 파일을 새로이 만들어주자
🌟 아래 페이지에서 언급된 것처럼, 몇가지 설정이 필요한데(아래 부분에서 추가되는 부분도 있다) 저번 시간에서 변경되는 부분이 있으니 주의해주자
에러를 잡은 코드는 여기에서 참조하자!
🌟 먼저, 지금은 아이디값을 직접 넣어주지만, 나중에는 시퀀스.nextval처럼 자동으로 생성될 수 있도록 할 것이기 때문에, call next value for hibernate_sequence 를 이용해주고, insert 작업을 data.sql에 넣어서 배치실행되도록 해주자
call next value for hibernate_sequence;
insert into user (`id`, `name`, `email`, `created_at`, `updated_at`) values (1, 'martin', 'martin@fastcampus.com', now(), now());

call next value for hibernate_sequence;
insert into user (`id`, `name`, `email`, `created_at`, `updated_at`) values (2, 'dennis', 'dennis@fastcampus.com', now(), now());

call next value for hibernate_sequence;
insert into user (`id`, `name`, `email`, `created_at`, `updated_at`) values (3, 'sophia', 'sophia@slowcampus.com', now(), now());

call next value for hibernate_sequence;
insert into user (`id`, `name`, `email`, `created_at`, `updated_at`) values (4, 'james', 'james@slowcampus.com', now(), now());

call next value for hibernate_sequence;
insert into user (`id`, `name`, `email`, `created_at`, `updated_at`) values (5, 'martin', 'martin@another.com', now(), now());
그리고 여기서 사용된 now()는 mySql의 문법으로 SYSDATE와 다르게, 하나의 트랜잭션 단위로 실행되고, 동일한 결과값을 반환한다는 특징을 갖는다
🌟(추가) 테이블명을 “USER(user)”로 하기 위해서 @Table(name="user")와 함께, 각 컬럼에 대해서 @Column(name=컬럼명)을 기입해주자!
package com.example.jpa_repository_interface.domain;

import lombok.*;

import javax.persistence.*;
import java.util.Date;

@Data
@NoArgsConstructor
@AllArgsConstructor
@RequiredArgsConstructor
@Entity
**@Table(name="user")**
public class User {
    @Id
    @GeneratedValue
    **@Column(name="id")**
    private Long id;
    @NonNull
    **@Column(name="name")**
    private String name;
    @NonNull
    **@Column(name="email")**
    private String email;
    **@Column(name="created_at")**
    private Date createdAt;
    **@Column(name="updated_at")**
    private Date updatedAt;
}
그 다음에는 설정파일인 build.gradle 에서 h2설정이 runtimeOnly 혹은 compileOnly였다면(기억이..) implementation으로 아래처럼 변경해주자(jdbc 는 혹시몰라서 의존성 추가해주었다)
plugins {
    id 'org.springframework.boot' version '2.5.3'
    id 'io.spring.dependency-management' version '1.0.11.RELEASE'
    id 'java'
}

group = 'com.example'
version = '0.0.1-SNAPSHOT'
sourceCompatibility = '1.8'

configurations {
    compileOnly {
        extendsFrom annotationProcessor
    }
}

repositories {
    mavenCentral()
}

dependencies {
    implementation 'org.springframework.boot:spring-boot-starter-data-jpa'
    implementation 'org.springframework.boot:spring-boot-starter-web'
    **implementation 'com.h2database:h2'**
    compileOnly 'org.projectlombok:lombok'
    runtimeOnly 'com.oracle.database.jdbc:ojdbc8'
    annotationProcessor 'org.projectlombok:lombok'
    testImplementation 'org.springframework.boot:spring-boot-starter-test'
}

test {
    useJUnitPlatform()
}
그리고 포트 등을 설정할 수 있는 application.yml을 아래처럼
spring.h2.console.enabled=truespring.datasource.url=처음 실행시 콘솔에서 발급받았던 jdbc urlspring.datasource.driver-class-name:org.h2.Driver: name까지 입력 후 Driver라고 뜨면 그걸 엔터로 탕! 선택하면 된다spring.sql.init.enabled=truespring.jpa.defer-datasource-initialization=true
를 설정해주자!
spring:
  h2:
    console:
      enabled: true
  datasource:
    url: yours
    driver-class-name: org.h2.Driver
  sql:
    init:
      enabled: true
spring.jpa.defer-datasource-initialization: true
server:
  port: 8089
그리고 테스트는 아래처럼 람다를 이용해서 forEach로 출력해주자
package com.example.jpa_repository_interface.repository;

import com.example.jpa_repository_interface.domain.User;
import org.junit.jupiter.api.Test;
import org.junit.jupiter.api.extension.ExtendWith;
import org.springframework.beans.factory.annotation.Autowired;
import org.springframework.beans.factory.annotation.Qualifier;
import org.springframework.boot.test.autoconfigure.orm.jpa.AutoConfigureTestEntityManager;
import org.springframework.boot.test.autoconfigure.orm.jpa.DataJpaTest;
import org.springframework.boot.test.context.SpringBootTest;
import org.springframework.test.context.ContextConfiguration;
import org.springframework.test.context.junit.jupiter.SpringExtension;
import org.springframework.transaction.annotation.Transactional;

import static org.junit.jupiter.api.Assertions.*;

//
@SpringBootTest
class UserRepositoryTest {

    @Autowired
    private UserRepository userRepository;

    @Test
    public void crud(){
      //  userRepository.save(new User());
    //    System.out.println(userRepository.findAll());
        userRepository.findAll().forEach(item->{
            System.out.println(item);
        });
    }

//    public void setUserRepository(UserRepository userRepository) {
//        this.userRepository = userRepository;
//    }
}
//혹은
userRepository.findAll().forEach(System.out::println);
//로도 동일한 결과를 볼 수 있다!
그러면 콘솔에서 아래와 같이 출력되는 것을 확인해볼 수 있다
User(id=1, name=martin, email=martin@fastcampus.com, createdAt=2021-08-11 23:53:25.771, updatedAt=2021-08-11 23:53:25.771)
User(id=2, name=dennis, email=dennis@fastcampus.com, createdAt=2021-08-11 23:53:25.784, updatedAt=2021-08-11 23:53:25.784)
User(id=3, name=sophia, email=sophia@slowcampus.com, createdAt=2021-08-11 23:53:25.785, updatedAt=2021-08-11 23:53:25.785)
User(id=4, name=james, email=james@slowcampus.com, createdAt=2021-08-11 23:53:25.785, updatedAt=2021-08-11 23:53:25.785)
User(id=5, name=martin, email=martin@another.com, createdAt=2021-08-11 23:53:25.786, updatedAt=2021-08-11 23:53:25.786)
📌실제 DB에서 어떻게 동작하는지를 살펴보고 싶다!📌
먼저, application.yml 파일을 건드려보자!
spring.jpa.show-sql=true 를 설정해주자
spring:
  h2:
    console:
      enabled: true
  datasource:
    url: your jdbc url
    driver-class-name: org.h2.Driver
  sql:
    init:
      enabled: true
  **jpa:
    show-sql: true #db실제 동작을 살펴보기 위함**
spring.jpa.defer-datasource-initialization: true

server:
  port: 8089
그리고, 추가로 저장까지 했을 때 어떻게 DB가 동작하는지도 보고싶어서 아래처럼 save를 추가해주자(테스트파일)
package com.example.jpa_repository_interface.repository;

import com.example.jpa_repository_interface.domain.User;
import org.junit.jupiter.api.Test;
import org.junit.jupiter.api.extension.ExtendWith;
import org.springframework.beans.factory.annotation.Autowired;
import org.springframework.beans.factory.annotation.Qualifier;
import org.springframework.boot.test.autoconfigure.orm.jpa.AutoConfigureTestEntityManager;
import org.springframework.boot.test.autoconfigure.orm.jpa.DataJpaTest;
import org.springframework.boot.test.context.SpringBootTest;
import org.springframework.test.context.ContextConfiguration;
import org.springframework.test.context.junit.jupiter.SpringExtension;
import org.springframework.transaction.annotation.Transactional;

import static org.junit.jupiter.api.Assertions.*;

//
@SpringBootTest
class UserRepositoryTest {

    @Autowired
    private UserRepository userRepository;

    @Test
    public void crud(){
        **userRepository.save(new User());**
        userRepository.findAll().forEach(System.out::println);
    }

}
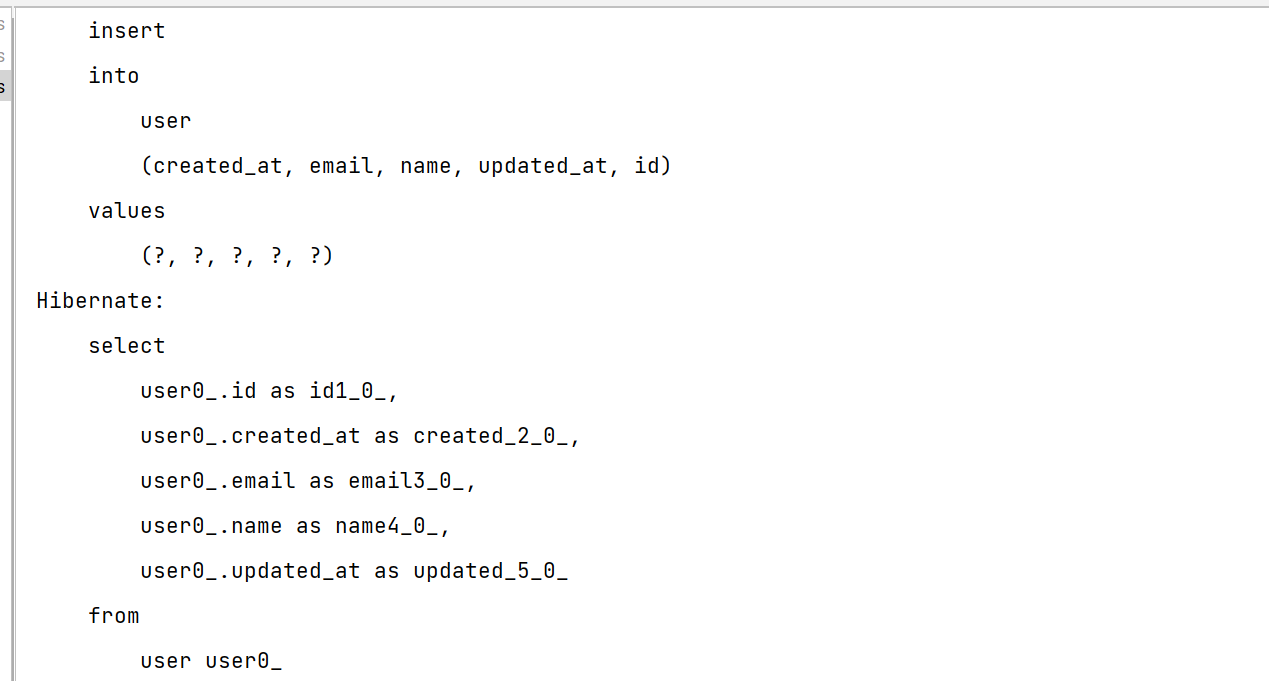
그러면 아래처럼(빨간펜으로 표시한 것은 findAll만 따로 실행해봤을 때 그 결과와 비교해서 표시한 것이다) Hibernate~ 가 출력되는 것을 확인해볼 수 있다

저장을 함으로써 Hibernate: call next value for hibernate_sequence와 Hibernate:insert into user 부분이 표시되는데, 후자는 jsp 서블릿에서 jdbc 중 PreparedStatement의 바인딩변수를 이용할 경우 가 연상된다!
그리고 조회 findAll 을 함으로써 Hibernate: select ~가 출력되는데 user0으로 표시되는 것은 generatedValue와 더불어 sequence의 영향인 듯 하다
이렇게 show-sql 을 설정함으로써 실제 작업을 로그로 남길 수 있다!
그리고 쿼리도 조금 더 정렬하기 위해서 spring.jpa.properties.hibernate.format_sql=true 를 추가해주고, 전반적으로 구조를 정리해주자
spring:
  h2:
    console:
      enabled: true
    url:your jdbc url
    driver-class-name: org.h2.Driver
  sql:
    init:
      enabled: true
  jpa:
    show-sql: true #db실제 동작을 살펴보기 위함
    **properties:
      hibernate:
        format_sql:
									true**
    defer-datasource-initialization: true
server:
  port: 8089
그러면 아래처럼 콘솔에 쿼리가 구조적으로 예쁘게 출력되는 것을 확인해볼 수 있다
이렇게, 어떤 쿼리 메서드를 부르면 어떤 쿼리가 생성되는지를 로그로 찍어보면 더 쉽게 이해해볼 수 있다
(아직 체감은 안되지만, 추후 릴레이션 학습에 많은 도움이 될 것이다!)
findAll() 메서드
- WHERE 절, 즉 조건이 없는 하에 모든 데이터에 대해서 조회
package com.example.jpa_repository_interface.repository;

import com.example.jpa_repository_interface.domain.User;
import org.junit.jupiter.api.Test;
import org.junit.jupiter.api.extension.ExtendWith;
import org.springframework.beans.factory.annotation.Autowired;
import org.springframework.beans.factory.annotation.Qualifier;
import org.springframework.boot.test.autoconfigure.orm.jpa.AutoConfigureTestEntityManager;
import org.springframework.boot.test.autoconfigure.orm.jpa.DataJpaTest;
import org.springframework.boot.test.context.SpringBootTest;
import org.springframework.test.context.ContextConfiguration;
import org.springframework.test.context.junit.jupiter.SpringExtension;
import org.springframework.transaction.annotation.Transactional;

import java.util.List;

import static org.junit.jupiter.api.Assertions.*;

//
@SpringBootTest
class UserRepositoryTest {

    @Autowired
    private UserRepository userRepository;

    @Test
    public void crud(){
        //userRepository.save(new User());
        //userRepository.findAll().forEach(System.out::println);
        List<User> users=userRepository.findAll();
        users.forEach(System.out::println);
    }

}
이번에는 위에서 findAll()만 따로 진행해보도록 하자
그러면 아래처럼 조건이 없이 전체출력되는 쿼리를 확인해볼 수 있다

findAll(Sort sort)
- 정렬 기준에 맞춰서 조회
- SELECT~ FROM~ORDER BY 와 유사
Sort 1 -Sort.by(Sort.Direction.DESC,기준) : 기준 열을 바탕으로 정렬
package com.example.jpa_repository_interface.repository;

import com.example.jpa_repository_interface.domain.User;
import org.junit.jupiter.api.Test;
import org.junit.jupiter.api.extension.ExtendWith;
import org.springframework.beans.factory.annotation.Autowired;
import org.springframework.beans.factory.annotation.Qualifier;
import org.springframework.boot.test.autoconfigure.orm.jpa.AutoConfigureTestEntityManager;
import org.springframework.boot.test.autoconfigure.orm.jpa.DataJpaTest;
import org.springframework.boot.test.context.SpringBootTest;
import org.springframework.data.domain.Sort;
import org.springframework.test.context.ContextConfiguration;
import org.springframework.test.context.junit.jupiter.SpringExtension;
import org.springframework.transaction.annotation.Transactional;

import java.util.List;

import static org.junit.jupiter.api.Assertions.*;

//
@SpringBootTest
class UserRepositoryTest {

    @Autowired
    private UserRepository userRepository;

    @Test
    public void crud(){
        //userRepository.save(new User());
        //userRepository.findAll().forEach(System.out::println);
        **List<User> users=userRepository.findAll(Sort.by(Sort.Direction.DESC,"name"));**
        users.forEach(System.out::println);
    }

}
위의 경우, by의 파라미터로 direction과 기준이 필요하기 때문에, name을 기준으로 내림차순되어 아래와 같이 출력되는 것을 확인해볼 수 있다
.PNG?raw=true)
Sort 2-Sort.by( Sort.Direction.fromString("asc/desc"), 기준) : 기준 컬럼을 기준으로 문자열에 대해서 오름차순 혹은 내림차순
package com.example.jpa_repository_interface.repository;

import com.example.jpa_repository_interface.domain.User;
import org.junit.jupiter.api.Test;
import org.junit.jupiter.api.extension.ExtendWith;
import org.springframework.beans.factory.annotation.Autowired;
import org.springframework.beans.factory.annotation.Qualifier;
import org.springframework.boot.test.autoconfigure.orm.jpa.AutoConfigureTestEntityManager;
import org.springframework.boot.test.autoconfigure.orm.jpa.DataJpaTest;
import org.springframework.boot.test.context.SpringBootTest;
import org.springframework.data.domain.Sort;
import org.springframework.test.context.ContextConfiguration;
import org.springframework.test.context.junit.jupiter.SpringExtension;
import org.springframework.transaction.annotation.Transactional;

import java.util.List;

import static org.junit.jupiter.api.Assertions.*;

//
@SpringBootTest
class UserRepositoryTest {

    @Autowired
    private UserRepository userRepository;

    @Test
    public void crud(){
        //userRepository.save(new User());
        //userRepository.findAll().forEach(System.out::println);
        **List<User> users=userRepository.findAll(Sort.by(Sort.Direction.fromString("desc"),"email"));
        users.forEach(System.out::println);**
    }

}
위의 경우는 Sort.Direction.fromString을 이용해서 값으로 “desc”를 주고
기준값으로 email을 주어
이메일 컬럼을 기준으로 문자열에 대해서 내림차순 정렬을 하게 지정하였다

.PNG?raw=true)
findAllById(Iterable)
- Lists를 이용하여 iterable에 접근
- Lists를 왜 쓰냐? ▶️ 간편하니까! 안쓴다면 아래처럼 어레이리스트를 만들고 아이디를 추가하고, 매개변수로 넣어주어야 하는데,
test 디렉토리에서 사용가능한 assertj의 이 기능을 통해서 보다 간편하게 작성하여 실행할 수 있다!
List<Long> ids= new ArrayList<>();
ids.add(1L);
ids.add(2L);
ids.add(3L);
List<User> users= userRepository.findAllById(ids);
- 아래처럼 Lists의 static 메서드인
new ArrayList를 이용하면 어레이리스트를 만들어 바로 적용가능하다!
List<User> users= userRepository.findAllById(Lists.newArrayList(1l,2l,3l));
그리고 위의 경우는, 아이디값이 1,2,3인 레코드를 가져오겠다는 의미이다!(resultset)
package com.example.jpa_repository_interface.repository;

import com.example.jpa_repository_interface.domain.User;
import org.assertj.core.util.Lists;
import org.junit.jupiter.api.Test;
import org.junit.jupiter.api.extension.ExtendWith;
import org.springframework.beans.factory.annotation.Autowired;
import org.springframework.beans.factory.annotation.Qualifier;
import org.springframework.boot.test.autoconfigure.orm.jpa.AutoConfigureTestEntityManager;
import org.springframework.boot.test.autoconfigure.orm.jpa.DataJpaTest;
import org.springframework.boot.test.context.SpringBootTest;
import org.springframework.data.domain.Sort;
import org.springframework.test.context.ContextConfiguration;
import org.springframework.test.context.junit.jupiter.SpringExtension;
import org.springframework.transaction.annotation.Transactional;

import java.util.List;

import static org.junit.jupiter.api.Assertions.*;

//
@SpringBootTest
class UserRepositoryTest {

    @Autowired
    private UserRepository userRepository;

    @Test
    public void crud(){
        List<User> users= **userRepository.findAllById(Lists.newArrayList(1l,2l,3l));**
        //List<Long> ids =new ArrayList();이용하는 것보다 간편
        users.forEach(System.out::println);
    }

}
그러면 아래처럼 WHERE 조건에서 IN을 통해서 아이디 범위를 좁혀서 선택하여 보여주게 된다
.PNG?raw=true)
-select%20%EA%B2%B0%EA%B3%BC.PNG?raw=true)
saveAll(Iterable)
- 여러 dto 객체를 일괄 저장하기
- 이번에도 Lists를 이용하면 저장할 때에 용이!
package com.example.jpa_repository_interface.repository;

import com.example.jpa_repository_interface.domain.User;
import org.assertj.core.util.Lists;
import org.junit.jupiter.api.Test;
import org.junit.jupiter.api.extension.ExtendWith;
import org.springframework.beans.factory.annotation.Autowired;
import org.springframework.beans.factory.annotation.Qualifier;
import org.springframework.boot.test.autoconfigure.orm.jpa.AutoConfigureTestEntityManager;
import org.springframework.boot.test.autoconfigure.orm.jpa.DataJpaTest;
import org.springframework.boot.test.context.SpringBootTest;
import org.springframework.data.domain.Sort;
import org.springframework.test.context.ContextConfiguration;
import org.springframework.test.context.junit.jupiter.SpringExtension;
import org.springframework.transaction.annotation.Transactional;

import java.util.List;

import static org.junit.jupiter.api.Assertions.*;

//
@SpringBootTest
class UserRepositoryTest {

    @Autowired
    private UserRepository userRepository;

    @Test
    public void crud(){

        User user1= new User("jack","jack@fastcampus.com");
        User user2=new User("steve","steve@fastcampus.com");
        **userRepository.saveAll(Lists.newArrayList(user1,user2));**

        List<User> users= userRepository.findAll();
        users.forEach(System.out::println);
    }

}
이번에는 RequiredArgsConstructor를 이용해서 user1, user2 객체를 만들어주고
이를 Lists.newArrayList(user1,user2)에 실어서 저장해준 후 확인해보도록 하자!
.gif?raw=true)
그러면 spring.jpa.show-sql=true 설정과 spring.jpa.properties.hibernate.format_sql=true 설정을 통해서 먼저 save될 때 나타나는 시퀀스 부분과 insert 부분이 예쁘게 확인되고 🧡 그리고 1~5번 아이디의 기존 레코드 외에 새로이 추가된 레코드들이 확인되는 것을 볼 수 있다 🧡
save(Entity)
- 엔티티 한 개만 저장 ❤
- saveAll과 다르게 한 개의 엔티티만 저장하여 반영됨을 확인해볼 수 있다!
package com.example.jpa_repository_interface.repository;

import com.example.jpa_repository_interface.domain.User;
import org.assertj.core.util.Lists;
import org.junit.jupiter.api.Test;
import org.junit.jupiter.api.extension.ExtendWith;
import org.springframework.beans.factory.annotation.Autowired;
import org.springframework.beans.factory.annotation.Qualifier;
import org.springframework.boot.test.autoconfigure.orm.jpa.AutoConfigureTestEntityManager;
import org.springframework.boot.test.autoconfigure.orm.jpa.DataJpaTest;
import org.springframework.boot.test.context.SpringBootTest;
import org.springframework.data.domain.Sort;
import org.springframework.test.context.ContextConfiguration;
import org.springframework.test.context.junit.jupiter.SpringExtension;
import org.springframework.transaction.annotation.Transactional;

import java.util.List;

import static org.junit.jupiter.api.Assertions.*;

//
@SpringBootTest
class UserRepositoryTest {

    @Autowired
    private UserRepository userRepository;

    @Test
    public void crud(){
        User user1= new User("jack","jack@fastcampus.com");
        User user2=new User("steve","steve@fastcampus.com");
     //   userRepository.saveAll(Lists.newArrayList(user1,user2));
        **userRepository.save(user2);**
        List<User> users= userRepository.findAll();
        users.forEach(System.out::println);
    }

}
.PNG?raw=true)
%20%EA%B2%B0%EA%B3%BC%20%EC%A1%B0%ED%9A%8C.PNG?raw=true)
위와 같이 역시나, 한개만 삽입되는 것을 확인해볼 수 있고, 데이터베이스 로그를 통해서 시퀀스를 한번만 부르고, insert도 한번 작동됨을 확인해볼 수 있다
🌟 📌그런데 주의할 점은! 우리가 call next value hibernate_sequence를 통해서, 우리가 아이디값을 넣지 않아도 자동 생성되어 적용되었다는 점이다! 만약, 우리가 이 다음값을 부르는 부분을 붙여놓지 않았다면, Unique index or primary key violation:"PRIMARY KEY ON~" 과 같은 기본키 제약조건 위배 에러를 맛보게 될 것이다!
**--call next value for hibernate_sequence;**
insert into user (`id`, `name`, `email`, `created_at`, `updated_at`) values (1, 'martin', 'martin@fastcampus.com', now(), now());

--call next value for hibernate_sequence;
insert into user (`id`, `name`, `email`, `created_at`, `updated_at`) values (2, 'dennis', 'dennis@fastcampus.com', now(), now());

--call next value for hibernate_sequence;
insert into user (`id`, `name`, `email`, `created_at`, `updated_at`) values (3, 'sophia', 'sophia@slowcampus.com', now(), now());

--call next value for hibernate_sequence;
insert into user (`id`, `name`, `email`, `created_at`, `updated_at`) values (4, 'james', 'james@slowcampus.com', now(), now());

--call next value for hibernate_sequence;
insert into user (`id`, `name`, `email`, `created_at`, `updated_at`) values (5, 'martin', 'martin@another.com', now(), now());

그런데, 만약 아래와 같이 시퀀스는 없는데, 아래처럼 1부터 시작하지 않는다면 어떨까?
**--call next value for hibernate_sequence;**
insert into user (`id`, `name`, `email`, `created_at`, `updated_at`) values (**6**, 'martin', 'martin@fastcampus.com', now(), now());

--call next value for hibernate_sequence;
insert into user (`id`, `name`, `email`, `created_at`, `updated_at`) values (2, 'dennis', 'dennis@fastcampus.com', now(), now());

--call next value for hibernate_sequence;
insert into user (`id`, `name`, `email`, `created_at`, `updated_at`) values (3, 'sophia', 'sophia@slowcampus.com', now(), now());

--call next value for hibernate_sequence;
insert into user (`id`, `name`, `email`, `created_at`, `updated_at`) values (4, 'james', 'james@slowcampus.com', now(), now());

--call next value for hibernate_sequence;
insert into user (`id`, `name`, `email`, `created_at`, `updated_at`) values (5, 'martin', 'martin@another.com', now(), now());
이 경우에는, 시퀀스가 없어서 당연히 1이 들어가게 되는데(generatedValue), 지금 아이디가 1인 레코드가 없기 때문에 충돌없이 새로이 추가되는 레코드가 삽입될 수 있다!
이렇게 위의 두 케이스를 비교해봤을 때, 데이터를 삽입할 때 시퀀스나 최댓값의 다음값을 이용하는 것의 중요성이 바로 기본키 제약조건 위배로 인한 충돌 문제와 직결됨을 확인해볼 수 있다
getOne(ID id)
📌 getOne과 findById의 차이점 - getOne은 엔티티를 받아오고 findById는 Optional 타입으로 받아온다 + 실제 동작도 조금 다르다!
▶️ findById는 null값이더라도, 예외를 발생시키지 않고서도, 비어있음을 표시할 수 있도록 Optional로 지원
고유값으로엔티티를 반환받아 오는 메서드
🍴Optional 참고 글🍴
https://esoongan.tistory.com/95#:~:text=Optional는 null이,를 처리할 수 있다.
package com.example.jpa_repository_interface.repository;

import com.example.jpa_repository_interface.domain.User;
import org.assertj.core.util.Lists;
import org.junit.jupiter.api.Test;
import org.junit.jupiter.api.extension.ExtendWith;
import org.springframework.beans.factory.annotation.Autowired;
import org.springframework.beans.factory.annotation.Qualifier;
import org.springframework.boot.test.autoconfigure.orm.jpa.AutoConfigureTestEntityManager;
import org.springframework.boot.test.autoconfigure.orm.jpa.DataJpaTest;
import org.springframework.boot.test.context.SpringBootTest;
import org.springframework.data.domain.Sort;
import org.springframework.test.context.ContextConfiguration;
import org.springframework.test.context.junit.jupiter.SpringExtension;
import org.springframework.transaction.annotation.Transactional;

import java.util.List;

import static org.junit.jupiter.api.Assertions.*;

//
@SpringBootTest
class UserRepositoryTest {

    @Autowired
    private UserRepository userRepository;

    @Test
    public void crud(){
       User user =userRepository.getOne(1L);
       System.out.println(user);
    }

}
getOne을 위와 같이 1L이라는 고유값으로 찾아내려고 하면(ID는 고유값 PK)
T getOne(ID id);
could not initialize proxy [com.example.jpa_repository_interface.domain.User#1] - no Session
org.hibernate.LazyInitializationException: could not initialize proxy [com.example.jpa_repository_interface.domain.User#1] - no Session
	at org.hibernate.proxy.AbstractLazyInitializer.initialize(AbstractLazyInitializer.java:170)
	at org.hibernate.proxy.AbstractLazyInitializer.getImplementation(AbstractLazyInitializer.java:310)
	at org.hibernate.proxy.pojo.bytebuddy.ByteBuddyInterceptor.intercept(ByteBuddyInterceptor.java:45)
	at org.hibernate.proxy.ProxyConfiguration$InterceptorDispatcher.intercept(ProxyConfiguration.java:95)
위와 같이 세션이 없어서 proxy 초기화를 할수 없다는 에러를 마주하게 된다
이렇게 , getOne을 하고 출력하기까지 유지시켜주기 위해서는 @Transactional 을 선언해주면 세션이 유지될 수 있다!
package com.example.jpa_repository_interface.repository;

import com.example.jpa_repository_interface.domain.User;
import org.assertj.core.util.Lists;
import org.junit.jupiter.api.Test;
import org.junit.jupiter.api.extension.ExtendWith;
import org.springframework.beans.factory.annotation.Autowired;
import org.springframework.beans.factory.annotation.Qualifier;
import org.springframework.boot.test.autoconfigure.orm.jpa.AutoConfigureTestEntityManager;
import org.springframework.boot.test.autoconfigure.orm.jpa.DataJpaTest;
import org.springframework.boot.test.context.SpringBootTest;
import org.springframework.data.domain.Sort;
import org.springframework.test.context.ContextConfiguration;
import org.springframework.test.context.junit.jupiter.SpringExtension;
import org.springframework.transaction.annotation.Transactional;

import java.util.List;

import static org.junit.jupiter.api.Assertions.*;

//
@SpringBootTest
📌**@Transactional**📌
class UserRepositoryTest {

    @Autowired
    private UserRepository userRepository;

    @Test
    public void crud(){
    📌   **User user =userRepository.getOne(1L);**📌
       System.out.println(user);
    }

}
그러면 그 결과, findById와 유사한 결과가 보이지만 차이점은 기능적으로
- 세션 유지를 위해서
@Transactional이 필요 - 엔티티를 반환(메서드 정의에서 확인 가능)
한다는 점이 존재한다는 것을 확인해볼 수 있었다
🌟 getOne은 엔티티에 대해서 lazy한 로딩을 지원(lazy 패치 지원)
findById(ID id)
고유값으로Optional 값을 받아오는 메서드
package com.example.jpa_repository_interface.repository;

import com.example.jpa_repository_interface.domain.User;
import org.assertj.core.util.Lists;
import org.junit.jupiter.api.Test;
import org.junit.jupiter.api.extension.ExtendWith;
import org.springframework.beans.factory.annotation.Autowired;
import org.springframework.beans.factory.annotation.Qualifier;
import org.springframework.boot.test.autoconfigure.orm.jpa.AutoConfigureTestEntityManager;
import org.springframework.boot.test.autoconfigure.orm.jpa.DataJpaTest;
import org.springframework.boot.test.context.SpringBootTest;
import org.springframework.data.domain.Sort;
import org.springframework.test.context.ContextConfiguration;
import org.springframework.test.context.junit.jupiter.SpringExtension;
import org.springframework.transaction.annotation.Transactional;

import java.util.List;
import java.util.Optional;

import static org.junit.jupiter.api.Assertions.*;

//
@SpringBootTest
//@Transactional
class UserRepositoryTest {

    @Autowired
    private UserRepository userRepository;

    @Test
    public void crud(){
      // User user =userRepository.getOne(1L);
       📌 **Optional<User>**📌 **user= userRepository.**📌**findById(1L);**📌
        System.out.println(user);
    }

}
먼저 눈에 띄는 것은
- 반환형태가
Optional로 랩핑되어있는 형태라는 점 ▶️ 별도 처리가 필요! - 세션 유지를 위한
@Transactional이 필요없다
라는 부분이다
❓ 그러면 없는 고유값으로 조회를 한다면, finddById는 어떨까?
예측을 해본다면, Optional은 null에 대해서 비어있다고 표시를 해주지, null pointer exception을 내지 않기 때문에 비어있다고 표시해줄 것같다!
package com.example.jpa_repository_interface.repository;

import com.example.jpa_repository_interface.domain.User;
import org.assertj.core.util.Lists;
import org.junit.jupiter.api.Test;
import org.junit.jupiter.api.extension.ExtendWith;
import org.springframework.beans.factory.annotation.Autowired;
import org.springframework.beans.factory.annotation.Qualifier;
import org.springframework.boot.test.autoconfigure.orm.jpa.AutoConfigureTestEntityManager;
import org.springframework.boot.test.autoconfigure.orm.jpa.DataJpaTest;
import org.springframework.boot.test.context.SpringBootTest;
import org.springframework.data.domain.Sort;
import org.springframework.test.context.ContextConfiguration;
import org.springframework.test.context.junit.jupiter.SpringExtension;
import org.springframework.transaction.annotation.Transactional;

import java.util.List;
import java.util.Optional;

import static org.junit.jupiter.api.Assertions.*;

//
@SpringBootTest
//@Transactional
class UserRepositoryTest {

    @Autowired
    private UserRepository userRepository;

    @Test
    public void crud(){
      // User user =userRepository.getOne(1L);
        **Optional<User> user= userRepository.findById(10L);//없는 아이디로 조회하면?**
        System.out.println(user);
    }

}
%2097e5f94069ea4ec0a3684192c8cbab2a/Untitled.png)
그러면, Optional.empty 라고 표시해주는 것을 확인해볼 수 있다!
그런데 실제로 사용하려면 앞서 언급했듯이 처리를 해주어야 하는데, 이를 아래와 같이 진행해보자
Optional 클래스의 orElse 메서드를 이용해서 null이면 파라미터로 전달받은 인자값을 반환 하고, 아니면 값을 반환하도록 처리해보자
그러면 아래처럼 더이상 Optional로 받지 않고 User로 받을 수 있다!
//Optional<T>
public T orElse(T other) {
        return value != null ? value : other;
}
package com.example.jpa_repository_interface.repository;

import com.example.jpa_repository_interface.domain.User;
import org.assertj.core.util.Lists;
import org.junit.jupiter.api.Test;
import org.junit.jupiter.api.extension.ExtendWith;
import org.springframework.beans.factory.annotation.Autowired;
import org.springframework.beans.factory.annotation.Qualifier;
import org.springframework.boot.test.autoconfigure.orm.jpa.AutoConfigureTestEntityManager;
import org.springframework.boot.test.autoconfigure.orm.jpa.DataJpaTest;
import org.springframework.boot.test.context.SpringBootTest;
import org.springframework.data.domain.Sort;
import org.springframework.test.context.ContextConfiguration;
import org.springframework.test.context.junit.jupiter.SpringExtension;
import org.springframework.transaction.annotation.Transactional;

import java.util.List;
import java.util.Optional;

import static org.junit.jupiter.api.Assertions.*;

//
@SpringBootTest
//@Transactional
class UserRepositoryTest {

    @Autowired
    private UserRepository userRepository;

    @Test
    public void crud(){
      // User user =userRepository.getOne(1L);
        **User user= userRepository.findById(10L).orElse(null);**
        System.out.println(user);
    }

}
그러면 아래처럼 이번에는 Optional.empty가 아닌 orElse의 인자값인 null이 보여지는 것을 확인해볼 수 있다
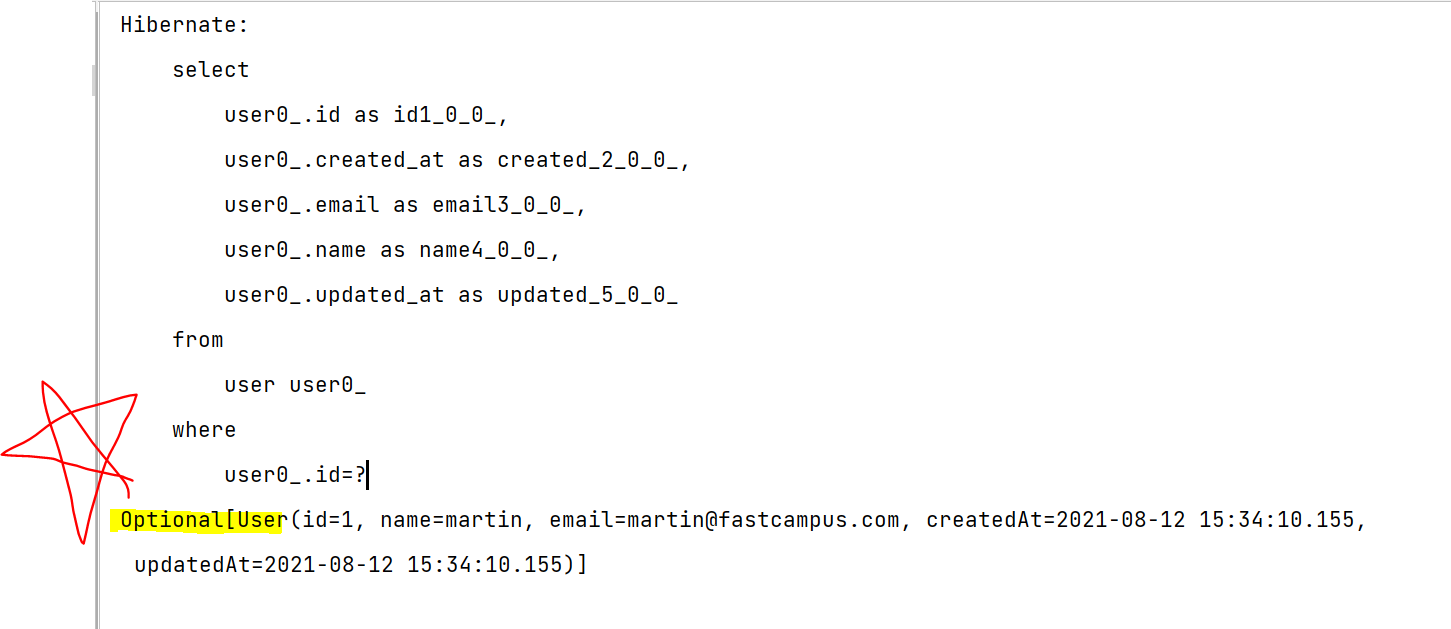
고유값이 존재하는 적절한 값이라면?
User user= userRepository.findById(1L).orElse(null);
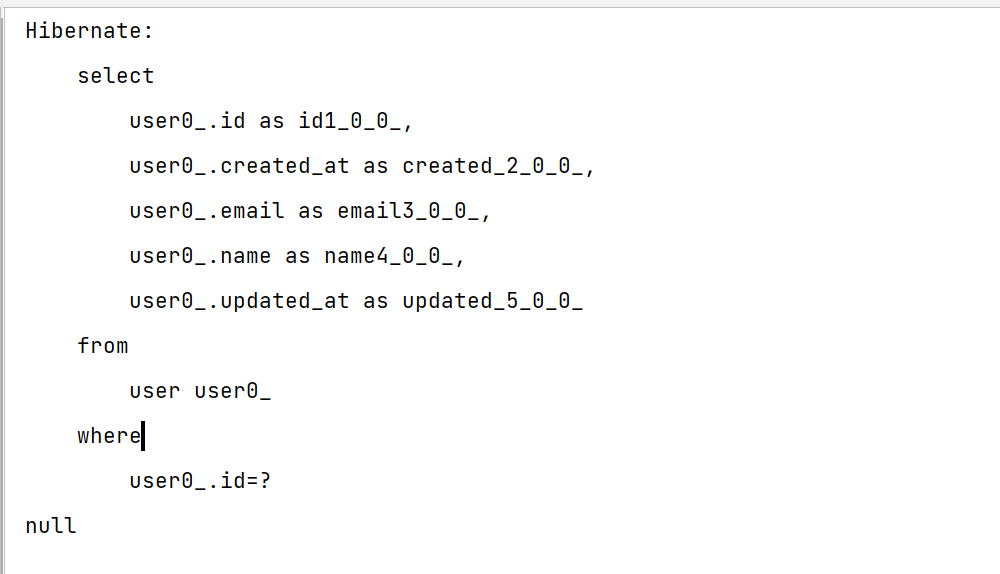
이제는 아래처럼 User(~)처럼 표시되는 것을 확인해볼 수 있다
Hibernate:
    select
        user0_.id as id1_0_0_,
        user0_.created_at as created_2_0_0_,
        user0_.email as email3_0_0_,
        user0_.name as name4_0_0_,
        user0_.updated_at as updated_5_0_0_
    from
        user user0_
    where
        user0_.id=?
User(id=1, name=martin, email=martin@fastcampus.com, createdAt=2021-08-12 15:55:05.726, updatedAt=2021-08-12 15:55:05.726)
▶️ 추후 LAZY, EAGER FETCH 전략을 학습하면 시선이 달라질 수도??
그래도 잠깐 맛만 본다면
/*
 * Copyright 2008-2021 the original author or authors.
 *
 * Licensed under the Apache License, Version 2.0 (the "License");
 * you may not use this file except in compliance with the License.
 * You may obtain a copy of the License at
 *
 *      https://www.apache.org/licenses/LICENSE-2.0
 *
 * Unless required by applicable law or agreed to in writing, software
 * distributed under the License is distributed on an "AS IS" BASIS,
 * WITHOUT WARRANTIES OR CONDITIONS OF ANY KIND, either express or implied.
 * See the License for the specific language governing permissions and
 * limitations under the License.
 */
package org.springframework.data.jpa.repository.support;

import static org.springframework.data.jpa.repository.query.QueryUtils.*;

import java.util.ArrayList;
import java.util.Collection;
import java.util.Collections;
import java.util.HashMap;
import java.util.List;
import java.util.Map;
import java.util.Optional;

import javax.persistence.EntityManager;
import javax.persistence.LockModeType;
import javax.persistence.NoResultException;
import javax.persistence.Parameter;
import javax.persistence.Query;
import javax.persistence.TypedQuery;
import javax.persistence.criteria.CriteriaBuilder;
import javax.persistence.criteria.CriteriaQuery;
import javax.persistence.criteria.Order;
import javax.persistence.criteria.ParameterExpression;
import javax.persistence.criteria.Path;
import javax.persistence.criteria.Predicate;
import javax.persistence.criteria.Root;

import org.springframework.dao.EmptyResultDataAccessException;
import org.springframework.data.domain.Example;
import org.springframework.data.domain.Page;
import org.springframework.data.domain.PageImpl;
import org.springframework.data.domain.Pageable;
import org.springframework.data.domain.Sort;
import org.springframework.data.jpa.convert.QueryByExamplePredicateBuilder;
import org.springframework.data.jpa.domain.Specification;
import org.springframework.data.jpa.provider.PersistenceProvider;
import org.springframework.data.jpa.repository.EntityGraph;
import org.springframework.data.jpa.repository.query.EscapeCharacter;
import org.springframework.data.jpa.repository.query.QueryUtils;
import org.springframework.data.jpa.repository.support.QueryHints.NoHints;
import org.springframework.data.repository.support.PageableExecutionUtils;
import org.springframework.data.util.ProxyUtils;
import org.springframework.data.util.Streamable;
import org.springframework.lang.Nullable;
import org.springframework.stereotype.Repository;
import org.springframework.transaction.annotation.Transactional;
import org.springframework.util.Assert;

/**
 * Default implementation of the {@link org.springframework.data.repository.CrudRepository} interface. This will offer
 * you a more sophisticated interface than the plain {@link EntityManager} .
 *
 * @author Oliver Gierke
 * @author Eberhard Wolff
 * @author Thomas Darimont
 * @author Mark Paluch
 * @author Christoph Strobl
 * @author Stefan Fussenegger
 * @author Jens Schauder
 * @author David Madden
 * @author Moritz Becker
 * @author Sander Krabbenborg
 * @author Jesse Wouters
 * @param <T> the type of the entity to handle
 * @param <ID> the type of the entity's identifier
 */
@Repository
@Transactional(readOnly = true)
public class SimpleJpaRepository<T, ID> implements JpaRepositoryImplementation<T, ID> {

	private static final String ID_MUST_NOT_BE_NULL = "The given id must not be null!";

	private final JpaEntityInformation<T, ?> entityInformation;
	private final EntityManager em;
	private final PersistenceProvider provider;

	private @Nullable CrudMethodMetadata metadata;
	private EscapeCharacter escapeCharacter = EscapeCharacter.DEFAULT;

	/*
	 * (non-Javadoc)
	 * @see org.springframework.data.repository.CrudRepository#findById(java.io.Serializable)
	 */
	@Override
	public Optional<T> findById(ID id) {

		Assert.notNull(id, ID_MUST_NOT_BE_NULL);

		Class<T> domainType = getDomainClass();

		if (metadata == null) {
			return Optional.ofNullable(**em.find(domainType, id)**);
		}

		LockModeType type = metadata.getLockModeType();

		Map<String, Object> hints = new HashMap<>();
		getQueryHints().withFetchGraphs(em).forEach(hints::put);

		return Optional.ofNullable(type == null ? em.find(domainType, id, hints) : em.find(domainType, id, type, hints));
	}

	@Deprecated
	@Override
	public T getOne(ID id) {

		Assert.notNull(id, ID_MUST_NOT_BE_NULL);
		**return em.getReference(getDomainClass(), id);**
	}
먼저 getOne을 보면,
- em은 entityManager를 의미하고
- getReference로 도메인 클래스를 가져오는데, 이것이 바로
proxy가 되는 것이고, 이getReference를 갖고 있고 실제 값을 구하는 시점에 값을 가져오는 것이 바로LAZY FETCH이다
위와 같은 특징을 잠깐 정리해볼 수 있다
그리고 findById를 보면
- find를 이용해서 직접 엔티티 객체를 가져와서 Optional로 감싸는 형태
를 보이고 있다
이렇게 직접 엔티티 객체를 가져오는 개념이 EAGER FETCH 이다