1_[spring]get api
GET API 작성하기
- @getMapping 어노테이션 사용
🌟ctrl키를 누른채 getMapping을 클릭하면 네이밍할 수 있는 범위를 확인할 수 있다!
그리고 어떤 변수에 대한 이름을 지은 것인지는
path=”/hello”
와 같이 명시적으로도 표현가능하지만
“/hello”
와 같이 표기가능하다!
package com.hello.helloworldapi.controller;

import org.springframework.web.bind.annotation.GetMapping;
import org.springframework.web.bind.annotation.RequestMapping;
import org.springframework.web.bind.annotation.RestController;

@RestController
@RequestMapping("/api/get")
public class GetApiController {

    @GetMapping(path="/hello")
    public String hello(){
        return "get hello";
    }


}
- 이번 방식은 구 버전인데, RequestMapping 어노테이션을 이용하는 방법이다. 명시적으로 어떤 것에 대한 매핑이 이루어질 지를 기재하지 않으면 PUT/DELETE 등 모든 메서드가 작동될 수 있다
package com.hello.helloworldapi.controller;

import org.springframework.web.bind.annotation.GetMapping;
import org.springframework.web.bind.annotation.RequestMapping;
import org.springframework.web.bind.annotation.RequestMethod;
import org.springframework.web.bind.annotation.RestController;

@RestControlle
@RequestMapping("/api/get")
public class GetApiController {

    //@RequestMapping("/hi") //get/post/put/delete 등 모든 메서드가 작동되게 됨
    @RequestMapping(path="/hi", method= RequestMethod.GET)
    public String hi(){
        return "hi";
    }

}
이러한 2번 방식의 path와 method가 합쳐진 형태가 바로 1번 형태가 된다
1번 방식은 이전에 확인해보았기 때문에 2번 방식을 확인해보면

응답이 잘 받아지는 것을 확인해볼 수 있다
- @PathVariable을 이용한 변화하는 값 구간에 대한 처리
🌟 그런데 예를 들어서 현재 100번째 사용자를 조회해서
/users/100
이었는데, 만약 200번째 사용자를 조회한다면
/users/200
이 된다! 즉, 값을 나타내는 뒷 부분이 변경된다
http://clearpal7.blogspot.com/2016/07/pathvariable.html
이러한 변화하는 값구간을 path variable으로 받을 수 있다!
위의 이러한 경우를 한 번 연습해보자
핵심은
- (1) 경로 뒤에 변화하는 값을 의미하는 변수명을 기입해준다 -예: 이름을 변경 - 이름 변수는 name으로 지정한다고 가정 ➡️ http://localhost:8089/api/get/path_variable/{name} ▶️ @GetMapping(“/path_variable/{name}
➡️ http://localhost:8089/api/get/name/{var} ▶️ @RequestMapping(path=”/name/{var}” , method=RequestMethod.GET)
- (2) 메서드의 파라미터로 @PathVariable 파라미터_타입 변동하는_필드의_이름 예)@PathVariable String name
🌟 path에 지정한 변수이름과 PathVariable 변수의 이름은 같아야 한다!!
{name}이면 @PathVariable String name으로 일치!
package com.hello.helloworldapi.controller;

import org.springframework.web.bind.annotation.*;

@RestController
@RequestMapping("/api/get")
public class GetApiController {
    //http://localhost:8089/api/get/path_variable/{name} :변화하는 값
    @GetMapping("/path_variable/{name}")
    public String pathVariable(@PathVariable String name){
        System.out.println("path variable로 받은 값: "+name);
        return name;
    }

    @RequestMapping(path="/name/{var}", method=RequestMethod.GET)
    public String variable(@PathVariable String var){
        System.out.println("var: "+var);
        return var;
    }
}

- 파라미터로 이용할 이름이 PathVariable과 동일하게 작성되어야만 하는 경우(아래의 예시처럼) 등과 같은 상황으로 PathVariable의 이름과 다르게 매핑을 해야할 경우에는 📌PathVariable(name={매핑에 정의해준 이름}) 자료형 다른_변수명 으로 이용하자!
@GetMapping(“/path_variable/{name}”) public String pathVariable(@PathVariable(name=”name”) String pathName)
하지만, 파라미터로 name을 또 사용하고자 한다면 어떻게 피해갈 수 있을까?
기존의 path variable을 우리가 사용하고자 한 변동값을 가리키는 name속성인 “name”과 매칭해주어야 하기 때문에 @PathVariable(name=”name”) String pathName으로 바꿔주면, PathVariable이 아닌 변수는 String name으로 사용 가능하다
package com.hello.helloworldapi.controller;

import org.springframework.web.bind.annotation.*;

@RestController
@RequestMapping("/api/get")
public class GetApiController {

    //http://localhost:8089/api/get/path_variable/{name} :변화하는 값
    @GetMapping("/path_variable/{name}")
    public String pathVariable(@PathVariable(name="name") String pathName,String name){
        System.out.println("path variable로 받은 값: "+pathName);
        return pathName;
    }

}
🌺 Query Parameter
- 검색을 할 때 사용되는 여러 인자들
- jsp, 서블릿에서 학습했던 쿼리스트링에 들어있는 요청 필드
- &로 구분된 key=value의 묶음으로 구성되어 있음
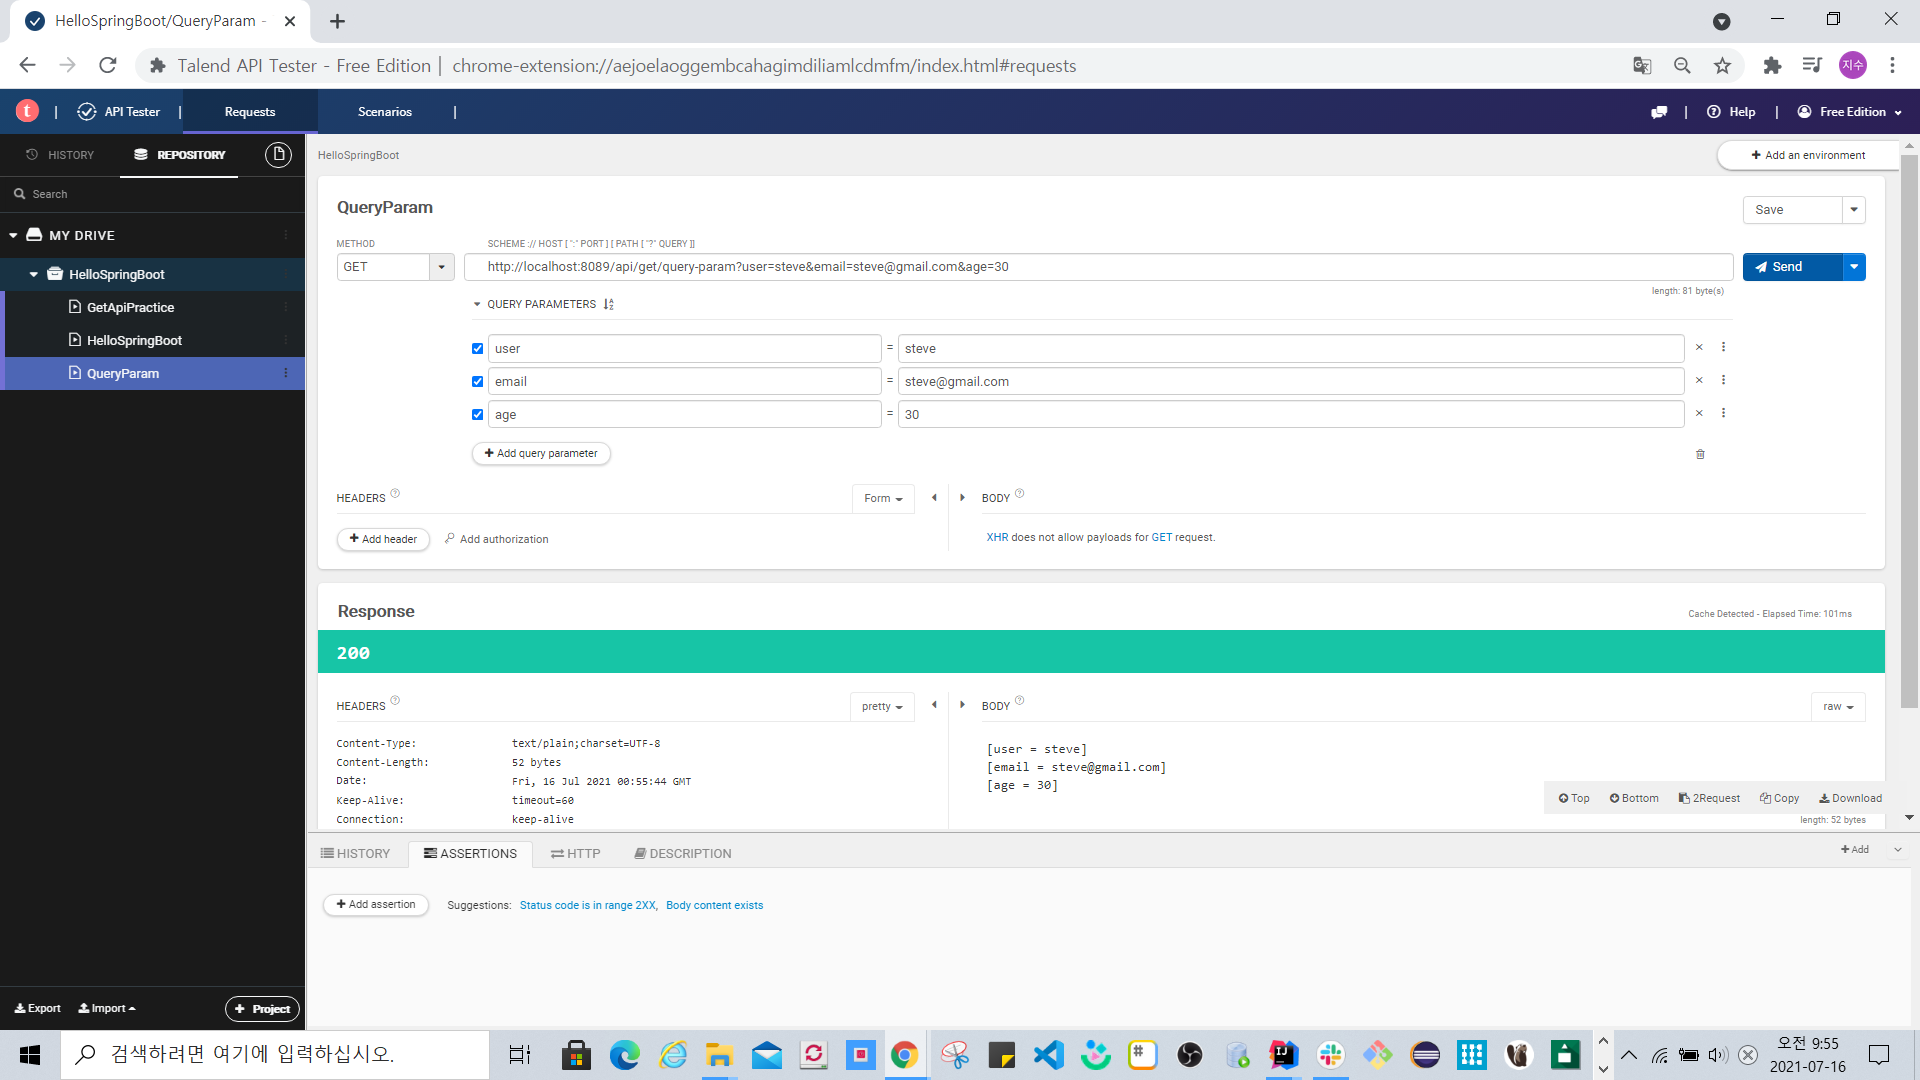
- Query Parameter를 위한 GET 요청 - @RequestParam Map을 이용한 파라미터
- 쿼리스트링을 잘 살펴보면, key-value의 묶음으로 구성되어 있는 것을 확인해볼 수 있다!
- key-value?? ▶️ Map 자료구조가 딱 떠오른다!!
- 이와 함께 RequestParam 어노테이션을 이용하자!
✴️ 람다식은 자바에서 arrow function 등과 유사한 개념인 것 같다!
package com.hello.helloworldapi.controller;

import org.springframework.web.bind.annotation.*;

import java.util.Map;

@RestController
@RequestMapping("/api/get")
public class GetApiController {

    //람다식 : 자바스크립트 arrow function 등과 유사
    //http://localhost:8089/api/get/query-param?user=steve&email=steve@gmail.com&age=30
    @GetMapping("/query-param")
    public String queryParam(**@RequestParam Map<String,String> queryParam**){

        StringBuilder sb= new StringBuilder();
        queryParam.entrySet().forEach(entry->{
            System.out.println("key: "+entry.getKey()+", value: "+entry.getValue());
            sb.append("["+entry.getKey()+" = "+entry.getValue()+"]\n");
        });

        return sb.toString();
    }
}

그런데 이 방식은 키값의 범위가 정해지지 않아서 좋기도 하지만,
맵 인스턴스.get(“키 이름”)으로 하나씩 접근해야 하는 불편함이 있다! 이를 해소할 수 있는 것이 바로 아래의 경우!
- 구체적으로 어떤 키를 가지고 값을 받는 지 명시하는 queryParameter를 받아오는 방법- 파라미터에 구체적으로 키 이름을 넣어주기 + RequestParam 어노테이션 사용하기
package com.hello.helloworldapi.controller;

import org.springframework.web.bind.annotation.*;

import java.util.Map;

@RestController
@RequestMapping("/api/get")
public class GetApiController {

    @GetMapping("/query-param02")
    public String queryParam2(
            **@RequestParam String name**,
            **@RequestParam String email**,
            **@RequestParam int    age**
    ){
        String res = new StringBuilder("[ name="+name+", email= "+email+", age="+age+"]").toString();
        System.out.println(res);
        return res;
    }
}
주의할 점은 자료형까지 명시를 해주었기 때문에 예를 들어서 age는 현재 integer인데 “123”이라는 값을 넣어주게 되면 400 에러, 즉 클라이언트 발생 에러가 발생된다!
그 외에 정상적으로 요청을 했을 경우에는 위에서 확인해본 방식과 유사하게 확인해볼 수 있다!
하지만, 이 방식 역시 변수가 늘어나면, 파라미터 갯수도 늘려가야 하는데
이를 DTO(Database Transfer Object)로 담아서 해결할 수 있다!
그렇게 되면 해당 객체 내의 필드에 키 값도 구체적일 것이고, 갯수가 늘어나도 dto 객체만 변경되면 상관이 없게 된다!
- 🌟🌟🌟🌟🌟DTO 객체를 이용해서 쿼리 파라미터를 요청
- 이클립스에서는 alt+shift+s
- 인텔리제이에서는 alt+insert 혹은 code-generate
에서 getter, setter 자동 완성이 제공되고 있다!
🌟 핵심!! 중요한 것은! dto 객체를 이용할 때에는 RequestParam 어노테이션을 사용할 필요가 없다는 점이다!!
간단하게 위에서 작성했던 name, email, age를 필드로 갖는 dto를 먼저 만들어두자
package com.hello.helloworldapi.dto;

public class UserRequest {
    private String name;
    private String email;
    private int    age;

    public UserRequest() {

    }

    public UserRequest(String name, String email, int age) {
        this.name = name;
        this.email = email;
        this.age = age;
    }

    public String getName() {
        return name;
    }

    public String getEmail() {
        return email;
    }

    public int getAge() {
        return age;
    }

    public void setName(String name) {
        this.name = name;
    }

    public void setEmail(String email) {
        this.email = email;
    }

    public void setAge(int age) {
        this.age = age;
    }

    @Override
    public String toString() {
        return "UserRequest{" +
                "name='" + name + '\'' +
                ", email='" + email + '\'' +
                ", age=" + age +
                '}';
    }
}
package com.hello.helloworldapi.controller;

import com.hello.helloworldapi.dto.UserRequest;
import org.springframework.web.bind.annotation.*;

import java.util.Map;

@RestController
@RequestMapping("/api/get")
public class GetApiController {


    @GetMapping("/query-param03")
    public String queryParam03(**UserRequest userRequest**){
        String st = userRequest.toString();
        System.out.println(st);
        return st;
    }
}
이 요청에 대한 응답을 talend에서 확인해보자!
http://localhost:포트번호/api/get/query-param03?name=steve&email=steve@gmail.com&age=30으로 확인해보자

그 결과를 확인해보았을 때, 자바스크립트의 객체 형태와 유사함을 볼 수 있다! (다만, js에서는 키:value 로 표시된다는 점만 제외하면 말이다)
📌 dto객체와 같은 객체가 파라미터로 들어가는 경우에는 스프링부트에서 알아서 판단을 하기 때문에 RequestParam을 붙이지 않는다!
[그 객체의 필드 이름명으로 키 값이 매칭된다]
🌟 요청된 파라미터에 대한 검증을 할 때에도 객체로 다루는 것이 편하다!
🌟 만약 쿼리파라미터의 종류가 적은 경우에는 6번 처럼 명시해도 좋고, 무기한으로 들어올 값이 명확하지 않으면 5번처럼 Map을 이용해도 좋다!
🌟 만약 위의 예시에서 &address=서울시 와 같은 알 수 없는 키-밸류가 들어간다면, 해당 구간은 누락될 수 있으므로, API 설계시에 유의해야 한다!