12_[css]css 선택자
CSS 선택자
(역할) 작성한 css 스타일을 원하는 특정 html 요소에 적용하기 위해 필요한 사인
기본 선택자 Basic Selectors
태그 선택자
- 태그로 찾기
h1{
}

p{
}

/*태그이름{} 은 태그이름인 곳들은 모두 스타일 ~로 통일해줘!*/
- 단점 : 원하는 핵심 부분에 접근하기에는 태그만으로는 부족함 ➡️이런 점에서 클래스로 찾는 방법 등이 필요!
클래스 선택자 . ‘
- 클래스로 찾기
▶️ 활용도가 높음(중복되어 사용할 수 있기 때문!)
**.클래스명**{
	속성:값;
}
적용 예제
<h1 class="title">제목1</h1>
<h2>제목2</h2>
<p class="main-text">본문1</p>
<p>본문2</p>
.title{
	color:red;
}
.main-text{
	color:blue;
}
➡️ h2태그 자체, 혹은 p태그 자체에 적용되는 스타일은 없음!(위의 예제에서!)
전체 선택자 * Universal Selector (Asterisk)
- 모든 요소를 선택
아이디 선택자 #E
- HTML id 속성의 값이 E인 요소 선택
-
전체 선택자의 단점: 모든 태그에 대해서 적용되기 때문에 활용도가 떨어짐
-
태그 선택자의 단점 : 태그 중 특정 요소에만 적용하는 경우에 대한 활용도가 떨어짐
<!DOCTYPE html>
<html lang="ko">
<head>
    <meta charset="UTF-8">
    <meta http-equiv="X-UA-Compatible" content="IE=edge">
    <meta name="viewport" content="width=device-width, initial-scale=1.0">
    <title>CSS 선택자</title>
    <link rel="stylesheet" href="./sel.css">
</head>
<body>
    <div>
        <ul>
            <li>사과</li>
            <li>딸기</li>
            <li>오렌지</li>
        </ul>
        <div id="carrot" class="carrot">당근</div>
        <p>토마토</p>
        <span class="carrot">당근</span>
    </div>
</body>
</html>
*{
    /*universal selector*/
    background-color: tomato;
}

li{
    /*tag selector*/
    margin:5px;
    width:70px;
    border:2px solid white;
    border-radius:30px;
    text-align: center;
    color:white;
    font-weight:bold;
}
#carrot{
    /*id selector*/
    font-size:30px;
    font-weight:bold;
}
.carrot{
    /*class selector*/
    color:white;
    border:3px dashed purple;
}
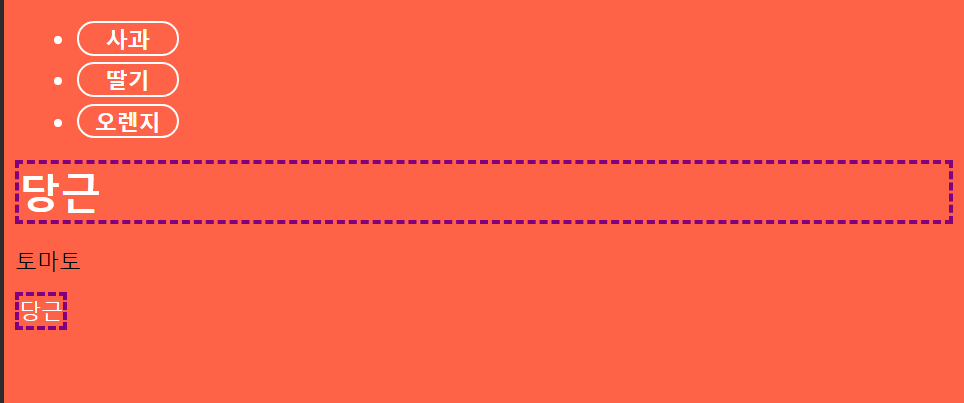
위의 경우, 전체에 대해서 배경색을 스타일링하고
carrot 클래스에 대해서 글자색과 border를 스타일링하였다
그 후 carrot 이라는 id를 가진 고유한 요소에 대해서 글자 크기와 굵기를 변경해주었다!
선택자 우선순위는 전체 < 태그< 클래스< 아이디 순서!
복합 선택자
일치 선택자 Basic Combinator
- 기본 선택자 두개가 붙어있는 형태!
- E와 F를 동시에 만족하는 요소를 선택
EF
(예시)
<!DOCTYPE html>
<html lang="ko">
<head>
    <meta charset="UTF-8">
    <meta http-equiv="X-UA-Compatible" content="IE=edge">
    <meta name="viewport" content="width=device-width, initial-scale=1.0">
    <title>복합 선택자</title>
    <link rel="stylesheet" href="./complex.css">
</head>
<body>
    <div>
        <ul>
            <li>사과</li>
            <li>딸기</li>
            <li>오렌지</li>
        </ul>
        <div class="carrot">당근</div>
        <p>토마토</p>
        <span class="carrot">당근</span>
    </div>
</body>
</html>
**span.carrot**{
    font-weight: bolder;
    color:teal;
}
- span 태그이면서 클래스가 carrot인 요소를 선택하여 스타일링
자식 선택자 Child Combinator
- 부모 요소를 중심으로 자식 요소를 선택하는 것!
- 기본선택자(부모. 조건) > 기본선택자(자식. 검색 대상)
- E의 자식 요소 F를 선택
E > F
(예시)
<!DOCTYPE html>
<html lang="ko">
<head>
    <meta charset="UTF-8">
    <meta http-equiv="X-UA-Compatible" content="IE=edge">
    <meta name="viewport" content="width=device-width, initial-scale=1.0">
    <title>복합 선택자</title>
    <link rel="stylesheet" href="./complex.css">
</head>
<body>
    <div>
        <ul>
            <li>사과</li>
            <li>딸기</li>
            <li class="orange">오렌지</li>
        </ul>
        <div class="carrot">당근</div>
        <p>토마토</p>
        <span class="carrot">당근</span>
    </div>
</body>
</html>
ul>.orange{
    color:salmon;
    font-weight: bold;
}
- 태그선택자 ul을 선택한 후, .orange 클래스 선택자로 한번 더 필터링함으로써 자식요소를 선택하여 스타일링!
후손/하위/자식 선택자 Descendant Combinator
- 선택자 사이에 띄어쓰기를 넣음
- E의 후손(하위) 요소 F를 선택
- E가 조건이 되고, F가 실질적인 검색 사항에 해당됨!
E F
- 후손의 개념을 아래의 예시와 함께 설명
<!DOCTYPE html>
<html lang="ko">
<head>
    <meta charset="UTF-8">
    <meta http-equiv="X-UA-Compatible" content="IE=edge">
    <meta name="viewport" content="width=device-width, initial-scale=1.0">
    <title>복합 선택자</title>
    <link rel="stylesheet" href="./complex.css">
</head>
<body>
    <div>
        <ul>
            <li>사과</li>
            <li class="straw">딸기</li>
            <li class="orange">오렌지</li>
        </ul>
        <div class="carrot">당근</div>
        <p>토마토</p>
        <span class="carrot">당근</span>
    </div>
</body>
</html>
- 후손(하위) 요소 : 자식의 자식 ➕ 자식 = 즉, 자신 아래의 모든 요소!
- 조상(상위) 요소 : 부모의 부모 ➕ 부모 = 즉, 자신 위의 모든 요소!
위의 예제와 위의 간략한 설명을 생각해보자
그렇다면, div 요소의 후손 요소는 li가 될 것이고, li의 조상 요소는 div 요소가 될 것이다!
⚠️하지만! div 입장에서는 자식도 후손이고, 자식의 자식도 후손으로 보기 때문에! ul, li 태그 모두 후손 요소로 볼 수 있음!
div .straw{
    color:orangered;
}
이러한 후손 요소를 이해했을 때, 위의 css는 div의 후손 요소 중 straw 클래스를 지닌 요소를 찾아내어 스타일링한다
즉, 딸기에 대해서 orangered 색의 글자 스타일링이 적용될 것이다!
인접 형제(자매) 요소 선택자 Adjacent Sibling Combinator
- E의 다음 형제 요소 F 하나만 선택
E + F
⚠️ 형제/자매 요소 : 같은 부모를 갖는 요소들 간의 관계
📌 여기까지 잠깐 CSS에서 요소간 관계에 따른 명칭을 정리해보기! 📌

요소들의 관계
<!DOCTYPE html>
<html lang="ko">
<head>
    <meta charset="UTF-8">
    <meta http-equiv="X-UA-Compatible" content="IE=edge">
    <meta name="viewport" content="width=device-width, initial-scale=1.0">
    <title>복합 선택자</title>
    <link rel="stylesheet" href="./complex.css">
</head>
<body>
    <div>
        <ul>
            <li>사과</li>
            <li class="straw">딸기</li>
            <li class="orange">오렌지</li>
        </ul>
        <div class="carrot">당근</div>
        <p>토마토</p>
        <span class="carrot">당근</span>
    </div>
</body>
</html>
span.carrot{
    font-weight: bolder;
    color:teal;
}

ul>.orange{
    color:salmon;
    font-weight: bold;
}

div .straw{
    color:orangered;
}

**📌 .straw + li{📌**
    width:100px;
    text-align: center;
    border-top:2px solid orangered;
    border-bottom:2px solid palegreen;
    border-left:2px solid palevioletred;
    border-right:2px solid violet;
    border-radius:5px;
}

인접 형제 요소 선택자
- 위의 경우, straw 클래스를 갖는 요소의 다음 인접 형제 요소가 orange 클래스인 요소이므로, 해당 부분이 스타일링된다
일반 형제 선택자 General Sibling Combinator
- E의 다음 형제 요소 F 모두 선택
E ~ F
<!DOCTYPE html>
<html lang="ko">
<head>
    <meta charset="UTF-8">
    <meta http-equiv="X-UA-Compatible" content="IE=edge">
    <meta name="viewport" content="width=device-width, initial-scale=1.0">
    <title>복합 선택자</title>
    <link rel="stylesheet" href="./complex.css">
</head>
<body>
    <div>
        <ul>
            <li class="apple">사과</li>
            <li class="straw">딸기</li>
            <li class="orange">오렌지</li>
        </ul>
        <div class="carrot">당근</div>
        <p>토마토</p>
        <span class="carrot">당근</span>
    </div>
</body>
</html>
span.carrot{
    font-weight: bolder;
    color:teal;
}

ul>.orange{
    color:salmon;
    font-weight: bold;
}

div .straw{
    color:orangered;
}

.apple ~ li{
    width:100px;
    text-align: center;
    border-top:2px solid orangered;
    border-bottom:2px solid palegreen;
    border-left:2px solid palevioletred;
    border-right:2px solid violet;
    border-radius:5px;
}
이번에는 인접 형제 요소 1개만 선택하는 것이 아닌, apple 요소 다음에 오는 요소 중 형제 요소를 모두 선택하게 되어, 위와 다르게, 딸기 && 오렌지 부분이 스타일링 된다

일반 형제 요소 선택자
가상 클래스 선택자 Pseudo-Classes Selectors
- 기본 선택자 부분에 붙여서 사용하는 선택자
- 기본 선택자 : ~
비교! 가상 요소 선택자 ▶️ 기본 선택자 :: ~
:hover
E에 마우스(포인터)가 올라가 있는 동안에만 E 선택
E:hover
<a href="https://www.google.com">Google!</a>
a:hover{
    font-weight: bold;
    color:orangered;
}

가상 클래스 선택자 hover
위의 경우, 링크 위에 마우스를 올렸을 때 색상과 글자 두께가 변하는 것을 확인해 볼 수 있다!
또한, 아래와 같이, 애니메이션 효과와 접목한다면, 마우스를 올려놓았을 때 크기를 커지게 했다가, 줄어들게 하는 효과도 구현해볼 수 있다!
<div class="box"></div>
.box{
    width: 100px;
    height: 100px;
    background-color: orangered;
    transition:3s;
}
.box:hover{
    width: 300px;
}

가상 클래스 선택자 hover
:active
- E를 마우스로 클릭하는 동안에만 E 선택
E:active
- active는 hover와 다르게, 마우스를 클릭하는 동안에만 해당 요소에 스타일링을 입힐 수 있다
<div class="box"></div>
.box{
    width: 100px;
    height: 100px;
    background-color: orangered;
    transition:3s;
}

.box:active{
    width: 500px;
}

가상 클래스 선택자 active
위의 예시에서처럼, 클릭을 하고 있는 동안에만 스타일링이 적용되어, 크기가 변하게 되는 것을 확인해볼 수 있다!
:focus
- E가 포커스된 동안(대화형 컨텐츠에 해당)에만 E 선택
- tabindex가 부여될 수 있는 요소, input 태그, img 태그 등이 해당됨
E:focus
(예시)
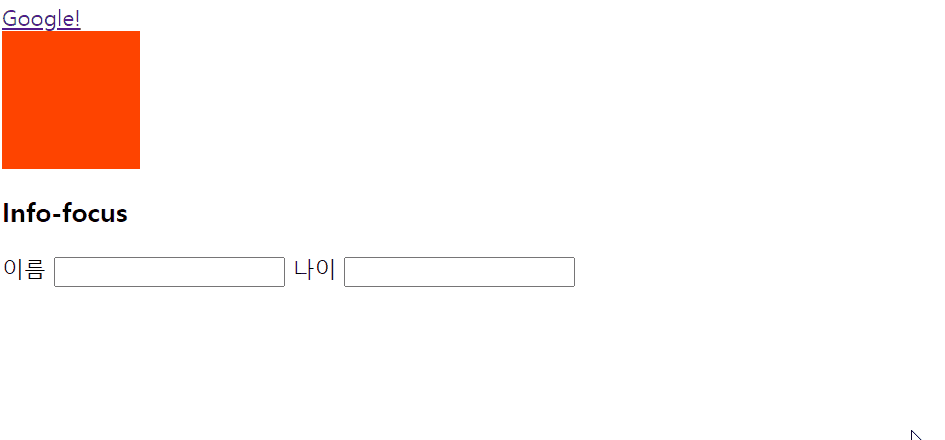
<div class="focus-ex">
        <h3 tabindex="-1">Info-focus</h3>
        <label>이름
            <input type="text" id="name">
        </label>
        <label>나이
            <input type="text"id="age">
        </label>
</div>
input{
	/*input 태그에는 테우리가 outline으로
    들어가 있음 하지만 까다로워서
    사용하지 않을 것!*/
    outline:none;
}
*:focus{
    border:5px solid violet;
    border-radius: 10px;
    padding:10px;
}
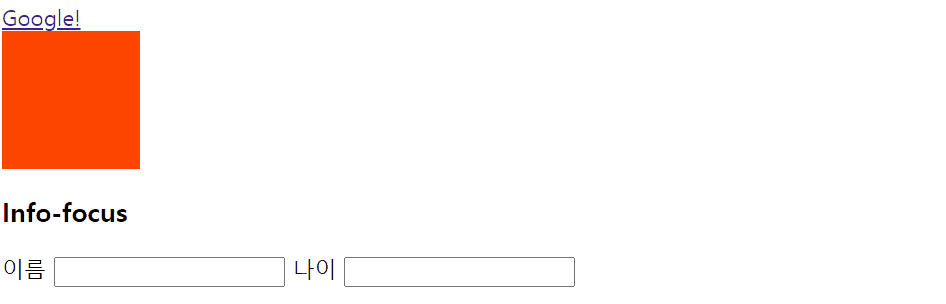
가상 클래스 선택자 focus
위의 예제에서 확인할 수 있는 것과 같이, 대화형 컨텐츠 혹은 tabindex가 지원되는 요소에 대해서 focus 선택자를 사용하였을 때, 그에 맞는 스타일링이 적용됨을 확인해볼 수 있다
여기에 input 태그에 대해서 transition: 0.4s를 추가해주면, 아래와 같은
애니메이션 효과도 확인해볼 수 있다!
:first-child
- E가 형제 요소 중 첫번째 요소라면 선택
E:first-child
*참고: first-child 이전의 선택자들은 이벤트 역할과 관련된 것처럼 생각하면 된다!
<!DOCTYPE html>
<html lang="en">
<head>
    <meta charset="UTF-8">
    <meta http-equiv="X-UA-Compatible" content="IE=edge">
    <meta name="viewport" content="width=device-width, initial-scale=1.0">
    <title>가상 클래스 선택자</title>
    <link rel="stylesheet" href="./child.css">
</head>
<body>
    <ul class="fruits">
        <li>딸기</li>
        <li>사과</li>
        <li>오렌지</li>
        <li>망고</li>
    </ul>
</body>
</html>
.fruits li:first-child{
    width:100px;
    background-color:orchid;
    border:1px solid violet;
    border-radius:10px;
    color:rebeccapurple;
    font-weight: bold;
    text-align: center;
}

위와 같은 html 문서 구조를 가진 형태에서, fruits 클래스 주변에 있는 후손 중 li 태그의 첫 번째 자식 요소에 대해서 위와 같이
orchid 배경과 violet 텍스트 컬러 등의 스타일링을 적용된 것을 확인해볼 수 있다
- 장점: 모든 요소에 class 별칭을 붙이기에 현실적으로 어려울 때, 유용하게 사용할 수 있다!
:last-child
- E의 형제 요소 중 가장 마지막 요소를 선택
E:last-child
html 구조는 위와 동일하고, css 스타일링은 아래와 같이 추가해보자
.fruits li:last-child{
    color:orangered;
    font-weight: bold;
}
그러면 가장 마지막 형제 요소인 망고 부분이 붉고 굵게 표시되는 것을 확인해볼 수 있다!
:nth-child(n)
- E가 형제 요소 중 n 번째 요소라면 선택
(n키워드 사용시 n은 0부터 해석됨(zero-base))
E:nth-child(n)
마찬가지로 html 문서는 그대로 사용하고, css만 아래부분을 추가해주면
.fruits li:nth-child(3){
    color:blueviolet;
}

위와 같이, 세 번째 형제요소인 오렌지에 blueviolet 색깔이 색칠되게 된다!
그리고
.fruits li:nth-child(2n){
    color:red;
}
와 같이 n을 사용하게 되면 n=0,1,2,…를 적용하여
사과와 망고에 빨간색으로 글씨가 칠해지게 된다!
(왜냐하면 0번째 요소는 없기 때문!)
xxx-child에서 주의할 점
<div class="fruits">
	<div>딸기</div>
	<p>사과</p>
	<p>망고</p>
	<span>오렌지</span>
</div>
.fruits p:nth-child(1){
	color:red;
}
위의 경우에는, .fruits의 첫 번째 자식 요소가 p태그가 아니기 때문에 선택되지 않는데,(오른쪽에서 왼쪽으로 해석!!)
.fruits p:nth-of-type(1){
	color:red;
}
로 고치면, 보다 올바른 해석!
그리고
<div class="box-group">
        <div>1</div>
        <div>2</div>
        <div>3
            <div>3-1</div>
            <div>3-2</div>
            <div>3-3</div>
        </div>
    </div>
.box-group div:first-child{
    color:red;
    font-weight: bold;
}
위와 같은 경우도, 후손에 자식도 포함되기 때문에 1과 3-1에 모두 색칠된다!
따라서 이러한 점들을 주의해주어야 한다
만약 1에만 색칠하고 싶다면
.box-group>div:first-child{
    color:red;
    font-weight: bold;
}
와 같이 스타일링을 적용해주면 된다
만약 3-1에만 색칠하고 싶다면
.box-group>div:nth-child(3) div:first-child{
    color:red;
    font-weight: bold;
}
와 같이 스타일링을 적용해주면 된다!
조금 더 들어가보자
<div class="box-group">
        <div>1</div>
        <div>2</div>
        <div>3
            <p>3-1</p>
            <div>3-2</div>
            <div>3-3</div>
        </div>
    </div>
와 같은 구조가 있다고 생각해보았을때
1과 3-1 모두에 색칠을 하고 싶다면
.box-group :first-child{
    color:red;
}
와 같은 경우에서 사용할 수 있다!
:nth-of-type(n)
- E의 타입(태그 이름)과 동일한 타입인 형제요소 중 E가 n번째 요소라면 선택
(n 키워드 사용시 0부터 해석(zero base)
E: nth-of-type(n)
⚠️ 클래스 선택자와 혼용하면 안됨!!
(예)
.fruits li.red:nth-of-type(1){ color:red; font-weight: bold; } ❌
부정 선택자 Negation Selector
- S가 아닌 E선택
E:not(S)
- S: 선택자
<ul class="fruits">
        <li>오렌지</li>
        <li class="straw">딸기</li>
        <li>망고</li>
        <li>사과</li>
    </ul>
.fruits li:not(.straw){
    color:red;
}
위와 같이 사용하면 되는데, 위에서는 straw 클래스 외의 요소를 선택하고, 그 요소들에 한해서, 빨간색으로 표시하게 된다. 즉, 딸기 외의 모든 요소가 빨간색 글자로 변하게 된다!
가상 요소 선택자 Pseudo-Elements Selectors ::
- 어떤 요소의 앞 혹은 뒤 등에 어떤 컨텐츠를 표시하기 위해서 사용하기 때문에, content 속성과 값 지정을 잃지 말자!
::before
- E 요소 내부의 앞에 내용(content) 삽입
E::before
::after
- E 요소 내부의 뒤에 내용 삽입
E::after
🐻 css 에서 이미지를 삽입할 때에는 url()을 이용! 🐻
<!DOCTYPE html>
<html lang="ko">
<head>
    <meta charset="UTF-8">
    <meta http-equiv="X-UA-Compatible" content="IE=edge">
    <meta name="viewport" content="width=device-width, initial-scale=1.0">
    <title>Document</title>
    <link rel="stylesheet" href="./pseudoEle.css">
</head>
<body>
    <ul>
        <li>숫자1</li>
        <li>숫자2</li>
        <li>숫자3</li>
        <li>숫자4</li>
        <li>숫자5</li>
        <li>숫자6</li>
        <li>숫자7</li>
        <li>숫자8</li>
        <li>숫자9</li>
        <li>숫자10</li>
        <li>숫자11</li>
        <li>숫자12</li>
        <li>숫자13</li>
        <li>숫자14</li>
        <li>숫자15</li>
        <li>숫자16</li>
        <li>숫자17</li>
        <li>숫자18</li>
        <li>숫자19</li>
        <li>숫자20</li>
    </ul>
</body>
</html>
ul li{
    margin:5px;
    font-size: 100px;;
}

ul li::after{
    content:".0 "url("https://heropy.blog/css/images/logo.png");
}
위와 같이 컨텐츠에는 url도 삽입할 수 있다!

⚠️ 가상 요소 선택자는 :before, :after로도 사용할 수는 있지만, ::로 작성하는 것이 권장되는 문법이다!
문자 선택자
🌻 시작 문자 선택자
🌺 :: first-letter - 첫 번째 글자를 선택
🌺 :: first-line - 첫 번째 줄을 선택
<!DOCTYPE html>
<html lang="ko">
<head>
    <meta charset="UTF-8">
    <meta http-equiv="X-UA-Compatible" content="IE=edge">
    <meta name="viewport" content="width=device-width, initial-scale=1.0">
    <title>CSS3 Selector Basic Page</title>
    <style>
        p::first-letter{font-size:30px;}
        pre::first-letter{font-size:30px;}
        pre::first-line{color:red;}
    </style>
</head>
<body>
    <h1>Lorem ipsum dolor sit amet</h1>
    <p>Lorem ipsum dolor sit amet, consectetur adipiscing elit.</p>
    <pre>Aenean ac erat et massa vehicula laoreet consequat et sem.
        가나다라마바사아자차카타파하
    </pre>
</body>
</html>

시작 문자 선택자
- 시작 문자 선택자도 “가상 요소 선택자” 이다!!
- p::first-letter와 pre::first-letter를 통해서 각각 L과 A가 선택되고
- pre::first-line을 통해서 Anean~이 선택된다!!
속성 선택자 Attribute(Attr) Selectors
- CSS에서는 속성을 Property라고 함
[attr]
- 속성 attr을 포함한 요소 선택
<!DOCTYPE html>
<html lang="ko">
<head>
    <meta charset="UTF-8">
    <meta http-equiv="X-UA-Compatible" content="IE=edge">
    <meta name="viewport" content="width=device-width, initial-scale=1.0">
    <title>Document</title>
    <link rel="stylesheet" href="./attr.css">
</head>
<body>
    <input type="text" value="Heropy">
    <input type="password" value="1234">
    <input type="text" value="disabled text" disabled>
</body>
</html>
[disabled]{
    opacity: 0.3;
    color:red;
}

- 속성 선택자는 해당 속성을 가진 모든 요소에 적용할 수 있는데, 이 경우 클래스를 통한 별칭을 생성하지 않아도 된다는 장점이 있다
attr=value
- 속성 attr을 포함하며 속성값이 value 인 요소 선택
[attr=value]
-html문서는 위와 동일하게 사용하고 css 스타일링만 변경해보겠다
[type=password]{
    border:3px dashed tomato;
    border-radius: 10px;
}
↔️
[type="password"]{
    border:3px dashed tomato;
    border-radius: 10px;
}

위와 같이 속성=값 혹은 속성=”값”으로 표시하면 해당 속성 및 값에 일치하는 요소에 대해서 스타일링을 적용해볼 수 있다!(위의 그림에서 노란색으로 테두리 표시해둔 부분처럼 말이다!)
[attr~=value]
[name~=abc]
- 쓰임새는 위의 [attr=value]와 유사!
[attr^=value]
- ^: 캐럿기호
- 속성 attr을 포함하여 속성값이 value로 시작하는 요소 선택
[attr^=value]
<!DOCTYPE html>
<html lang="ko">
<head>
    <meta charset="UTF-8">
    <meta http-equiv="X-UA-Compatible" content="IE=edge">
    <meta name="viewport" content="width=device-width, initial-scale=1.0">
    <title>Document</title>
    <link rel="stylesheet" href="./attr.css">
</head>
<body>
    <input type="text" value="Heropy">
    <input type="password" value="1234">
    <input type="text" value="disabled text" disabled>

    <button class="btn-success">Success</button>
    <button class="btn-danger">Danger</button>
    <button>Normal</button>
</body>
</html>
[disabled]{
    opacity: 0.3;
    color:red;
}

[type=password]{
    border:3px dashed tomato;
    border-radius: 10px;
}

[class^="btn-"]{
    background-color: yellowgreen;
    border-radius: 10px;
    border: 1px dashed red;
}

위와 같이 btn-으로 시작하는 클래스에 한해서 yellowgreen 배경에 border 스타일링이 적용된 버튼 요소를 확인해볼 수 있다
[attr$=value]
- 속성 attr을 포함하며 속성값이 value로 끝나는 요소 선택
[attr$=value]
[class$=er]{
    color: teal;
    font-weight: bold;
}
위의 html을 동일하게 이용한 후 위의 속성 선택자처럼 er로 끝나는 요소를 선택하게 된다면, btn-danger 클래스 요소의 글자 색상을 teal 색상으로, 글자 굵기는 굵게 하여 나타나게 될 것이다!
CSS 선택자- 상속(Inherit)
- 조상 요소로 부터 하위 요소로 CSS 스타일링 속성이 전달되는 것!(extends)
예시를 통해서 차근차근 짚어가보자
<!DOCTYPE html>
<html lang="ko">
<head>
    <meta charset="UTF-8">
    <meta http-equiv="X-UA-Compatible" content="IE=edge">
    <meta name="viewport" content="width=device-width, initial-scale=1.0">
    <title>Document</title>
    <style>
        .ecosystem{
            color:red;
        }
    </style>
</head>
<body>
    <div class="ecosystem">생태계
        <div class="animal">동물
            <div class="tiger">호랑이</div>
            <div class="lion">사자</div>
            <div class="elephant">코끼리</div>
        </div>
        <div class="plant">식물</div>
    </div>
</body>
</html>
위의 예제에서는 조상요소(부모요소)인 생태계 내부에 동물과 식물이 위치하고, 동물 내부에 몇 가지 동물들이 포함되어 있다
그런데 css에서 부모요소에 대해서 color:red 를 지정하게 되면, 그 안의 모든 자식 요소들에 대해서도 스타일링이 적용된다!
▶️ 🌟 모든 CSS 속성이 해당되는 것은 아니지만, 특정 CSS 속성들은 부모 요소에 대해서 적용을 해주기만 하여도, 그 내부 하위 요소들 전체에 대해서 스타일링 적용이 가능하다!
➡️ 상속의 개념!
✅ 대부분 글자(text)를 다루는 속성들이 상속됨!(암기 x)
참고-상속을 지원하는 속성들
- 폰트 굵기 등을 다루는 font-* 속성들
- font-size -font-weight -font-style -font-height -font-family : 외부 폰트 링크시 사용되는 속성
- color
- text-align
- text-indent : 들여쓰기 속성
- letter-spacing : 자간
- opacity - 투명도(0~1)
…
강제 상속
- 모든 속성들이 강제 상속을 할 수 있는 것도 아니지만, 후손 요소를 제외한 자식요소에 대해서 상속 가능!(속성값:inherit)
<!DOCTYPE html>
<html lang="ko">
<head>
    <meta charset="UTF-8">
    <meta http-equiv="X-UA-Compatible" content="IE=edge">
    <meta name="viewport" content="width=device-width, initial-scale=1.0">
    <title>Document</title>
    <style>
        *{
            padding:0;
            margin:0;
        }
        .parent{
            position:absolute;
            top:10px;
            left:30px;
            width: 300px;
            height: 300px;
            background-color: teal;
            border:1px solid red;
        }
        .child{
            position:inherit;
            border:inherit;
        }
    </style>
</head>
<body>
    <div class="parent">
        parent node
        <div class="child">child node</div>
    </div>
    <script>
        const parent = document.querySelector(".parent"),
             child  =document.querySelector(".child");
        const checker=`parent: top ${parent.offsetTop} left ${parent.offsetLeft}|
        child: top ${child.offsetTop} left ${child.offsetLeft}`;
        console.log(checker);
    </script>
</body>
</html>

위의 경우처럼, inherit을 지정해주면, 해당 속성의 값을 물려받아서 , 위의 경우에는
position:absolute;
가 child 요소에 포함되게 된다
CSS 선택자 우선순위
- 브라우저의 규칙 중 아래와 같이, 같은 요소를 가리키는 CSS 선택자 중 어떤 것을 선택할 지 결정하는 지에 관한 규칙(선택은 브라우저가!)
- 우선순위 결정 방법
1.명시도-명시도 점수가 높은 선언이 우선됨
2.선언 순서-명시도 점수가 같은 경우, 가장 마지막에 기술된 선택자를 이용하여 해석 [그래서 처음에 공부한 부분 중에서, html 구조 순서대로 선택하여 기술하는 것이 매우 중요!]
- 중요도 - 명시도가 상속 규칙보다 우선시됨(간접적으로 지정되는 특성이라서) -아래의 !important를 이용하게 되면, 강제적으로 부여할 수 있음
🌟 명시도 점수 🌟
- !important : 점수 =∞(무한대) pt ➡️ 무한대이기 때문에 다른 선언들을 모두 제치고, 가장 먼저 선택되게 됨!
- style 인라인 방식(style attribute) : 1000 pt
✅ 단점 : JS DOM 객체 등을 활용해서 속성을 덮어쓰기 할 경우, 점수가 꽤 높아서 적용이 어려워질 수 있음! ▶️ 유지 보수에 많은 제약이 존재하게 됨! 그래서 보통 CSS 인라인 선언 방식은 비추임!!
- 아이디 선택자 #E → 100 pt
🌟 고유한 요소를 지정하기 때문에 우선순위 명시도 점수가 꽤 높음
-
클래스 선택자 .E →10pt[가상 클래스 선택자도 가상이지만 클래스이기 때문에 해당됨]
-
태그 선택자 → 1pt[가상 요소 선택자도 가상이지만 요소이기 때문에 해당될 수 있음]
-
전체(Universal) 선택자 → 0 pt
-
상속은 점수를 계산하지 않음!!
8. 부정 선택자 :not은 점수가 없음!!-가상 클래스 선택자 중에서 예외적!!
▶️ 전체 < 태그 < 클래스 < 아이디 [선택자 우선순위!!]
✴️ !important
.
<div id="here">abcdefg</div>
<!---중략, css-->
<!--main.css-->
#here{
	background-color: teal !important;
}
div{
	background-color:orange;
}
!important는 동일한 요소를 선택자 등을 이용해서 같은 속성을 다양하게 나열했을 때, (위와 같이)
이런이런 방식으로 스타일링을 기술했는데, 이중에서 이 아이를 가장 먼저로 생각해줘! 라는 개념!!
https://www.w3schools.com/css/css_important.asp
<!DOCTYPE html>
<html lang="ko">

<head>
    <meta charset="UTF-8">
    <meta http-equiv="X-UA-Compatible" content="IE=edge">
    <meta name="viewport" content="width=device-width, initial-scale=1.0">
    <title>Document</title>
    <style>
        *{
            color:teal;
        }
        body{
            color:violet;
        }
        div{
            color:red !important;
        }
        #color_yellow{
            color: yellow;
        }
        .color_green{
            color:green;
        }
        div{
            color:blue;
        }

    </style>
</head>
<body>
    <div id="color_yellow" class="color_green" style="color:orange;">Hello World!</div>
</body>

</html>
즉, 위와 같이 !important를 해주게 된다면, 비록 body나 전체 html문서에 대해서 color 속성을 상속시켰더라도, 또한 다른 선택자를 이용해서 지정했더라도 !important가 붙은 선택자의 스타일링이 적용된다. 따라서 위의 경우는 color:red;가 적용된다!
명시도 점수를 계산해보자!
[example]
.list li.item{}
.list li:hover{}
.box::before{}
#submit span{}
header .menu li:nth-child(2){}
h1{}
:not(.box){}
.not(span){}
-
먼저 .list li.item은 클래스선택자 2개와 태그선택자 1개가 사용되었기 때문에 명시도 점수=10*2+1=21pt 가 된다
-
.list li:hover 는 클래스선택자1개와 가상 클래스 선택자 1개, 태그 선택자 1개가 사용되어 명시도 점수= 10+10+1=21pt가 된다
-
.box::before는 클래스 선택자 1개와 가상 요소 선택자 1개가 사용되어 명시도 점수=10+1=11pt가 된다
-
#submit span는 아이디 선택자 1개와 태그 선택자 1개가 사용되어 명시도 점수 = 100+1=101pt가 된다
-
header .menu li:nth-child(2)는 태그 선택자 2개와 클래스 선택자 1개, 가상 클래스 선택자 1개가 사용되어 명시도 점수 = 12+102=22pt가 된다
-
h1은 태그 선택자이기 때문에 명시도 점수는 1pt가 된다
-
:not(.box)은 부정 선택자는 계산되지 않으므로 클래스 선택자 만이 계산되어 10pt가 된다
-
:not(span)은 부정 선택자는 계산되지 않으므로 태그 선택자 만이 계산되어 1pt가 된다